You are using an out of date browser. It may not display this or other websites correctly.
You should upgrade or use an alternative browser.
You should upgrade or use an alternative browser.
MPC-Ertl 1/43 X-Wing Red 5
- Thread starter Necronaut
- Start date
Outstanding job!
whiskeyrat
New Member
What changes did you make to the lower hull shape?
It looks like he fixed the undercut on the bottom where it begins to slope down (under the cockpit area); on the MPC model "as-is", it cuts in on a slight upward angle instead of flattening out. I had to do the same with mine (along with fix the wing mechanism, but didn't notice the engine cans until now).What changes did you make to the lower hull shape?
Last edited:
TazMan2000
Master Member
Outstanding.
TazMan2000
TazMan2000
Necronaut
Active Member
Sorry, I just noticed all the replies!What changes did you make to the lower hull shape?
The kit as received has a weird v-shape about halfway down the hull (not the slight keel that should run lengthwise along the lower hull…) right under the front of the cockpit hatch.
I just sanded it flat, and reinforced the thinned plastic from inside with stock styrene sheet.
Yeah, I think they over-compensated for how it starts to flatten out; they probably got that idea from watching the Battle of Yavin scenes and didn't consider the effects of perspective.Sorry, I just noticed all the replies!
The kit as received has a weird v-shape about halfway down the hull (not the slight keel that should run lengthwise along the lower hull…) right under the front of the cockpit hatch.
I just sanded it flat, and reinforced the thinned plastic from inside with stock styrene sheet.
Necronaut
Active Member
Did they actually?! That’s pretty disappointing to hear. This kit leaves a lot to be desired for accuracy.They had the model in their possession to create the kit.
Maybe they were more interested in making a toy alternative to the Kenner X-Wing? Maybe time to market was of the essence? Who knows…
rbeach84
Sr Member
Perhaps they worked making the kit masters and had to rely on photos they took when they had access to the ILM models... very easy to do if not really meticulous with your research (as Tamiya always seems to do with their 'mapping' of the 'originals'...)
Ah well, certainly makes a modeler out of you! HA!
R/ Robert
Ah well, certainly makes a modeler out of you! HA!
R/ Robert
Attachments
Right?Perhaps they worked making the kit masters and had to rely on photos they took when they had access to the ILM models... very easy to do if not really meticulous with your research (as Tamiya always seems to do with their 'mapping' of the 'originals'...)
Ah well, certainly makes a modeler out of you! HA!
R/ Robert
whiskeyrat
New Member
Yes, I see what you mean... I had to go run take a look at my old MPC build to confirm but it's there. I never knew that wasn't supposed to be there, nice catch!Sorry, I just noticed all the replies!
The kit as received has a weird v-shape about halfway down the hull (not the slight keel that should run lengthwise along the lower hull…) right under the front of the cockpit hatch.
I just sanded it flat, and reinforced the thinned plastic from inside with stock styrene sheet.
rbeach84
Sr Member
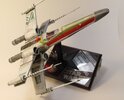
Indeed it does! Necronaut did an outstanding job (I especially like the level of weathering...) and after having built the beast, I *really* appreciate the amount of effort expended. I kept the moving foils, but had to build a solid 'hinge' and 'socket' for it, which was quite challenging, not to mention all the improvements to the mounting of the cockpit, fixing the nose 'warp', adding a droid 'pit, blaster cannon mounts, extra detailing & greebling on the foils and the aft bulkhead (to recess it and improve its fit...). It isn't perfect but I'm very happy with it. As they say, it isn't the tool, it is the tool wielder!
;^)
And I can honestly say, I had fun!!
R/ Robert
;^)
And I can honestly say, I had fun!!
R/ Robert
rbeach84
Sr Member
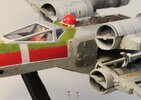
One thing I learned during this build was you could use a Sharpie marker to apply a mark and then 'chip' it using a bit of Scotchbrite cleaning pad or a knife tip. The marker ink dries hard and fairly brittle, so it abrades very nicely. This is how I applied the blue stipes on the intakes...since the markers come is a wide variety of colors, including three 'metalics', it can be quite useful at times.
Cheers!
Cheers!
joberg
Legendary Member
Thanks for that rbeach48! I'll try that ASAPOne thing I learned during this build was you could use a Sharpie marker to apply a mark and then 'chip' it using a bit of Scotchbrite cleaning pad or a knife tip. The marker ink dries hard and fairly brittle, so it abrades very nicely. This is how I applied the blue stipes on the intakes...since the markers come is a wide variety of colors, including three 'metalics', it can be quite useful at times.
Cheers!
I found on the ROTJ version, the plastic that the model was made of was particularly soft and structurally unsound for anything that had to take repeated stresses (such as the s-foils meeting the pivot joint). After seeing them weaken and break during the build, I cut out the entire mechanism and custom build my own, going from the center pivot all the way into the wing blocks:


Last edited:
Similar threads
- Replies
- 9
- Views
- 298
- Replies
- 10
- Views
- 494