Mid Grade Phaser project

Chrisisall

Master Member
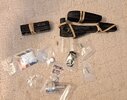
Just snagged an RJS midgrade kit with metal parts.
Yeah, I know I said I was done doing phasers after my last hero, but this popped up and I couldn't resist making one last perfect midgrade (my Ron Tracey is nice & all, but it was just a 'throw together').
This kit is so nice! The 1/350 Enterprise I was about to finish will just have to wait a week or so, this is exciting!
Too late tonight to do much with it, but stay tuned, boppers!
 

Attachments

  • 20231109_202556 (1).jpg
    20231109_202556 (1).jpg
    336.7 KB · Views: 137
Those look great! Is that hero from a kit?

I just washed it all, and cut the holes I need with an xacto knife, and was about to super gel glue them together, but everything has to be aligned so finely I think I'll need epoxy instead. Super glue gives no room for subtle re-alignment after the surfaces touch...
20231110_170837.jpg
20231110_170903.jpg
20231110_170924.jpg
 
Those look great! Is that hero from a kit?

I just washed it all, and cut the holes I need with an xacto knife, and was about to super gel glue them together, but everything has to be aligned so finely I think I'll need epoxy instead. Super glue gives no room for subtle re-alignment after the surfaces touch...
View attachment 1760652View attachment 1760653View attachment 1760654

The hero is a John Long P1, with the P2 Frankesteined together from various randomly-sourced parts—Sporak shells, etc.
 
I've never worked with fiberglass before, so I may be taking an unconventional route here.
I rubber banded the P2 halves together tightly, and made sure they were lined up just right, then hot glued them together from the inside. this took a while as I had to rotate it 5 times for the glue pools not to run. The handle & the P1 were super glued and I used tape to align the back ends before I slapped them together with like 2 seconds to properly fit them together. I was successful. Don't try this at home, kids. Then I used epoxy putty to fill a seam on the P1 (I may have gone overboard here, but I'd rather have too much to work than not enough), and build up the handle length (personal preference- I like the long handle on the mid grade Parmen gave us a perfect side view of).
Tomorrow I don the mask & do the dreaded sanding....
20231111_165158.jpg
20231111_170541.jpg
20231111_175222.jpg
20231111_175215.jpg
 
I've never worked with fiberglass before, so I may be taking an unconventional route here.
I rubber banded the P2 halves together tightly, and made sure they were lined up just right, then hot glued them together from the inside. this took a while as I had to rotate it 5 times for the glue pools not to run. The handle & the P1 were super glued and I used tape to align the back ends before I slapped them together with like 2 seconds to properly fit them together. I was successful. Don't try this at home, kids. Then I used epoxy putty to fill a seam on the P1 (I may have gone overboard here, but I'd rather have too much to work than not enough), and build up the handle length (personal preference- I like the long handle on the mid grade Parmen gave us a perfect side view of).
Tomorrow I don the mask & do the dreaded sanding.... View attachment 1760979View attachment 1760980View attachment 1760981View attachment 1760982

If you have never worked with fiberglass before, make sure that you are masked-up whenever you are sanding your parts…
 
Uh oh. You know this spells trouble? You will look back on this project as the ‘gateway drug’ that pushed you into full hero territory. :love:
 
I started sanding the epoxy putty but I ran out of sandpaper!! Epoxy putty just eats that stuff up.
Back to Loews tomorrow.
I didn't sand much fiberglass, but what I did sand of it was really easy. It was almost like sanding resin...
20231112_172458.jpg
20231112_170822.jpg
 
Back
Top