Mark VI Pepakura Iron Man Build

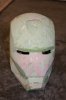
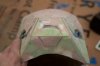
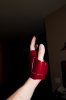
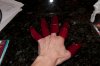
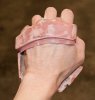
OK, I've had a couple of folks PM me about sizing Zabana's gloves. This is what I've discovered through my build. If the pepped piece fits just right...or even if it is a little big...it will be too small. My hands are 7.5 inches around at the widest part. I did mine with a scale of .82. They probably should have been done at .85 as the glove is a little small with the 2 layers of resin/glass inside and the magnets installed to keep the pieces together. Sized at .90 they were too big. The knuckles and palm on that .90 pep are shown in the first 2 pictures. The rest of the pics show how my .82 scale fit as a pep and afterwards with 2 layers of glass. After the fingers were all painted, I had to strip them and sand down the underlapping parts because, though they looked great straight, the nicely angled parts that go under the other pieces made it impossible to bend the fingers very much, so round off the corners and make sure they are kind of angled down like I show in the two close ups. Those angled pieces were straight and had nice sharp corners and edges before. They work great now. You need to remember to leave room for whatever method you are using to connect the glove pieces (I used teeny rare earth magnets and will probably modify the magnet locations to give me more room...). Also, the gloves will have to be modified on the back side to allow you to bend your wrist back. That straight edge on the back doesn't allow you to flex your wrist backward very much and the magnets holding mine together kept separating when I bent my wrist backwards. I've seen other folks do something similar, which is what led me to trim mine...after I had already painted them :cry. Also, the finger portions don't fit the same with the pepped glove on as they do when you aren't wearing it, so make sure you size the fingers AFTER the glove is wearable. With the glove on, the fingers WILL be forced further out, so if they are too long when you aren't wearing the glove, they will be even that much longer with it on. Mine all fit great with the glove off, but when I put the glove on, the pinkies were too long. I guess the way the glove is shaped at that particular spot forces the pinkie finger pieces out further than the others. I had to sand down 2 of the 3 pieces on both pinkies to make them shorter, because, the tip of my finger was barely in the fingertip piece, which made it almost impossible for me to bend those sections. The last pic shows my sharpie mark where I sanded that piece down. Even after sanding that much off, it still wasn't enough, so II had to not only sand further on that piece, I also had to sand the other piece as well on both pinkies. Maybe my pinkies are unusually small compared to the rest of my fingers, I don't know. As for diameter, you need to leave room for a glove potentially, and/or a way to string them together. I was really heavy on the resin on the inside and did glass the inside, but then I couldn't get the little buggers on! I ended up dremeling out most of the fiberglass, but I guess there is enough resin on them that they are stiff enough despite that. My fingers are strung together with DY22s (.022" diameter) guitar strings which are epoxied in place, and I'm planning on epoxying the ends of the guitar strings to the top of the inside of glove on all the fingers, and the bottom of the glove on the thumb, so I angled the back portion of the guitar strings up on all the last finger pieces.

I bought a pair of fabric Iron Man gloves to wear inside, but they are waaaay to big, so I looked for thin stretchy black ones since it's nearly impossible to find red gloves to match and stretchy fabric tends to not take color if you try to dye it. The gloves I got on Amazon (Amazon.com: Terramar Adult Thermasilk Glove Liner (Black, Medium): Clothing) were perfect...thin and really stretchy. They fit inside the gloves and fingers, but I don't know if this is the route I want to go. Someone suggested making a mold of your hands, detailing in the little ridges, then moulding Smooth-On Dragon skin to the finger molds to cover those gaps where your fingers show underneath. Don't know how much room that would take up... A couple of the pics show where I cut the gloves to get them on. Though I think Darkside501st's modified this file to both make it easier to determine where to separate, and also so the center ring is a separate piece or something, so if you have an older file, you may want to look for the new mod. Hope this helps...
 

Attachments

  • palm gloveimage.jpg
    palm gloveimage.jpg
    1.3 MB · Views: 160
  • 20130321-145820--DSC_8062.jpg
    20130321-145820--DSC_8062.jpg
    2.4 MB · Views: 147
  • 20130825-122135--DSC_6774.jpg
    20130825-122135--DSC_6774.jpg
    4.3 MB · Views: 137
  • 20130829-200001--DSC_6811.jpg
    20130829-200001--DSC_6811.jpg
    5.7 MB · Views: 147
  • 20130829-200007--DSC_6812.jpg
    20130829-200007--DSC_6812.jpg
    5.5 MB · Views: 158
  • 20131017-092709--DSC_7383.jpg
    20131017-092709--DSC_7383.jpg
    6.2 MB · Views: 199
  • 20130319-190410--DSC_8040-2.jpg
    20130319-190410--DSC_8040-2.jpg
    519.8 KB · Views: 130
  • 20131017-202658--DSC_7392.jpg
    20131017-202658--DSC_7392.jpg
    701.9 KB · Views: 136
  • 20131017-202712--DSC_7393.jpg
    20131017-202712--DSC_7393.jpg
    571.8 KB · Views: 125
  • 20130825-122119--DSC_6772.jpg
    20130825-122119--DSC_6772.jpg
    4.7 MB · Views: 141
  • 20130505-210045--DSC_2479.jpg
    20130505-210045--DSC_2479.jpg
    1.7 MB · Views: 164
  • 20130319-190410--DSC_8040.jpg
    20130319-190410--DSC_8040.jpg
    5.9 MB · Views: 143
  • 20130319-191108--DSC_8043.jpg
    20130319-191108--DSC_8043.jpg
    2.1 MB · Views: 143
  • 20130319-191113--DSC_8044.jpg
    20130319-191113--DSC_8044.jpg
    1.8 MB · Views: 140
  • 20130331-130147--DSC_8551.jpg
    20130331-130147--DSC_8551.jpg
    1.9 MB · Views: 160
  • 20130504-090724--DSC_2452.jpg
    20130504-090724--DSC_2452.jpg
    6.6 MB · Views: 138
  • 20130504-090735--DSC_2454.jpg
    20130504-090735--DSC_2454.jpg
    6.6 MB · Views: 128
  • 20130505-210027--DSC_2477.jpg
    20130505-210027--DSC_2477.jpg
    2.1 MB · Views: 146
  • DSC_7438.jpg
    DSC_7438.jpg
    93.7 KB · Views: 143
  • DSC_7436.jpg
    DSC_7436.jpg
    72.8 KB · Views: 134
Last edited:
No updates as my Java class has been kicking my butt. However, should have some time over weekend to put glazing putty on my chest and back pieces and possibly paint if weather is good.
 
Chest and back primed and ready for painting!
 

Attachments

  • 20131104-200515--DSC_7494.jpg
    20131104-200515--DSC_7494.jpg
    87.3 KB · Views: 123
  • 20131104-200455--DSC_7493.jpg
    20131104-200455--DSC_7493.jpg
    86.3 KB · Views: 124
  • 20131104-144334--DSC_7492.jpg
    20131104-144334--DSC_7492.jpg
    77.6 KB · Views: 125
  • 20131104-144317--DSC_7490.jpg
    20131104-144317--DSC_7490.jpg
    72.5 KB · Views: 118
Though I think the .90 scale (helmet on the right) will be too small, I'm still doing bondo work and will separate it. The original 1.0 scale is on the left and the .95 is in the middle. Had to post pics of the first stages of bond since I used both regular bondo and the Evercoat Gold which ends up being green when mixed with the blue hardner :p Funny it looks Christmassy...
 

Attachments

  • 20131105-082220--DSC_7514.jpg
    20131105-082220--DSC_7514.jpg
    85.2 KB · Views: 126
  • 20131105-082147--DSC_7513.jpg
    20131105-082147--DSC_7513.jpg
    85 KB · Views: 102
  • 20131105-082142--DSC_7512.jpg
    20131105-082142--DSC_7512.jpg
    87.1 KB · Views: 124
  • 20131105-082134--DSC_7511.jpg
    20131105-082134--DSC_7511.jpg
    81.5 KB · Views: 110
  • 20131105-082123--DSC_7510.jpg
    20131105-082123--DSC_7510.jpg
    71.7 KB · Views: 112
  • 20131105-082114--DSC_7509.jpg
    20131105-082114--DSC_7509.jpg
    93.3 KB · Views: 112
  • 20131105-082101--DSC_7508.jpg
    20131105-082101--DSC_7508.jpg
    84.2 KB · Views: 124
  • 20131103-184406--DSC_7482.jpg
    20131103-184406--DSC_7482.jpg
    76.7 KB · Views: 107
  • 20131103-184357--DSC_7481.jpg
    20131103-184357--DSC_7481.jpg
    81.8 KB · Views: 111
  • 20131103-184352--DSC_7480.jpg
    20131103-184352--DSC_7480.jpg
    89.9 KB · Views: 132
  • 20131103-184348--DSC_7479.jpg
    20131103-184348--DSC_7479.jpg
    96.5 KB · Views: 131
  • 20131102-163730--DSC_7454.jpg
    20131102-163730--DSC_7454.jpg
    92.9 KB · Views: 127
  • 20131102-163658--DSC_7453.jpg
    20131102-163658--DSC_7453.jpg
    81.4 KB · Views: 115
  • 20131102-163650--DSC_7452.jpg
    20131102-163650--DSC_7452.jpg
    84.1 KB · Views: 113
  • 20131102-163642--DSC_7451.jpg
    20131102-163642--DSC_7451.jpg
    80.4 KB · Views: 133
  • 20131027-212830--DSC_7440.jpg
    20131027-212830--DSC_7440.jpg
    81.5 KB · Views: 166
Last edited:
Some pics of the new .95 helmet. After seeing that Darkside501st modded a different helmet pep file to eliminate the groove running along the back and sides, I decided to mod Dubean33's unfold of the Sharkmark pep on the fly as I glued the pieces together to elimate that groove as well. That groove caused the most misalignment problems with the helmets when I built the first two, and resulted in having to do more bondo work after glassing. I'll detail that groove in after all my bondo work is done, like Darkside501st suggested when he modded the other pep file. I also used cardboard to back the teeth instead of trying to pep those teeny parts again since they came out kind of sloppy for helmets 1 & 2. I made sure the air pockets in the cardboard ran vertically so I could work resin in along the length to harden it. Hopefully I won't have to glass the teeth at all. Will see how that works after I get it separated. I'll probably cover the teeth up with painters' tape when I bondo this one as well in order to keep the detail sharp without having to sand a bunch of body filler out after the fact. Also, On the .90 helmet, the "octagon" detail on the chin stuck out more than it was supposed to due to me having a hard time getting that inset part just right when I pepped it, so I'm put more body filler on and will detail that out as well after sanding it flat. That piece has been problematic on all 3 helmets I've done. I did mod the pep for the last helmet I did, to create a cut out of sorts and then used thin cardboard for that detail in order to keep the groove detail around it. That helped some. I also didn't do not do all the inside detail in the eyes which gets cut out anyway, but did reinforce the area so it would keep its shape when resined and glassed. I also made sure I put extra layers (5 or 6 total...can't remember) of fiberglass on the tongue, since that part tends to flex after separation. I wanted to make sure it was stiff, yet still low profile, and not have to add anything after separation to make sure it didn't flex. Took my time on the glassing. Did each layer in 4 separate glassing sessions, because I've found that even when you use adhesive, if you glass a portion, then turn it so that newly glassed section is facing the floor, the glass tends to pull away from the card stock. So I'd glass a section and leave it with that side down util it cured. After each glassing session, I also made sure I trimmed out/sanded down any fibers that were sticking up and wouldn't allow the second layer to lie flat before I put the next layer in. Made a huge difference in how the inside looks compared to the other two, and virtually eliminated the air pockets I got with helmets 1 & 2. Must force myself to slow down and take my time...:roll eyes Hard to do when you get excited to see some results!

Also, I had tried something different on the .90 scale helmet than I did on the first one. I resined inside and out before I connected the pieces for glassing. I wouldn't do THAT again, as it caused huge problems with trying to align all the edges. I did do some tabless gluing of the last helmet, on the top of the lid and the nose of the faceplate to see if it would make the pep smoother. It did, but took me about twice as long since I had to cut all those teeny strips to connect the pieces instead of using pre done tabs... Not sure if I would do tabless again or not.
 

Attachments

  • 20131105-081105--DSC_7497.jpg
    20131105-081105--DSC_7497.jpg
    92.4 KB · Views: 125
  • 20131105-081118--DSC_7498.jpg
    20131105-081118--DSC_7498.jpg
    87 KB · Views: 145
  • 20131105-081418--DSC_7501.jpg
    20131105-081418--DSC_7501.jpg
    83.1 KB · Views: 114
  • 20131105-081431--DSC_7502.jpg
    20131105-081431--DSC_7502.jpg
    91.5 KB · Views: 117
  • 20131105-081629--DSC_7505.jpg
    20131105-081629--DSC_7505.jpg
    92.5 KB · Views: 123
  • 20131105-081031--DSC_7495.jpg
    20131105-081031--DSC_7495.jpg
    77.3 KB · Views: 103
  • 20131102-163941--DSC_7466.jpg
    20131102-163941--DSC_7466.jpg
    87.3 KB · Views: 101
  • 20131102-163921--DSC_7463.jpg
    20131102-163921--DSC_7463.jpg
    95.8 KB · Views: 109
  • 20131102-163806--DSC_7457.jpg
    20131102-163806--DSC_7457.jpg
    78.2 KB · Views: 118
  • 20131102-163819--DSC_7458.jpg
    20131102-163819--DSC_7458.jpg
    81.3 KB · Views: 106
  • 20131102-163824--DSC_7459.jpg
    20131102-163824--DSC_7459.jpg
    83.6 KB · Views: 196
  • 20131102-163847--DSC_7461.jpg
    20131102-163847--DSC_7461.jpg
    84.1 KB · Views: 103
  • 20131102-163904--DSC_7462.jpg
    20131102-163904--DSC_7462.jpg
    77.4 KB · Views: 117
  • 20131102-163730--DSC_7454-2.jpg
    20131102-163730--DSC_7454-2.jpg
    92.9 KB · Views: 114
Finished putting the color on the chest and back. Still need to clear coat, but it's too humid now...
 

Attachments

  • DSC_7532.jpg
    DSC_7532.jpg
    80.2 KB · Views: 192
  • 20131106-144604--DSC_7528.jpg
    20131106-144604--DSC_7528.jpg
    92.1 KB · Views: 197
this is looking very screen accurate.
cant wait to see final results. paint work looks great!!
 
This whole project is great and I'm taking mental notes of your choices in construction, specifically how to join pieces with tabs/magnets and how to set up joints. I'm a just a little bit behind you in my fiberglass build (also a Mk VI), so I thank you for sharing your successes as well as mistakes so I don't make the same ones.

One question, though...were you planning on putting in the detail lines on the chest?
 
IM1.jpgIM2.jpgIM3.jpg

the only thing I didn't complete all the way was the neck piece...but people didn't care....wasn't perfect, but it got the job done.
 
This whole project is great and I'm taking mental notes of your choices in construction, specifically how to join pieces with tabs/magnets and how to set up joints. I'm a just a little bit behind you in my fiberglass build (also a Mk VI), so I thank you for sharing your successes as well as mistakes so I don't make the same ones.

One question, though...were you planning on putting in the detail lines on the chest?
Glad to share since I got a lot of my inspiration and ideas from others on here as well. No, I'm not planning on putting in the lines...

- - - Updated - - -

View attachment 254305View attachment 254306View attachment 254307

the only thing I didn't complete all the way was the neck piece...but people didn't care....wasn't perfect, but it got the job done.

Looks great!
 
Decided to score the detail lines in the chest after all. Taped them off with painters tape and used a hacksaw to detail in the lines, dabbed with primer and then with black paint. When I pulled off the tape, found that the primer had bled past the edges of the tape:face palm. How do other folks paint the detail lines on their suits? Anyone know?

The .90 helmet is finally separated. And, as I suspected, it IS too small, so I'll put it aside for now and work on the .95 scale. Will save it as a display and maybe paint with a different color scheme. Used aluminum tubing and wood screws for the screw details. Cut the tubing and epoxied the rings onto the cut off screw heads. Drilled through the helmet where all the screw details will go (way too many times since the drill bit kept chewing up the edges of the hole...:angry) and epoxied them into place. For the cheek details, I used a bigger diameter tube with a thicker wall and before putting them in, covered the hole with part of a latex glove, pushed the ring in and backfilled with bondo. After it cured, I pulled the ring and piece of latex off, leaving a smooth surface on the bottom of the hole. Then I epoxied the rings in place. The reason I didn't do anything with the screws on the faceplate is because I was thinking I might use those holes to actually mount one set of the hinges from there. That is pretty close to where they were mounted on my first helmet was.
 

Attachments

  • 20131117-191020--DSC_7561.jpg
    20131117-191020--DSC_7561.jpg
    66 KB · Views: 114
  • 20131117-191051--DSC_7562.jpg
    20131117-191051--DSC_7562.jpg
    55.8 KB · Views: 110
  • 20131117-205018--DSC_7563.jpg
    20131117-205018--DSC_7563.jpg
    80.6 KB · Views: 114
  • 20131117-205036--DSC_7564.jpg
    20131117-205036--DSC_7564.jpg
    85.1 KB · Views: 116
  • 20131117-205052--DSC_7565.jpg
    20131117-205052--DSC_7565.jpg
    72.9 KB · Views: 122
  • 20131117-205058--DSC_7566.jpg
    20131117-205058--DSC_7566.jpg
    82.4 KB · Views: 132
  • 20131117-205150--DSC_7567.jpg
    20131117-205150--DSC_7567.jpg
    75.9 KB · Views: 135
  • 20131117-205223--DSC_7568.jpg
    20131117-205223--DSC_7568.jpg
    78.9 KB · Views: 138
  • 20131117-191013--DSC_7560.jpg
    20131117-191013--DSC_7560.jpg
    69.8 KB · Views: 131
  • 20131117-191007--DSC_7559.jpg
    20131117-191007--DSC_7559.jpg
    78.9 KB · Views: 113
  • 20131117-191002--DSC_7558.jpg
    20131117-191002--DSC_7558.jpg
    66.1 KB · Views: 121
  • 20131117-065503--DSC_7534.jpg
    20131117-065503--DSC_7534.jpg
    77.8 KB · Views: 132
  • 20131117-114801--DSC_7536.jpg
    20131117-114801--DSC_7536.jpg
    82.5 KB · Views: 110
  • 20131117-115316--DSC_7538.jpg
    20131117-115316--DSC_7538.jpg
    78.2 KB · Views: 131
  • 20131117-132744--DSC_7542.jpg
    20131117-132744--DSC_7542.jpg
    72.8 KB · Views: 138
  • 20131117-132754--DSC_7543.jpg
    20131117-132754--DSC_7543.jpg
    72.5 KB · Views: 127
  • 20131117-132825--DSC_7545.jpg
    20131117-132825--DSC_7545.jpg
    73.2 KB · Views: 118
  • 20131117-133015--DSC_7550.jpg
    20131117-133015--DSC_7550.jpg
    71.2 KB · Views: 110
  • 20131117-190955--DSC_7557.jpg
    20131117-190955--DSC_7557.jpg
    76.7 KB · Views: 151
Decided to score the detail lines in the chest after all. Taped them off with painters tape and used a hacksaw to detail in the lines, dabbed with primer and then with black paint. When I pulled off the tape, found that the primer had bled past the edges of the tape:face palm. How do other folks paint the detail lines on their suits? Anyone know?

The .90 helmet is finally separated. And, as I suspected, it IS too small, so I'll put it aside for now and work on the .95 scale. Will save it as a display and maybe paint with a different color scheme. Used aluminum tubing and wood screws for the screw details. Cut the tubing and epoxied the rings onto the cut off screw heads. Drilled through the helmet where all the screw details will go (way too many times since the drill bit kept chewing up the edges of the hole...:angry) and epoxied them into place. For the cheek details, I used a bigger diameter tube with a thicker wall and before putting them in, covered the hole with part of a latex glove, pushed the ring in and backfilled with bondo. After it cured, I pulled the ring and piece of latex off, leaving a smooth surface on the bottom of the hole. Then I epoxied the rings in place. The reason I didn't do anything with the screws on the faceplate is because I was thinking I might use those holes to actually mount one set of the hinges from there. That is pretty close to where they were mounted on my first helmet was.

Very Nice work! I have only done a helmet so far but I used a fine detail brush for the lines and had a dry towel to wipe off if I messed up.
 
Thanks.
So stang67, did you paint your helmet in the red/gold and then detail in with the small brush?
 
Yes that is exactly how. Use a quality fine brush and a steady hand. You can get the brush from a Store like Micheal's, A good hobby store or an art store. I used one from a hobby store. I think you will get a better one from Michael's. I only had automotive spray paint, So I sprayed a little in a small cup(It will get on you so where gloves if you do it this way) then thinned a bit with a few drops reducer/thinner. Looking back on your work so far, painting the lines should be a piece of cake for you. It takes a little practice to get used to painting like this. Just take your time. Mine didn't turn out perfect but I did it 15 minutes. Take a look at my thread if you get a chance to see how it turned out.
One tip I learned was drag your arm and hand keeping your hand steady, only use like a pencil when your in a tight area. If you've ever watched a show like OVERHAULIN they do it the same way on the cars they rebuild. I learned from painting some of the parts on my 67 Mustang and painting trim on the house.

Good Luck! Your very talented.!
 
The .95 helmet separation is complete. Shows how I printed off some of the pep pieces to get my scored lines accurate. Now need to rework/clean up the edges with bondo, build up the lips on the inside and install magnets. It does go over my ears. Will have to post pics while I have it on to see the scale.
 

Attachments

  • 20131123-155104--DSC_7598.jpg
    20131123-155104--DSC_7598.jpg
    84.9 KB · Views: 119
  • 20131123-155058--DSC_7597.jpg
    20131123-155058--DSC_7597.jpg
    89.8 KB · Views: 136
  • 20131123-155052--DSC_7596.jpg
    20131123-155052--DSC_7596.jpg
    72.2 KB · Views: 126
  • 20131123-154845--DSC_7595.jpg
    20131123-154845--DSC_7595.jpg
    88.4 KB · Views: 126
  • 20131123-154831--DSC_7594.jpg
    20131123-154831--DSC_7594.jpg
    85.9 KB · Views: 131
  • 20131123-154825--DSC_7593.jpg
    20131123-154825--DSC_7593.jpg
    74.2 KB · Views: 124
  • 20131123-134730--DSC_7592.jpg
    20131123-134730--DSC_7592.jpg
    89 KB · Views: 135
  • 20131123-134724--DSC_7591.jpg
    20131123-134724--DSC_7591.jpg
    86.5 KB · Views: 125
  • 20131123-124846--DSC_7585.jpg
    20131123-124846--DSC_7585.jpg
    86.5 KB · Views: 127
  • 20131123-124109--DSC_7584.jpg
    20131123-124109--DSC_7584.jpg
    92.5 KB · Views: 124
  • 20131123-122219--DSC_7583.jpg
    20131123-122219--DSC_7583.jpg
    80.7 KB · Views: 143
  • 20131123-122023--DSC_7582.jpg
    20131123-122023--DSC_7582.jpg
    92.6 KB · Views: 129
  • 20131123-121950--DSC_7581.jpg
    20131123-121950--DSC_7581.jpg
    77 KB · Views: 132
  • 20131123-121003--DSC_7580.jpg
    20131123-121003--DSC_7580.jpg
    88.5 KB · Views: 118
  • 20131123-120924--DSC_7578.jpg
    20131123-120924--DSC_7578.jpg
    91.5 KB · Views: 134
  • 20131123-120910--DSC_7577.jpg
    20131123-120910--DSC_7577.jpg
    76.5 KB · Views: 137
  • 20131123-120901--DSC_7576.jpg
    20131123-120901--DSC_7576.jpg
    77.5 KB · Views: 139
Back
Top