Mark VI Pepakura Iron Man Build

Re: Iron Man Build

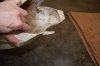
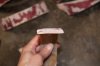
No painting on the legs today. Rainy. So I worked on bondoing my boots--thanks Zabana for the awesome boot files! The heels are mostly done. The toes just started. Lots of little detail. Not going to mess with the sole except to prime and paint. Who's going to see it anyway. Wonder if anyone has tried using plastidip and dipping the bottom of the soles or brushing it on the part of the soles that actually touch the ground. You would have to put something on the soles to prevent slipping.
 
Re: Iron Man Build

Update on painting the rubber seal. Yesterday, I sprayed the Inferno red metallic duplicolor I was using directly on the rubber gasket. Color was too dark with the black rubber underneath, so I then tried spraying a regular white primer on, then spraying the inferno red metallic paint and it all cracked and flaked. I did go ahead and purchase the vinyl paint in silver to use behind the knees, but haven't found any in gold to use in the inner elbow gap.
 
Re: Iron Man Build

Zabana's boots are ready for glazing putty tomorrow...I got some red paint on the shins yesterday and another coat today as well as putting the silver paint on the thighs. I left the tape on the shins overnight since I knew I'd need to put more red paint on. THAT was a mistake. I can feel sticky residue where I pulled the tape off, so I'm going to have to remove the residue before I can paint the top part of the shin silver.
 
Re: Iron Man Build

NOTE: The garage door seal is vinyl, not rubber. Looked and felt like rubber to me and I didn't read the packaging:facepalm
Wonder if the vinyl paint will work as well on rubber. Perhaps inner tubes...so I could have wider pieces that could be painted? Will have to test.

Found a bicycle inner tube in my garage and tested it on that. Paint works great on the inner tube too! Yeah!!
 
Last edited:
Re: Iron Man Build

Legs...Done. Thought I'd use magnets to cover the bolt holes so the Chicago screws could be totally removed. Yeah...they didn't want to stay in place even though they're mongo 1.5" magnets... May just leave them like they are...hmmm.
 

Attachments

  • 20130930-173449--DSC_7022.jpg
    20130930-173449--DSC_7022.jpg
    92.9 KB · Views: 133
  • 20130924-210525--DSC_6994.jpg
    20130924-210525--DSC_6994.jpg
    91.5 KB · Views: 132
  • 20130924-210500--DSC_6993.jpg
    20130924-210500--DSC_6993.jpg
    81.9 KB · Views: 225
  • 20130922-120025--DSC_6973.jpg
    20130922-120025--DSC_6973.jpg
    96.7 KB · Views: 123
  • 20130922-120024--DSC_6972.jpg
    20130922-120024--DSC_6972.jpg
    88.9 KB · Views: 122
  • 20130921-183033--DSC_6971.jpg
    20130921-183033--DSC_6971.jpg
    94 KB · Views: 112
  • 20130921-183028--DSC_6970.jpg
    20130921-183028--DSC_6970.jpg
    85.1 KB · Views: 119
  • 20130921-123214--DSC_6969.jpg
    20130921-123214--DSC_6969.jpg
    88.3 KB · Views: 123
  • 20130921-123209--DSC_6968.jpg
    20130921-123209--DSC_6968.jpg
    88.7 KB · Views: 128
  • 20130920-150940--DSC_6953.jpg
    20130920-150940--DSC_6953.jpg
    82.6 KB · Views: 149
  • 20130920-150925--DSC_6952.jpg
    20130920-150925--DSC_6952.jpg
    85.3 KB · Views: 142
Last edited:
Re: Iron Man Build

Legs...Done. Thought I'd use magnets to cover the bolt holes so the Chicago screws could be totally removed. Yeah...they didn't want to stay in place even though they're mongo 1.5" magnets... May just leave it like it is...hmmm.
 
Re: Iron Man Build

Also reworked the ribs. Made them thinner, heated and curved them more, rounded off all the edges to help minimize chipping, and shortened the side pieces. Clearcoat doesn't do a great job of protecting the pieces when they rub...:eek Also used thicker elastic on the joins to help keep them together better and minimize rubbing... BTW, my errant sharpie marks next to the angled grooves I cut in DID show up through the red paint, so Yikes! Probably not noticeable by anyone but me, but a reminder to sand out, cover better with primer...:facepalm
 

Attachments

  • 20131001-070954--DSC_7024.jpg
    20131001-070954--DSC_7024.jpg
    96.3 KB · Views: 120
  • 20131001-140816--DSC_7030.jpg
    20131001-140816--DSC_7030.jpg
    87.2 KB · Views: 123
  • 20131001-071011--DSC_7026.jpg
    20131001-071011--DSC_7026.jpg
    68.5 KB · Views: 120
  • 20130929-174727--DSC_7021.jpg
    20130929-174727--DSC_7021.jpg
    74.8 KB · Views: 202
  • 20130929-174705--DSC_7020.jpg
    20130929-174705--DSC_7020.jpg
    76.1 KB · Views: 115
  • 20130929-174659--DSC_7019.jpg
    20130929-174659--DSC_7019.jpg
    77.9 KB · Views: 126
Last edited:
Re: Iron Man Build

What about putting felt/fabric on the back sides of the ribs and wherever else it's rubbing? Do you think that would help minimize chipping?
 
Re: Iron Man Build

What about putting felt/fabric on the back sides of the ribs and wherever else it's rubbing? Do you think that would help minimize chipping?

I was thinking of doing something like that. Felt or foam on the inside of the back, chest and cod, and inside of the ribs where the abs come in contact.
 
Re: Iron Man Build

Keeping in mind that thick felt or foam will change the way they fit, I wonder if regular fabric would be the way to go with the parts that fit more tightly together.
 
Re: Iron Man Build

Keeping in mind that thick felt or foam will change the way they fit, I wonder if regular fabric would be the way to go with the parts that fit more tightly together.

Thin foamies perhaps. I think a thin fabric wouldn't work, a fleece would, but that would be thicker than the thin foamies or felt.
 
Re: Iron Man Build

What about a flannelette or something similar? Thinner than fleece and even the thin foamies (unless you have foamies in your area that are thinner than the ones I can find here!).
 
Re: Iron Man Build

Dragon Skin could be a way to go can dye it add to the ribs its super stretch and strong Just a thought...
 
Re: Iron Man Build

Dragon Skin could be a way to go can dye it add to the ribs its super stretch and strong Just a thought...

Hm. Never used Dragon Skin before. Did a bit of research and it looks like it might work.

I'm wondering though, if it would be too rubbery and kind of "grab" at the pieces it is protecting so the pieces wouldn't be able to slide across the dragon skin when I move?
 
Last edited:
Update. Shoulder Bells are done. Boots are finally done and assembled!
 

Attachments

  • 20131010-131128--DSC_7299.jpg
    20131010-131128--DSC_7299.jpg
    93.3 KB · Views: 162
  • 20131011-053148--DSC_7321.jpg
    20131011-053148--DSC_7321.jpg
    96.4 KB · Views: 171
  • 20131011-053153--DSC_7322.jpg
    20131011-053153--DSC_7322.jpg
    96.3 KB · Views: 148
  • 20131011-053214--DSC_7323.jpg
    20131011-053214--DSC_7323.jpg
    59.9 KB · Views: 238
  • 20131011-053229--DSC_7324.jpg
    20131011-053229--DSC_7324.jpg
    79.2 KB · Views: 156
  • 20131011-053434--DSC_7325.jpg
    20131011-053434--DSC_7325.jpg
    86.4 KB · Views: 151
  • 20131011-054413--DSC_7326.jpg
    20131011-054413--DSC_7326.jpg
    81.3 KB · Views: 154
  • DSC_7328.jpg
    DSC_7328.jpg
    96 KB · Views: 181
  • DSC_7329.jpg
    DSC_7329.jpg
    79 KB · Views: 150
  • DSC_7330.jpg
    DSC_7330.jpg
    96.9 KB · Views: 159
  • DSC_7331.jpg
    DSC_7331.jpg
    84.2 KB · Views: 159
Pics of my finished wrist and elbow pieces...they were easy compared to the biceps which are still in the bondo stage. Forearm is still being bondoed too. Probably have a couple more layers to apply before I'm happy with the pieces. They are by far not perfect...but they are good enough, seeing as how I don't REALLY need to be aerodynamic...:lol

The plugs for the shoes I fabricated out of 1/8" black ABS sheet. Only took me about 3 hours to get all 4 of them the way I wanted them:unsure

I feel like I should go back and repost pics from when they weren't loading properly, but what a PITA.

Oh, the neck brace has a circular rare earth magnet with a hole in it glued to the underside of the front, the back portion tabs slide in and a cut off nail head gets threaded through the hole from underneath to hold the two pieces together and the magnet keeps the nail in place. I'm going to see how well this works once everything is assembled.
 

Attachments

  • DSC_7344.jpg
    DSC_7344.jpg
    80.3 KB · Views: 155
  • DSC_7343.jpg
    DSC_7343.jpg
    77.5 KB · Views: 139
  • DSC_7342.jpg
    DSC_7342.jpg
    94.7 KB · Views: 154
  • DSC_7341.jpg
    DSC_7341.jpg
    96.8 KB · Views: 151
  • DSC_7339.jpg
    DSC_7339.jpg
    85 KB · Views: 158
  • DSC_7338.jpg
    DSC_7338.jpg
    87.2 KB · Views: 156
  • 20130927-104724--DSC_7005.jpg
    20130927-104724--DSC_7005.jpg
    78.3 KB · Views: 127
  • 20130927-104740--DSC_7007.jpg
    20130927-104740--DSC_7007.jpg
    93.2 KB · Views: 129
  • 20130927-120924--DSC_7013.jpg
    20130927-120924--DSC_7013.jpg
    81.6 KB · Views: 128
  • 20131010-192251--DSC_7308.jpg
    20131010-192251--DSC_7308.jpg
    75.2 KB · Views: 155
  • 20131010-192324--DSC_7312.jpg
    20131010-192324--DSC_7312.jpg
    95.4 KB · Views: 128
  • 20131010-192332--DSC_7313.jpg
    20131010-192332--DSC_7313.jpg
    95.3 KB · Views: 123
  • 20131010-192338--DSC_7314.jpg
    20131010-192338--DSC_7314.jpg
    79 KB · Views: 125
  • 20131010-192353--DSC_7316.jpg
    20131010-192353--DSC_7316.jpg
    85.3 KB · Views: 121
  • 20131008-134141--DSC_7052.jpg
    20131008-134141--DSC_7052.jpg
    89.8 KB · Views: 151
Last edited:
OK funny story. Woke up early a couple of days ago and wanted to try on chest and back to see how the ribs/abs fit inside, before I did any body filler on those two pieces. Husband was gone on a trip and kiddos were still in bed. Put on the cod, and taped on the abs and ribs since they still haven't been rigged to be attached yet. Then I put the chest and back on and got the sawed off nails popped into the holes on the underside of the neck brace. I could hear them snap into place on the 1/2" diameter rare earth magnets with the holes in the middle. Cool! Everything was holding together, the nails stayed up against the magnets, and the abs and ribs fit up inside the chest and back... Time to take it off. So, I reach inside the suit to grab the nails and pull them off the magnets and out of the holes in order to separate the chest and back. I tried for 15 minutes to release those mothers from the magnets getting more and more dismayed. And though I was laughing at myself for getting into this predicament, I wasn't about to "lounge" around the house with the chest and back pieces on until one of the kids woke up...being teenagers, they probably wouldn't wake until 10 or 11 and it was 6 am. After I took off the cod and slid the abs and ribs down to get them off, I kept trying to pull out the nails and finally succeeded after another 5 minutes! It was hard to get ahold of the nails because the heads are smaller than the magnet diameter and I just couldn't get a good grip on it. Guess I need to find something with a larger head or use some JB weld to glue a washer that's slightly larger than 1/2" to the nail so I can grab it more easily...
 
Back and Chest are coming along. Got a bit crazy with the mouse sander and sanded right through the resined card stock on a bunch of the high spots :eek And, since the glass hadn't stayed down when I laid it in those nooks and crannies, I got soft spots since there was no resin or fiberglass behind it. So, I backfilled with resin, using a syringe to pump some of it in the larger holes. Got those spots sanded down and used body filler to smooth out again.

Also finished painting the biceps and forearms. It had been too cold and wet here to do any painting the last 4 days, so the pieces sat in the garage finished except for the paint. Pay attention to the cans you grab folks. I grabbed a can of primer instead of clear coat and almost sprayed it on one of the pieces!!! :eek:eek
 

Attachments

  • DSC_7396.jpg
    DSC_7396.jpg
    89.2 KB · Views: 149
  • DSC_7397.jpg
    DSC_7397.jpg
    90.3 KB · Views: 149
  • DSC_7400.jpg
    DSC_7400.jpg
    78.4 KB · Views: 126
  • DSC_7401.jpg
    DSC_7401.jpg
    87 KB · Views: 146
  • DSC_7404.jpg
    DSC_7404.jpg
    95.8 KB · Views: 131
  • DSC_7405.jpg
    DSC_7405.jpg
    82.3 KB · Views: 120
  • DSC_7408.jpg
    DSC_7408.jpg
    79.1 KB · Views: 163
  • DSC_7410.jpg
    DSC_7410.jpg
    96.4 KB · Views: 187
  • DSC_7411.jpg
    DSC_7411.jpg
    89.8 KB · Views: 139
With the exception of paint, the neck seal is finished. I used magnets and an aluminum strip to connect the seal in the back and attach the smaller back piece. The aluminum strip allows the seal to flex open in the back without having to use a hinge, which would leave a gap. I cut off a bolt head and rounded the edge off so it would pop more easily into the donut magnet. Then drilled a hole in the aluminum strip for the bolt and epoxied the bolt to the aluminum strip.

The small piece in the back had some gaps where the ridges on the main part of the seal joined, so I put foil on the portions where that back piece rests, then slapped on bondo to fill in the gaps. After the bondo hardened, it was pretty easy to peel off the foil and sand it to make it neater, but not remove the edges it created. You can see how the back piece has a scalloped edge of sorts because of this and it fits more cleanly. The first picture shows what I'm talking about. The little magnets on the main part of the seal were easy to install by drilling all the way through the piece, then using 2 part epoxy glue on the edges of the holes, pushing the magnets in (it was a really snug fit), and backfilling with bondo. Much easier to do that than trying to carve out a dimple to put the magnets in. Then I used epoxy sculpt to form the tab with magnets at the front of the seal. It snaps in place with some authority when those teeny rare earth magnets meet and just has a hairline crack at the join.

Here is a link to the video I uploaded.Iron Man Mark VI Neck Seal - YouTube
 

Attachments

  • 20131023-164153--DSC_7420.jpg
    20131023-164153--DSC_7420.jpg
    83.9 KB · Views: 131
  • 20131023-164202--DSC_7421.jpg
    20131023-164202--DSC_7421.jpg
    80 KB · Views: 133
  • 20131023-164213--DSC_7422.jpg
    20131023-164213--DSC_7422.jpg
    79.8 KB · Views: 148
  • 20131023-164246--DSC_7423.jpg
    20131023-164246--DSC_7423.jpg
    66.4 KB · Views: 126
  • 20131023-164325--DSC_7425.jpg
    20131023-164325--DSC_7425.jpg
    74.4 KB · Views: 143
  • 20131023-164341--DSC_7426.jpg
    20131023-164341--DSC_7426.jpg
    92.5 KB · Views: 127
  • 20131023-164350--DSC_7427.jpg
    20131023-164350--DSC_7427.jpg
    79 KB · Views: 131
  • 20131023-181427--DSC_7428.jpg
    20131023-181427--DSC_7428.jpg
    96.4 KB · Views: 132
  • 20131023-181438--DSC_7429.jpg
    20131023-181438--DSC_7429.jpg
    81.5 KB · Views: 126
Back
Top