Great job. It came together nicely. Looks like your about ready for paint. I need to get back to mine. My last couple days off have been spent hanging Christmas lights.The left and right halves of the cockpit are mounted on separate pieces of styrene so they can be slid into position after painting and applying decals. I made a mockup of the body out of extra acrylic to figure out the location of everything in relation to the angles and it worked beautifully.
View attachment 1642576View attachment 1642577View attachment 1642578
You are using an out of date browser. It may not display this or other websites correctly.
You should upgrade or use an alternative browser.
You should upgrade or use an alternative browser.
Let's Build Greeblie Pack #12 - A Skyhopper Group Build
- Thread starter Blitzkreig
- Start date
Thanks. I was really able to capitalize on my extended weekend. Be careful hanging those lights. Ladders and guys our age can have a fraught relationship.Great job. It came together nicely. Looks like your about ready for paint. I need to get back to mine. My last couple days off have been spent hanging Christmas lights.
No more Wonder Woman plane! Primed with Tamiya primer and then given a light once over with piece of 1500 sanding sponge to knock down any rough patches. Just a couple touch ups needed.


Pilot with “LoRes” paint job in position to test placement and everything fits perfectly.


Next will be figuring out the color and doing test swatches.
Pilot with “LoRes” paint job in position to test placement and everything fits perfectly.
Next will be figuring out the color and doing test swatches.
Attachments

Its coming together really nice. Great work.No more Wonder Woman plane! Primed with Tamiya primer and then given a light once over with piece of 1500 sanding sponge to knock down any rough patches. Just a couple touch ups needed.
View attachment 1642765
View attachment 1642768
View attachment 1642772
Pilot with “LoRes” paint job in position to test placement and everything fits perfectly.
View attachment 1642775
View attachment 1642776
View attachment 1642779
View attachment 1642781
Next will be figuring out the color and doing test swatches.
Last edited:
After some trial and error and confusion my color study proved successful. The winner is a 50:50 mix of 1975 Light Reefer Grey and Dark Reefer Grey. For the underside Tamiya XF-2 White beat out Reefer White.


Great news. Will you have a list or will they be available in your Etsy store?Bases are half done, balls in progress… two weeks out, probably $55 for the set of custom parts, I think. Will post more when I have them in hand!
Hey, everyone! It's been awhile since I've posted but that doesn't mean progress isn't being made, especially in the paint department.
The main body colors went down nice. I used a mix of Archive-X for the grey. The white is Tamiya XF-2 White. The red stripe was 1975 SP Daylight Red knocked back a little with a pinch of 1975 Coach Green.


Next the cockpit was buttoned up with the LoRes pilots complete with "camera grade" paint job.
I added a styrene bulkhead behind the pilots. I was looking at some pictures of the original and it look like there was something back there. Also it seems that the control panel decals were applied to a piece of styrene on the side so I did that as well. While on the topic of decals, shout out to Moffeaton for the decals. They're a must if you're building this kit and are available at his Etsy store.
Those black bars under the front windows were more challenging than they looked and took a couple of attempts to get them right. The proportions (length v. height) were tricky.


With that it's time to start weathering. I'm going for the 50 year old aged white paint look. I'm using oils for this effect and so far I'm pleased with the results. More to come...

The main body colors went down nice. I used a mix of Archive-X for the grey. The white is Tamiya XF-2 White. The red stripe was 1975 SP Daylight Red knocked back a little with a pinch of 1975 Coach Green.
Next the cockpit was buttoned up with the LoRes pilots complete with "camera grade" paint job.
I added a styrene bulkhead behind the pilots. I was looking at some pictures of the original and it look like there was something back there. Also it seems that the control panel decals were applied to a piece of styrene on the side so I did that as well. While on the topic of decals, shout out to Moffeaton for the decals. They're a must if you're building this kit and are available at his Etsy store.
Those black bars under the front windows were more challenging than they looked and took a couple of attempts to get them right. The proportions (length v. height) were tricky.
With that it's time to start weathering. I'm going for the 50 year old aged white paint look. I'm using oils for this effect and so far I'm pleased with the results. More to come...
stevielewis
Sr Member
Excellent work!
How do parts T7 & T8 attach to the chairs?
I couldn't tell and just left them off. They can't be seen and the seats worked fine without them.How do parts T7 & T8 attach to the chairs?
Looks FANTASTIC. Esp. impressed by your 50/50 light vs dark reefer grey paint discovery. Reminds me of another ship that was painted in a 50/50 mix.
Happy New Year, everyone!
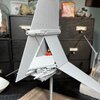
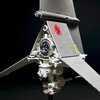
Let’s fast forward: It’s finished! Due to a combination of laziness colliding with momentum I don’t have many pictures of the in between stages. Actually I do and I can post them later but the truth is I finished my first true studio scale build and I’m excited to share it. Now it just needs an accurate stand (hint, hint).


Let’s fast forward: It’s finished! Due to a combination of laziness colliding with momentum I don’t have many pictures of the in between stages. Actually I do and I can post them later but the truth is I finished my first true studio scale build and I’m excited to share it. Now it just needs an accurate stand (hint, hint).
Attachments
Last edited:
Well doneHappy New Year, everyone!
Let’s fast forward: It’s finished! Due to a combination of laziness colliding with momentum I don’t have many pictures of the in between stages. Actually I do and I can post them later but the truth is I finished my first true studio scale build and I’m excited to share it. Now it just needs an accurate stand (hint, hint).
View attachment 1654974
View attachment 1654975
View attachment 1654976
View attachment 1654978
View attachment 1654979
View attachment 1654981
View attachment 1654982View attachment 1654977
View attachment 1654989
stevielewis
Sr Member
Looks fantastic! I may spring for one of those kits soon.
Do it! It's a fun build that's relatively easy!Looks fantastic! I may spring for one of those kits soon.
Similar threads
- Replies
- 2
- Views
- 572
- Replies
- 25
- Views
- 6,697
- Replies
- 56
- Views
- 8,497
- Replies
- 126
- Views
- 13,273