Probe Droid Pod (232 version) *Updated 2/4*

Boxcar Bret

Sr Member
RPF PREMIUM MEMBER
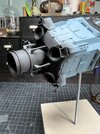
Killing a lion, wandering the desert on peyote, making one of the Probe Droid Dispatch Pods from "The Empire Strikes Back". It seem's every culture has a rite of passage and it seems this is the one for studio scale builders on the RPF.

My first foray into the world of studio scale was the off-the-shelf background filming miniature X-Wings from "The Empire Strikes Back" and "Return of The Jedi". After that I built the T-16 Skyhopper kit from Jason Eaton and Masterpiece models and that hooked me. The scale combined with watching the texture build by adding parts and greeblies hooked me.

I ordered some resin kits and was disappointed by the quality. I had looked into scratch building before but it seemed cost prohibitive given the number of kits needed and hunting them down. I've realized now that's exactly what will scratch my itch and the Probe Droid Dispatch Pod seems like the perfect gateway drug.

The kits are purchased and Padawan311 hooked me up with some of the extra one off parts from his stash along with some CNC mounting blocks for inside and bases. I partially blame him for pushing me in this direction. Seriously, thanks, man. You're the best.

That said, watch this space for more developments. Oh, and feedback is always welcome.

IMG_4438.jpg
 
I started with the mounting point by gluing in the 1/4-20 threaded insert into the CNC'd block of acrylic courtesy of Padawan311. I glued a bolt a couple of threads in to create a stop for when the mounting rod is threaded in.

IMG_4499.jpg


The excess of the bolt was then cut off and the block glued to one of the 8-Rad hulls.

IMG_4502.jpg


IMG_4501.jpg


Acrylic discs were glued in to block the turret holes and the hulls were ready to be glued into shape.

IMG_4503.jpg


I was really apprehensive of this step but like so many other things it was easier than I thought. That's not to say it wasn't challenging but it wasn't the nightmare I thought it would be.

I started with two hulls propped into position with a couple of 1-3-4 blocks and gently pushed together with one hand. I carefully applied Tamiya Extra Thin cement with a pointed paint brush along the joint. This allowed for a long reach and the ability to cover a greater distance gluing than I would with the cap top brush.

IMG_4504.jpg


Once the glue set I moved to the next two hulls and repeated the step. Next was gluing the two assemblies together. This was a little more challenging as I had to leave room for the fifth and final hull. After some trial and error (and contorting) Was able to hold the two assemblies in place with one hand and apply the cement with the other.

IMG_4505.jpg


This left the last hull to be glued in. It took some studying of the angles to figure out that the easiest way was to stand it on end and line up the edges. After running some cement down the seams I put some rubber bands around it to clamp everything in place. I then added some styrene rod in the joints inside just to beef up and reinforce the seams.

IMG_4510.jpg


IMG_4508.jpg


I'm impressed with how solid it is. The next step will be doing to end cap pieces.

IMG_4515.jpg
 
I’m having trouble IDing that little part inside the T-34 wheel. It looks like the hub cover for some sort of Russian tank but it doesn’t seem to have the bolt heads. Thoughts? Any help would be appreciated.

IMG_1043.jpeg


IMG_1043.jpeg
 
I’m having trouble IDing that little part inside the T-34 wheel. It looks like the hub cover for some sort of Russian tank but it doesn’t seem to have the bolt heads. Thoughts? Any help would be appreciated.

View attachment 1779089

View attachment 1779090
At that resolution I'm tempted to see nothing but the grooves of a possible anchoring point...
It's a rather unlikely location for adding some extra detail.

Beautiful build, by the way. I'm really enjoying it!
 
Next up was adding the Morser Karl (or Thor) parts to the back end. I used a scrap piece of styrene to keep the spacing even and relatively consistent.

IMG_4529.jpg


Making the end panels proved to be more challenging than I thought. After taking an approximate measurement of the openings all it took was drawing an accurate pentagon on cardstock, cutting it out and holding it up to the opening to discover how "out of pentagon" the hulls were. I was surprised because looking at it it's not noticeable at all. I ended up standing it on end and tracing around the end to make a pattern. This was transferred to styrene (.5mm) and roughly cut out to sneak up on the correct shape by sanding, holding it put to the opening, and sanding a little more until it was the right shape.

IMG_4532.jpg


The other end messed me up. I was looking at pods others had made and it looked like the panel was recessed. I made a pentagon shaped piece like before and then added sides from styrene strips to create a tray if you will. It should be noted that this was no easy feat but I anticipated it so I refrained from gluing the cut down louvered covers so I could get my dumb fingers in there to hold it in place while I glued it in place.

IMG_4547.jpg


With the hard part finished the fun part of gluing on the greeblies started.

IMG_4552.jpg


IMG_4550.jpg


IMG_4571.jpg


IMG_4575.jpg


Pay attention with these little dudes from the Flakvierling38. They have to have their centers removed which I made quick work of with a file. So quick that I didn't notice there were different pieces. Make sure all five match so they'll all be in the correct orientation

IMG_4558.jpg


IMG_4559.jpg


Next was the "Spinal Tap" moment of the build. All I'll say is the Lotus MkIII comes in 1/20 too.

CE1D3B2F-8898-4E12-A515-001F6A639551.jpg


Fortunately I found someone on eBay that was selling just the wheels sprue from the correct 1/12 kit for $28. I know, right?!! With that the thruster bell was assembled.

IMG_4690.jpg


IMG_4691.jpg


I'm a gorilla when it comes to handling models when I'm working on them so in order to 1. make sure I minimized the chances of me snapping off a piece and 2. hold the model in a safe and upright position to glue the remaining parts on I fashion stand out of a tape roll and some foam sheet. It worked perfectly!

IMG_4693.jpg


When I put the thruster in place it was quickly apparent that the recessed part was too deep so I filled it with a piece of 1/8 acrylic and it was perfect after that. All the remaining greeblies around the engine were glued on next.

IMG_4696.jpg


When I was building aircraft and armor models I made this cradle out of a car wash sponge. There's a big notch cut out of it. It's perfect for holding smaller models that are an unusual shape securely at an angle.

IMG_4697.jpg


The final five sub assemblies were glued on and with that the assembly was completed!

IMG_4706.jpg


IMG_4707.jpg


Time for paint!
 
Thanks to Craig's help the last last piece was identified, found and, after carefully popping of the T-34 wheel, glued in place.

IMG_4712.jpg


IMG_4720.jpg


The model was primered using Mr. Finishing Surfacer 1500 Gray. This is my go to primer. I love how beautifully it sprays, dries smooth and quickly with a hairdryer.

IMG_4733.jpg


IMG_4723.jpg


The whole thing was painted with ArchiveX ILM Stormy Sea. The US distributor has been out for a while and I wasn't sure I'd have enough but I decided to roll the dice and I ended up having enough and then some. At first I thought I might've scored some sort of magical bottomless bottle but I think it's more of a testimony to the excellent coverage of ArchiveX paints. This is also the point where the model went into what I call "internet dress" mode.

Untitled-1.jpg


The color shifted depending on the light source from room to room or from one end of the desk to the other. At the end of the day it's how it photographs that's important to me. The photos of my AMT 1/32 TIE fighter is a shining example of how I expect ILM Stormy Sea to look.

I used Tamiya 1mm and 3mm tape to mask off the markings. This took some trial and error to figure out the proportions and by far the most tedious part of the build. About two hours in total complete this step. After that I was anxious to mask off the five panels and it went quickly. This would come back to haunt me,

IMG_4778.jpg


IMG_4779.jpg


After spraying the panels with ArchiveX 1975 Engine Black I was rewarded with the incredible satisfaction of peeling off all the tape to reveal the markings and panels. And that's when I discovered my mistake: I masked the panels to the edge instead of the the pieces of angle iron on the front and back.

IMG_4781.jpg


IMG_4783.jpg


This left me with two choices. other try to mask the angle iron pieces times ten or brush paint over the mistake. I went the route of brush painting since I know my brush skills are better than my masking skills as I have demonstrated.

IMG_4784 (1).jpg


The back end and thrusters were painted in layers of 1975 SP Lark Dark Lark Grey and 1975 Engine Black with a light hit of Tamiya Flat Black in the nozzles for some sooty goodness.

IMG_4789 (1).jpg


IMG_4792 (1).jpg


A VERY light mist of light grime to knock everything back a little bit and tie it together (like a great rug). A few flicks of the trigger on the airbrush gave some random splatters. That's it for now. Next will be the post weathering. If you're still reading at this point thanks for your interest.
 

Attachments

  • IMG_4789.jpg
    IMG_4789.jpg
    332.8 KB · Views: 34
Nice work on the build and great photos. I can never photograph that blue correctly.
Thanks! It’s a trip but I learned about it years ago when I made my Bandai TIE fighter. I was recommended Tamiya Haze Grey as the most accurate color and was disappointed by how blue it looked. It was that experience that taught me how much studio lighting impacts the look of a model. I’m still learning but I really love playing with lighting and seeing what kind of drama I can create with it.
 

Your message may be considered spam for the following reasons:

If you wish to reply despite these issues, check the box below before replying.
Be aware that malicious compliance may result in more severe penalties.
Back
Top