rexposition

New Member
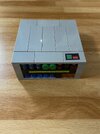
Hi! Long-time reader, first-time poster. I made a tricorder out of LEGOS many years ago and decided to use Leo Cad to refine it and order the parts from LEGO. I figure I'd post it here for anyone interested. I'll follow up below with pictures of the "prototype" as well as the cad version, real build, etc.

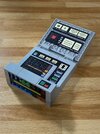
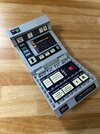
When ordering the pieces, I had to make a few quick design changes in my head as LEGO didn't carry the exact parts (or colors) I needed. Most notably, the sensor grid should have been mostly translucent pieces, but they will all be solid colors in the actual build. I attempted to create buttons and "graphics" using LEGOs for the inside panels, but it just looked messy, so I'll create those in photoshop and print them on decal paper.

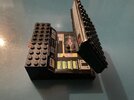
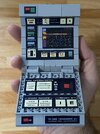
The original build was printed on regular paper, coloured in with pencils and taped on. Sharpie was used over the tape. As this was built with mostly black blocks, sharpie was used to also cover any blocks that were not black.

Stay tuned for more!
 
Here are photos of the prototype build. Note that there is a removable scanner on the underside, like a Mark X. This was not designed into the upcoming build.
IMG_1023.jpegIMG_1024.jpegIMG_1027.jpgIMG_1028.jpgIMG_1029.jpgIMG_1030.jpgIMG_1025.jpegIMG_1026.jpeg
 

Attachments

  • IMG_1031.jpg
    IMG_1031.jpg
    2.6 MB · Views: 135
And here are images from the build in leocad. Again, this will differ from the real build as mentioned in the original post. In addition to the sensor grid, the hinge on the prototype (note there is only one) was used in cad build as well. However, these exact hinges weren't available so there will be similar hinges that use a 2x3 plate rather than a 2x4.

In the prototype, the graphic was cut to accommodate the interlocks, but I am thinking of cutting these off so the decal can remain intact. We'll see.

I plan to swing by the LEGO store to see if there are some better options for the sensor grid on their pick-a-brick wall, but I have never been so not sure how extensive the library is.

Untitled.jpgUntitled 2.jpgUntitled 3.jpgUntitled 4.jpgLego Tricorder.png
 
Update - The LEGO store had a very limited selection from the brick wall so that was a bust. But, I found a reasonably priced pack of translucent LEGO bricks on eBay, so hopefully that'll have what I need to make the sensor grid look better.

Now I'm just waiting for all the parts to come in so I can assemble. I did think of a better way to possible build the hinge area using the parts I already ordered, but I would only have enough for one build. I don't want to order more parts from LEGO to avoid the service fee. I'll see how I feel about it when I do the build up. I definitely have enough for one as designed and one with the modifications.
 
All of the pieces came in and I have completed the 3 builds and one test decal applications.

I did run into a significant issue along the way with the hinges. I assumed the hinge was similar to the one used in the prototype, but it turned out to be significantly different. I had to cannibalize parts from one to make 2 good versions. I supplemented with as many gray parts as I had let in my on stash and then used other colors in areas that would be hidden.

The decals printed fine but are prone to easily rubbing off, so I will add clear packing tape to seal them before cutting them out and applying.

When I built the top sensors, I did try it with the solid LEGOs first to see how I felt, but I was unhappy. So I spent a bit of time creating a bunch of different versions before settling on the finals. I did not have enough of everything to make 3 identical versions, but the variation is okay with me. Different Tricorders for different functions.

Still up is to apply the final decals. Note the screen in the test one is upside down. I may leave it. a.jpgasas.jpgasasasas.jpgdfbsdfbsdfb.jpgerfqrf.jpgfbdffdb.jpgqr.jpgqwr.jpgs.jpgsaasasasas.jpgsdfbbb.jpgvqrrv.jpgweew.jpgwfwfe.jpg
 
Last edited:
All finished. The packing tape worked really well. I used an exact-o knife mostly. This was fun. I also replaced the paper on the original with the decals since I had a bunch of extra. Enjoy.
 

Attachments

  • B0734A0A-BF4B-4655-937E-4672D17E0411.jpeg
    B0734A0A-BF4B-4655-937E-4672D17E0411.jpeg
    1.4 MB · Views: 57
  • 30D240E7-1D20-4D67-8C8F-55FB4D9EE153.jpeg
    30D240E7-1D20-4D67-8C8F-55FB4D9EE153.jpeg
    1.5 MB · Views: 63
  • 887B223A-0372-47ED-80E9-A1367AE74D3C.jpeg
    887B223A-0372-47ED-80E9-A1367AE74D3C.jpeg
    1.8 MB · Views: 49
  • 2CC3F98B-E1E1-4069-9F38-21CD5DDD55B3.jpeg
    2CC3F98B-E1E1-4069-9F38-21CD5DDD55B3.jpeg
    1.5 MB · Views: 55
  • 758D31EB-2351-4DC7-9619-4CA39D4062B6.jpeg
    758D31EB-2351-4DC7-9619-4CA39D4062B6.jpeg
    1.6 MB · Views: 54
  • IMG_1165.MOV
    20.3 MB

Your message may be considered spam for the following reasons:

If you wish to reply despite these issues, check the box below before replying.
Be aware that malicious compliance may result in more severe penalties.
Back
Top