Jurassic world mosquito in amber - advice please

Thanks for the comments. I wouldn't mind doing a run, but am really struggling on the cranefly front. I have one in my freezer which I'll have a go with at the weekend. Also have some more accurate amber pigment on the way.

I think this is why you cooked the last fly. The fly contains liquid and when stored in the freezer is either going to be really cold or really wet and neither is good to drop into resin which sets of an exothermic reaction as it cures. Adding too much catalyst will also cook anything your wanting to embed as well. Placing the fly in the raw resin (regardless if it equal parts or a catalyst additive) will keep the air off it and "preserve" it at room temperature.

When you are ready to add the resin soaked fly to the prop, there will be enough contact with mixed resin to cure it. Even if it didn't cure, it is now 100% enclosed by cured resin and will be fully preserved.
 
Thanks for the advice, that sounds like a plan. I am a bit worried about the crane flies legs dropping off when transferring it into the resin. Will give it a go the next crane fly I come across. Will try and post some pics of the latest attempt tomorrow.
 
I'd mix a small amount of tinted resin to have on hand as well for when you find it. That way you can drop is straight in and let is soak up the resin.
 
Hey, I'm using East Coast water clear polyester casting resin with castin' craft amber tint.
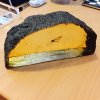
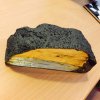
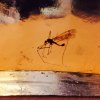
Here are the pictures I promised of the latest go. I got the cranefly spot on, managed to work out how to pour in layers in the right proportions, but didn't add enough pigment. Did a small test but it turns out the more resin, and presumably more heat generated, the lighter the colour. The new castin' craft pigment gives a lovely light brown/orange colour, and is more natural looking than the previous pigment.
I've sculpted and started moulding a more accurate version which I should get done by the end of the week. I continue to hope and keep a eye out for more crane flies.
ImageUploadedByTapatalk1432475604.250714.jpg
ImageUploadedByTapatalk1432475620.139922.jpg
ImageUploadedByTapatalk1432475641.681895.jpg
ImageUploadedByTapatalk1432475653.619787.jpg
 
Latest crane fly victim. This was a big fella and turn out pretty well. Would love a circular sander and a buffing wheel to get these super smooth, but they'll do. Have put some of the others up on eBay if anyone wants a bargain.

ImageUploadedByTapatalk1434888714.010120.jpg
ImageUploadedByTapatalk1434888723.412677.jpg
ImageUploadedByTapatalk1434888732.453063.jpg
ImageUploadedByTapatalk1434888742.039016.jpg
ImageUploadedByTapatalk1434888751.858201.jpg
ImageUploadedByTapatalk1434888764.733736.jpg
 
That one looks really good.

You local auto parts store may have buffing and polishing compounds...

The first thing I thought of was wet sanding with 2000 grit sandpaper, but I'm sure that's too rough to give you a nice glossy surface.


-MJ
 
Have you been sanding the faces of the cast any? If not, you should.

The resin you're using (polyester) is a layering resin, meaning it cures in layers. What I do is pour a cast, let it cure for around a week, then sand through the outer (not fully cured) layer, exposing a cured layer underneath. When I'm speaking of layers, they are very thin, it doesn't take much. I start with and use 240 (wet sanding) until it is no longer tacky, then work my way up to 2000 (240, 400, 600, 800, 1000, 1200, 1500, 2000). After the 2000, it will be very hazy, but you go over it with some polishing compound (I use Meguiar's M105 and M205) and it becomes perfectly clear. You don't need anything powered to sand/polish these, in fact that might create too much heat, doing it by hand is sufficient. Use a rubber block sanding pad and put your paper on there.

As for the heat of the cast, you can control that by using less hardener. I buy syringes and needles (largest gauge I can find) at Tractor Supply (any place that sells livestock supplies should have them). They allow you to just draw the hardener from the bottle and get a more precise measurement. Once you know exactly how many cc's you need it's very simple to get the same amount every time. It will eventually eat away at the rubber stopper in the syringe, so use it for a few cast (if done on the same day), then trash it. The syringes are pretty cheap, 25 or 50 cents a piece, the needle can be reused quite a bit more.
 
Could you elaborate a little more on how you're pouring these and how you position the crane flies in the resin? I imagine it's fairly thin layers and you lay the fly on its side?
 
Have you been sanding the faces of the cast any? If not, you should.

The resin you're using (polyester) is a layering resin, meaning it cures in layers. What I do is pour a cast, let it cure for around a week, then sand through the outer (not fully cured) layer, exposing a cured layer underneath. When I'm speaking of layers, they are very thin, it doesn't take much. I start with and use 240 (wet sanding) until it is no longer tacky, then work my way up to 2000 (240, 400, 600, 800, 1000, 1200, 1500, 2000). After the 2000, it will be very hazy, but you go over it with some polishing compound (I use Meguiar's M105 and M205) and it becomes perfectly clear. You don't need anything powered to sand/polish these, in fact that might create too much heat, doing it by hand is sufficient. Use a rubber block sanding pad and put your paper on there.

As for the heat of the cast, you can control that by using less hardener. I buy syringes and needles (largest gauge I can find) at Tractor Supply (any place that sells livestock supplies should have them). They allow you to just draw the hardener from the bottle and get a more precise measurement. Once you know exactly how many cc's you need it's very simple to get the same amount every time. It will eventually eat away at the rubber stopper in the syringe, so use it for a few cast (if done on the same day), then trash it. The syringes are pretty cheap, 25 or 50 cents a piece, the needle can be reused quite a bit more.

Thanks very much for the advice. I'm going to go get some sand paper at the weekend. I picked up some turtle wax polishing compound this evening and did a little test with the sandpaper that I had. It worked pretty well so going to attempt it on the better ones.

As for the casting, I mix three volumes of resin with the pigment up at the same time to get a consistent colour. The first batch, which is roughly half the total volume of the cast, 150ml, is poured and left to harden. The second pour of 50ml contains the insect, placed carefully about half way through the pour. The insect will move around slightly so you have to be careful. Then the final pour of 100ml goes on top after the second layer has set. Hope that helps.

I'll keep updating until I'm completely happy with one. I've got one in the freezer that somebody at work brought me - yes, it is becoming an obsession!
 
You might be doing this already and I misread, but an easy way to get consistant color for each batch is mix a single batch in a larger container, then seperate it into the other containers. You would add the hardner to each of the 3 other containers.

As for the bug moving, I pour one half and let it start to cure (never timed it, I just move the mold until I can tell it's starting to gel). When it first starts to gel, I place the bug. Placing it too early and it will sink through the resin, placing it too late and it will just sit on top of the resin and can move when you do the final pour. Just trial and error, getting a feel for it. The good thing is, the resin you're using is slower curing (unless you overdo the hardner), so the window to work it isn't too tight.
 
Thanks for the advice again, you know I never even thought about mixing one large batch and separating before I added the catalyst. Doh!

The sanding and buffing advice really spurred me on to having a go, and it paid off.....

ImageUploadedByTapatalk1435319141.661538.jpg
ImageUploadedByTapatalk1435319154.449138.jpg
ImageUploadedByTapatalk1435319165.621315.jpg
ImageUploadedByTapatalk1435319177.927822.jpg
ImageUploadedByTapatalk1435319191.833846.jpg
ImageUploadedByTapatalk1435319203.773636.jpg
ImageUploadedByTapatalk1435319216.068218.jpg
ImageUploadedByTapatalk1435319225.003935.jpg

Not perfect but getting there. I managed to get this far with normal grades of sandpaper (no wet sanding), because that's all I had, and some scratch remover from halfords (t-cut).
 
Very nice! Your crane fly obsession seems to be yielding some impressive results. I especially like the "crust" effect you have going, it looks very convincing. While I've yet to see the new movie, the amber piece from the original always fascinated me. This looks like the kind of thing Hammond would be delighted to have to hold down his most important papers!
 
Back
Top