Unlimited Run Iron Giant Bolt/Screw kit w/ electronic light and sound

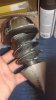
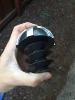
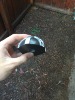
What color did you go with for the underside? I'm always torn when doing a two tone paint job whether to make the underside the color of the scallops (darker) or the cage (lighter).


I went with the darker color on the underside. Here's a few pictures:

IMG_6698_zpsjnancnkn.jpg


FullSizeRender-4_zps7pctwm3w.jpg


I found the clip that shows the screw from the underside, and I feel like my colors are pretty "screen accurate". :)


Screen%20Shot%202016-06-10%20at%209.04.55%20AM_zpst02rvie5.png


Attachments

  • FullSizeRender-4_zps7pctwm3w.jpg
    FullSizeRender-4_zps7pctwm3w.jpg
    130.3 KB · Views: 112
  • FullSizeRender-4_zps7pctwm3w.jpg
    FullSizeRender-4_zps7pctwm3w.jpg
    130.3 KB · Views: 118
  • FullSizeRender-4_zps7pctwm3w.jpg
    FullSizeRender-4_zps7pctwm3w.jpg
    130.3 KB · Views: 121
  • IMG_6698_zpsjnancnkn.jpg
    IMG_6698_zpsjnancnkn.jpg
    200.8 KB · Views: 119
  • IMG_6698_zpsjnancnkn.jpg
    IMG_6698_zpsjnancnkn.jpg
    200.8 KB · Views: 114
  • IMG_6698_zpsjnancnkn.jpg
    IMG_6698_zpsjnancnkn.jpg
    200.8 KB · Views: 116
  • IMG_6698_zpsjnancnkn.jpg
    IMG_6698_zpsjnancnkn.jpg
    200.8 KB · Views: 114
  • FullSizeRender-4_zps7pctwm3w.jpg
    FullSizeRender-4_zps7pctwm3w.jpg
    130.3 KB · Views: 121
  • Screen%20Shot%202016-06-10%20at%209.04.55%20AM_zpst02rvie5.png
    Screen%20Shot%202016-06-10%20at%209.04.55%20AM_zpst02rvie5.png
    165.2 KB · Views: 145
  • Screen%20Shot%202016-06-10%20at%209.04.55%20AM_zpst02rvie5.png
    Screen%20Shot%202016-06-10%20at%209.04.55%20AM_zpst02rvie5.png
    165.2 KB · Views: 128
  • Screen%20Shot%202016-06-10%20at%209.04.55%20AM_zpst02rvie5.png
    Screen%20Shot%202016-06-10%20at%209.04.55%20AM_zpst02rvie5.png
    165.2 KB · Views: 127
  • Screen%20Shot%202016-06-10%20at%209.04.55%20AM_zpst02rvie5.png
    Screen%20Shot%202016-06-10%20at%209.04.55%20AM_zpst02rvie5.png
    165.2 KB · Views: 133
Last edited by a moderator:
Rec'd mine yesterday looks awesome, it's beautifulifully casted few, if bumps to fix nothing putty and sanding can't accomplish, Can't wait to start this project. You really did an amazing job justice19423. I do have one question and this is for anyone how well does the board and electronics fit I'm scared of tearing apart one of the pre soldered joints, I tried test fitting it and we'll it was difficult. Once again awesome job, really love this kit. Will be posting pictures soon just trying to figure out the paint job I want.
 
Rec'd mine yesterday looks awesome, it's beautifulifully casted few, if bumps to fix nothing putty and sanding can't accomplish, Can't wait to start this project. You really did an amazing job justice19423. I do have one question and this is for anyone how well does the board and electronics fit I'm scared of tearing apart one of the pre soldered joints, I tried test fitting it and we'll it was difficult. Once again awesome job, really love this kit. Will be posting pictures soon just trying to figure out the paint job I want.


It is a tight fit but I've done it a few times, it does fit. Just take your time and don't glue and pieces in place until its all where you want it to be.
 
Normally I just lurk here, but just letting you know that I also received my kit this Saturday!
The casts look great and fit together really well. Planning on picking up some paints this week.Haven't decided on if I want to do a metallic "realistic" look or cartoon look yet.
Decided to already do the soldering part, and it works beautifully. I didn't have a lot of cable available to me unfortunately but I made it work with what I had.
KROFkUY.jpg
 
Normally I just lurk here, but just letting you know that I also received my kit this Saturday!
The casts look great and fit together really well. Planning on picking up some paints this week.Haven't decided on if I want to do a metallic "realistic" look or cartoon look yet.
Decided to already do the soldering part, and it works beautifully. I didn't have a lot of cable available to me unfortunately but I made it work with what I had.
View attachment 634563


Looks good. Thanks for posting photos

A couple notes for others...
It looks like you have a bit of Kapton film under there. Is that right? If so, did you cut that from the supplied kapton? The entire piece kapton is meant to be used to line the pipe and keep the electronics isolated.

If you need another piece, please let me know.

I opt not to shrink tube the LED leads as it can make them hard to thread into the LED holes. Cutting the leads short and making sure to get a complete solder joint should be plenty of protection against shorting.

It can make things easier if you connect the wires to the back of the board. This will give you more room when sliding the board into place.

Lastly, the electronics use very little current. Don't be afraid to use the thinnest wire you can find.


Just to be clear, this assembly looks fine and totally usable. Just wanted to add some notes for anyone else.
 
I'm trying to decide on the best steps for assembly....

-glue kapton film inside copper tube
-slide pre-soldered board in with LEDs first and speaker on the same end as the button?
-Fit LEDs into the cap?
 
I'm trying to decide on the best steps for assembly....

-glue kapton film inside copper tube
-slide pre-soldered board in with LEDs first and speaker on the same end as the button?
-Fit LEDs into the cap?

Sounds like the right order to me.

I usually thread the LEDs into their holes and pull them out the other end as I slide the board into place. This keeps the wires out of the way as you position everything.
 
As for your notes, thank you very much. Some answers.
The wire is that thick cause it was what I still had on hand, and my closest hardware store is about 1.5 hours away (read im impatient) I would definitely advice thinner cabling of you have it.

The kapton is small thin tape supplied by myself, I still have your piece no worries. The reason it's on there is because I was using some metal washers to keep it up while soldering.


Dry fitting the lds with shrink seems to fit (honestly didn't think about this) but if it becomes a problem I'll remove it.

I was actually surprised by the loudness of the speaker btw. Great stuff.


Cool. I think I'm paranoid of people not understanding the kit. ha ha

Yeah, the speaker was a good find. I tested a lot of them and I was shocked at how much better that one was than all the others. Including some far more expensive components.
 
Okay here we go.... I haven't painted or done any model making in years but I figured this would be a great way to get back into it. I wanted to paint my bolt like "I" was the kid and I kept this bolt my entire life and am now passing it along. Was shooting for an old/rusted look, like its been moved around and sitting in my tool chest or something for sometime. Let me know what you think....I know it needs prob some more sanding and a bit more color but its a start.
20160614_160723.jpg
 

Attachments

  • 20160614_160755.jpg
    20160614_160755.jpg
    468.8 KB · Views: 197
Last edited:
I like the worn look, might go a similar route. I have already decided to not do a "cartoon" paint scheme. Primed mine yesterday.
I also redid the wires with thinner ones (learn from my impatience) had to cram a little too much in the copper tube, and if I have to one day replace the batteries this will save me some hassle.
 
Hello Justice91423. Received my kit today and everything looks great! Thanks very much for it. I think my son will enjoy making it. Best regards.
Kevin Kibbe
 
Just got everything soldered last night. I still need to trim the LED's down, but almost ready to assemble. I decided to go with the "traditional" light pattern (all lights blink at once). The wife said she liked it more, and thought it should be screen-accurate. :$

 
Last edited by a moderator:
Hello Justice91423. Received my kit today and everything looks great! Thanks very much for it. I think my son will enjoy making it. Best regards.
Kevin Kibbe

Thanks for all your help.

Kevin designed the PCB, everyone

- - - Updated - - -

Okay here we go.... I haven't painted or done any model making in years but I figured this would be a great way to get back into it. I wanted to paint my bolt like "I" was the kid and I kept this bolt my entire life and am now passing it along. Was shooting for an old/rusted look, like its been moved around and sitting in my tool chest or something for sometime. Let me know what you think....I know it needs prob some more sanding and a bit more color but its a start.
View attachment 635071

LOVE IT!
 
Back
Top