Hunk a Junk's Mando N-1 Hasbro toy conversion build log

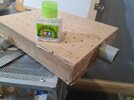
As you can see the box is a bit rough around the edges like the N1,but it does what it's supposed to:) extra thin for size reference.
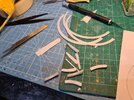
I use the Cricut 'maker'. Its a bit of a learning curve but with your CAD talent it shouldn't be a problem.
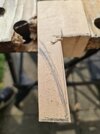
Recylcled UPVC window parts, milliput and masking tape for Mandos seat.
The Tubonic is waste UPVC and stretched sprue (The cost of living in the UK has turned use into Jawa like scavengers)
Seat.jpg
turbonic venturi.JPG
 

Attachments

  • vacform box.jpg
    vacform box.jpg
    2.2 MB · Views: 126
  • Rib segments.jpg
    Rib segments.jpg
    2.7 MB · Views: 129
  • canopy.jpg
    canopy.jpg
    956.8 KB · Views: 135
  • ribs going in.jpg
    ribs going in.jpg
    896.4 KB · Views: 140
Hi, The cutter cuts styrene easy ,which is the main material I used for the the exposed ribs, I'd say it cuts anything up 1mm or so any thicker and you can finish off with a xato. Theres a bit of trial and error built into using a cutter but it saves time. The toy's canopy is to big and is quite thick, so I made a Vacform buck for it and also one for Grogu's bubble.
I made my own vacform box, its not that hard if you have time and you can use your oven or grill to heat the plastic. I'm using clear acetate.
Careful when using the oven; hopefully, it's not the one you use to cook foodo_O:oops: Small baking oven are the one used to vacu-form small parts and you can find them, for cheap, in any Salvation Army or second hand stores. If you don't have one, you can always use a heat gun (with gloves on)to shape your plastic on the buck.
 
I have a hotplate that I use for annealing photo etch. I could probably use that to heat the plastic. I think it's time to start building a vacuform!

Great pictures Accent Art! Some old school craftsmanship!
 
I did a quick test print of the cockpit. I learned a couple of things. First, I learned the canopy bubble on the toy is probably not usable because it's the wrong shape. I could try to compromise and make it good enough, or I could make it more accurate and use it as an excuse to build a vacuform. So vacuform it is! Second, I can see a lot of the smaller details will be lost, so I'll likely remove them to make it easier to just add fiber optics for control lights. The detail is still good and I think it should be even better on the final print.
IMG_0497.jpg
IMG_0495.jpg
IMG_0498.jpg
 
After a few tests and tweaks, I think I have the final prints for the Turbonic Venturi Power Assimilator and the open machine bay it sits on. I had to enlarge and enhance a few details, but I'm pretty happy with the results.
IMG_0528.jpg
IMG_0529.jpg
IMG_0531.jpg
IMG_0538.jpg
IMG_0543.jpg
IMG_0548.jpg
IMG_0550.jpg
IMG_0552.jpg


I'll airbrush on some primer and some back tonight (being carefully not to fill those tiny holes and openings) before starting in with the silver and gray drybrushing. Now that this section is done, I'll focus on the cockpit.

Thanks for looking!
 
Good stuff with the cockpit, not sure if you know there's a small dial display stuffed into the left hand side of the console near the hand toggle.Its set at a 45 degree angle as well, you see it when the scurrier pops its head out of the binnacle and when Mando's on his test flight. I don't think Anakin's cockpit had this, must be Peli Motto's handywork.
cockpit 8.JPG
new dial.JPG
 
Good stuff with the cockpit, not sure if you know there's a small dial display stuffed into the left hand side of the console near the hand toggle.Its set at a 45 degree angle as well, you see it when the scurrier pops its head out of the binnacle and when Mando's on his test flight. I don't think Anakin's cockpit had this, must be Peli Motto's handywork.
View attachment 1561491View attachment 1561492

I did not see that! Good catch. I'm doing a cockpit test print right now, so I'll make sure to add it for the final. I decided to see if I can make the toy's clear canopy work after all. I've been sanding it to try to get a pointier shape and I think I may get it close enough to be acceptable.
 
I did not see that! Good catch. I'm doing a cockpit test print right now, so I'll make sure to add it for the final. I decided to see if I can make the toy's clear canopy work after all. I've been sanding it to try to get a pointier shape and I think I may get it close enough to be acceptable.
If it doesn't work I'll run you off a vacuform copy of canopy and bubble from my master, DM me postage details on Insta : Login • Instagram if you like.
Vacfrm canopies.jpg
 
If it doesn't work I'll run you off a vacuform copy of canopy and bubble from my master, DM me postage details on Insta : Login • Instagram if you like.
View attachment 1561511

Oooh that's tempting... :p I need to get the dome for Grogu's rumble seat too. Does your canopy have the slight rise toward the back above Mando's head? That's something I can't quite achieve sanding the toy canopy and I'm trying to decide if it's something I can't live without. I may still force myself to make my own vacuform since I've always wanted one, but I'm going to need to ponder this...
canopy.jpg
 
Oooh that's tempting... :p I need to get the dome for Grogu's rumble seat too. Does your canopy have the slight rise toward the back above Mando's head? That's something I can't quite achieve sanding the toy canopy and I'm trying to decide if it's something I can't live without. I may still force myself to make my own vacuform since I've always wanted one, but I'm going to need to ponder this...View attachment 1561521
I wasn't conscious of this when fabricating the canopy buck but I think it looks like its there ?
20220331_152157.jpg

20220331_152202.jpg
 
Thanks, sir! Added the pipes to the back. The reference photos I have for the back aren't as clear, so I'll need to sit and pause through the episodes on my big screen to see if I can pick out some more details. Then again, once printed this thing will be approx. 2cm by 2 cm, so it may not matter.
View attachment 1558664View attachment 1558665View attachment 1558666View attachment 1558667
I have the same desire to have the .stl files if you make them available...I am ***** on Tinkercad...and it's not for the lack of trying!!!
 

Your message may be considered spam for the following reasons:

If you wish to reply despite these issues, check the box below before replying.
Be aware that malicious compliance may result in more severe penalties.
Back
Top