Harry Potter trunk canvas and paint

Nowonder

Well-Known Member
Hi people,
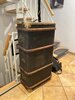
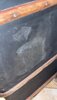
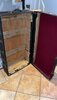
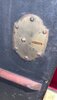
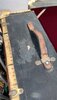
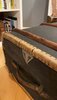
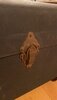
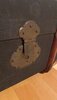
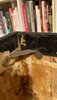
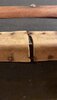
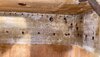
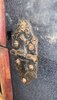
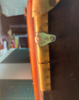
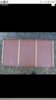
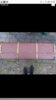
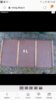
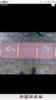
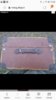
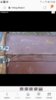
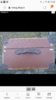
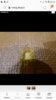
I happen to have just bought a bentwood steamer trunk that I would like to customize and make look like a Hogwarts trunk. Matter is it happens to have a couple of holes in the canvas. I've seen a lot of threads here on these strunks, so I was wondering what might be the best approach to fix these holes... maybe remove the whole canvas in the section and replace it? If so, what techniques do you suggest? What materials (solvent to melt the glue, new canvas, type of paint)? Any suggestion appreciated
 

Attachments

  • Screenshot_20181204-193712_Samsung Internet.jpg
    Screenshot_20181204-193712_Samsung Internet.jpg
    536.6 KB · Views: 299
  • Screenshot_20181204-193733_Samsung Internet.jpg
    Screenshot_20181204-193733_Samsung Internet.jpg
    619.7 KB · Views: 294
  • Screenshot_20181204-193544_Samsung Internet.jpg
    Screenshot_20181204-193544_Samsung Internet.jpg
    656.8 KB · Views: 277
  • Screenshot_20181204-193650_Samsung Internet.jpg
    Screenshot_20181204-193650_Samsung Internet.jpg
    636.2 KB · Views: 280
  • Screenshot_20181204-193928_Samsung Internet.jpg
    Screenshot_20181204-193928_Samsung Internet.jpg
    648.7 KB · Views: 286
  • Screenshot_20181204-193837_Samsung Internet.jpg
    Screenshot_20181204-193837_Samsung Internet.jpg
    599.5 KB · Views: 303
  • Screenshot_20181204-193906_Samsung Internet.jpg
    Screenshot_20181204-193906_Samsung Internet.jpg
    644 KB · Views: 283
  • Screenshot_20181204-201552_Samsung Internet.jpg
    Screenshot_20181204-201552_Samsung Internet.jpg
    716.7 KB · Views: 310
  • Screenshot_20181204-201528_Samsung Internet.jpg
    Screenshot_20181204-201528_Samsung Internet.jpg
    613.1 KB · Views: 288
Instead of replacing the canvas, I would reseal the canvas with some matte ModPodge and then paint over it with brown paint. That is what I'm doing with mine.
 
Hello everyone. I've been lucky enough to make a bargain on ebay for an old travel trunk which I'd like to restore as some kind of "Corona-Activity" during lockdown. It's partially damaged on the surface (I reckon some old labels must have been ripped of there harshly, causing the damage). So my first question to you all would be, if any of you has an idea of how to "fill" up these damages in order to create an even surface. I have thought of some organic PVA (Planatol) mixed with paint and perhaps some sawdust / woodshavings or crushes plastic pearls to create a similar texture. The middle area on the top will get a the Hogwarts Coat of Arms and my initials gilded on either sides, so the main purpose of filling up the damaged areas is to get an even surface. Apart from that I'd like to replace the leather edge protectors with some new leather and replace the old rusty nails with new brass ones. The problem is, that in order to replace the broken leather pieces from the edges and corners, I would need to remove the brass elements which unfortunately are all riveted onto the trunk. Any ideas on how to remove them + reassembling it to the trunk? Where would I get such rivets from? Last but not least, I've already started cleaning the rust of the hinges and locks with a Dremel, which works beautifully. If you've got any ideas and advise on how to best remove the rust / treat the brass elements and in general how to best clean the trunk without damaging anything, I'd be much obligated. Oh an the inside... The previous owner has dreadfully glued in some self adhesive velvet vinyl. I'd like to refurbish the interior with some traditional old fabric (they usually used striped ones as far as I'm concerned). Any ideas on where to get that stuff from? Thank you all so much. As you can tell, it's my first refurbishing project, so any ideas will be much appreciated. As a designer who's trained and skilled in bookbinding, I've luckily got all the tools necessary for most of it, still refurbishing is another level. Thank you all very much!

In some of the pictures you can see a before and after on some of the brass elements, which I've started to de-rust with the dremel.
 

Attachments

  • 610CC7E1-1D7A-4C9B-A5E2-CB55215A567F_1_201_a.jpeg
    610CC7E1-1D7A-4C9B-A5E2-CB55215A567F_1_201_a.jpeg
    2.6 MB · Views: 198
  • BD55EC3F-B625-45DC-879E-2A312DE77472.jpeg
    BD55EC3F-B625-45DC-879E-2A312DE77472.jpeg
    1.2 MB · Views: 202
  • 134CB3F6-593C-484C-B6C4-D85A15C0BFBF.jpeg
    134CB3F6-593C-484C-B6C4-D85A15C0BFBF.jpeg
    1.1 MB · Views: 193
  • 7D4507B4-C235-440A-A2D7-61B08594EFBF.jpeg
    7D4507B4-C235-440A-A2D7-61B08594EFBF.jpeg
    1.4 MB · Views: 196
  • FFE0094A-BB0F-4270-BF78-23DBD9BADF8C.jpeg
    FFE0094A-BB0F-4270-BF78-23DBD9BADF8C.jpeg
    1.2 MB · Views: 204
  • E8F7F552-7DA7-4A99-A9A0-3D8A08722F97.jpeg
    E8F7F552-7DA7-4A99-A9A0-3D8A08722F97.jpeg
    1.4 MB · Views: 211
  • DE74D8CA-7225-4A64-8E35-2E9885D158E2.jpeg
    DE74D8CA-7225-4A64-8E35-2E9885D158E2.jpeg
    1.4 MB · Views: 202
  • 27252F7B-7A94-4D18-832B-F759916F71B8.jpeg
    27252F7B-7A94-4D18-832B-F759916F71B8.jpeg
    1.3 MB · Views: 201
  • DBBD3818-438C-4430-8A27-714FBB200FD9.jpeg
    DBBD3818-438C-4430-8A27-714FBB200FD9.jpeg
    1.2 MB · Views: 206
  • 8E0B2936-079F-4987-A00D-1C6973EC2D97.jpeg
    8E0B2936-079F-4987-A00D-1C6973EC2D97.jpeg
    1.3 MB · Views: 193
  • F2FE6586-0D10-495B-84BF-05C6BA2C1C97.jpeg
    F2FE6586-0D10-495B-84BF-05C6BA2C1C97.jpeg
    1.5 MB · Views: 202
  • 322C4C76-C4B0-4231-AC14-856B91503A8C.jpeg
    322C4C76-C4B0-4231-AC14-856B91503A8C.jpeg
    2 MB · Views: 202
  • 1A87EBAF-DD72-4386-AF38-3A7300810843.jpeg
    1A87EBAF-DD72-4386-AF38-3A7300810843.jpeg
    1.7 MB · Views: 191
  • A7158ACE-4283-497A-957A-F30F25C74844.jpeg
    A7158ACE-4283-497A-957A-F30F25C74844.jpeg
    1.4 MB · Views: 204
  • B70F470D-96DB-4EAE-B65F-EA40FAABE70D.jpeg
    B70F470D-96DB-4EAE-B65F-EA40FAABE70D.jpeg
    1.3 MB · Views: 191
  • F1B2A2F9-2296-4FB3-B93B-DFD16FE4ACFA.jpeg
    F1B2A2F9-2296-4FB3-B93B-DFD16FE4ACFA.jpeg
    1.5 MB · Views: 195
  • D04C7C87-BF1D-4B89-A649-F269DE983DE0.jpeg
    D04C7C87-BF1D-4B89-A649-F269DE983DE0.jpeg
    1.5 MB · Views: 204
  • 1C3E3DF2-6B20-498A-A03A-81C99FDFC618.jpeg
    1C3E3DF2-6B20-498A-A03A-81C99FDFC618.jpeg
    1.5 MB · Views: 186
  • CD713D21-C569-4A8F-9B9B-3CC16AD9D82B.jpeg
    CD713D21-C569-4A8F-9B9B-3CC16AD9D82B.jpeg
    1.5 MB · Views: 198
  • 1F7A15F3-A292-4C0C-91ED-F4DF95BE182B.jpeg
    1F7A15F3-A292-4C0C-91ED-F4DF95BE182B.jpeg
    1.7 MB · Views: 203
  • 0C408D25-F78F-4E4C-B404-AE71FDDC9141.jpeg
    0C408D25-F78F-4E4C-B404-AE71FDDC9141.jpeg
    2.2 MB · Views: 199
  • Screenshot 2020-05-02 at 13.32.02.png
    Screenshot 2020-05-02 at 13.32.02.png
    4.4 MB · Views: 190
  • Screenshot 2020-05-02 at 13.31.37.png
    Screenshot 2020-05-02 at 13.31.37.png
    2.1 MB · Views: 210
  • Screenshot 2020-05-02 at 13.31.33.png
    Screenshot 2020-05-02 at 13.31.33.png
    2.1 MB · Views: 192
Here are some reference Photos. Btw. any ideas on how to make High Res Screenshots of iTunes Movies or a digitalised blue-ray file?
 

Attachments

  • IMG_5642.jpeg
    IMG_5642.jpeg
    8.5 MB · Views: 227
  • IMG_5643.jpeg
    IMG_5643.jpeg
    8.6 MB · Views: 193
  • IMG_5644.jpeg
    IMG_5644.jpeg
    10 MB · Views: 202
  • IMG_5645.jpeg
    IMG_5645.jpeg
    7.1 MB · Views: 197
  • IMG_5646.jpeg
    IMG_5646.jpeg
    7.3 MB · Views: 195
  • IMG_5647.jpeg
    IMG_5647.jpeg
    7.7 MB · Views: 212
  • IMG_5648.jpeg
    IMG_5648.jpeg
    9.4 MB · Views: 200
  • 0CE0D567-61ED-42FD-B43E-198DD8DB0E36.jpeg
    0CE0D567-61ED-42FD-B43E-198DD8DB0E36.jpeg
    176.9 KB · Views: 208
Any updates on the trunk?

I've done some rust removal as part of home repair. I used "Calcium Lime Rust" (sold as CLR) but you'd have to be careful. It eats rust right up and, if your piece is rusted all the way through, you will end up with a hole! I don't know if there is a more elegant solution for exacting restoration work. I've had success with Brasso to polish parts after you finish the rough work with a Dremel.

Did you figure anything out the rivets? They are by design very difficult to remove. They can be a pain and (unless someone has a way I've never used) require destructive removal techniques. You typically have to drill them to separate the shaft from the head. Then you'd need to replace them with something similar. Are the only rivets you plan to remove the ones that that ride overtop of the leather you want to replace?
 
Back
Top