skeplin
New Member
Hello friends!
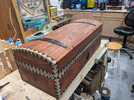
Many months ago I received a request from a friend of a friend to build a replica of a Quidditch Trunk from Harry Potter. After doing some research and taking some stills from the movie, I found a stellar post by Monkey540 with progress and plans. This thread highlights my progress and lessons learned along the way. I'll start with the finished shots -- I'm quite pleased with the result.


First things first, I worked from these movie stills. I used Adam Savage's technique of scaling to estimate the size of the box according to the characters as they appeared on screen.


With sizes in mind, I turned to Monkey540's plans and started selecting materials. I decided to use pine as it's easier to work with and has a more "worn" look to it when stained and sanded. I had a friend 3D print a full sized quaffle (in one go on his super-sized printer) so I could test the layout. One thing to note is I'm pretty sure they propped up the quaffle in that open-lid shot. There's no way it would have find in there with the lid closed the way it's presented..


With the sizes right, I set to gluing the base together and setting in the supports for the "shelf".


More to come as I organize my pictures!
Many months ago I received a request from a friend of a friend to build a replica of a Quidditch Trunk from Harry Potter. After doing some research and taking some stills from the movie, I found a stellar post by Monkey540 with progress and plans. This thread highlights my progress and lessons learned along the way. I'll start with the finished shots -- I'm quite pleased with the result.
First things first, I worked from these movie stills. I used Adam Savage's technique of scaling to estimate the size of the box according to the characters as they appeared on screen.
With sizes in mind, I turned to Monkey540's plans and started selecting materials. I decided to use pine as it's easier to work with and has a more "worn" look to it when stained and sanded. I had a friend 3D print a full sized quaffle (in one go on his super-sized printer) so I could test the layout. One thing to note is I'm pretty sure they propped up the quaffle in that open-lid shot. There's no way it would have find in there with the lid closed the way it's presented..
With the sizes right, I set to gluing the base together and setting in the supports for the "shelf".
More to come as I organize my pictures!

