My HP Quidditch Trunk [Completed]

Monkey540

Sr Member
Hello again,

I have been wanting to make a full quidditch trunk for some time.
I have noticed from other builds there was minimal details on actually building the box, and I wanted to give a full process as I see a lot of questions about this, as well as some things I've figured out on my own. I hope it helps anyone working on their own.

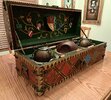
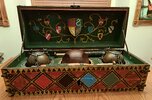
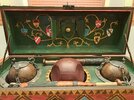
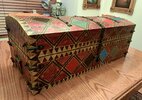
Here's a look at the completed trunk:

20230910_195326.jpg

20230911_182617.jpg

20230911_172257.jpg

20230911_182316.jpg

20230911_172225.jpg


Here's the full story

A few years ago I started by making my own beater bats, see the build here:


But then I didn't continue. Finally, last year, I entered my golden snitch in a prop replica contest here in Edmonton, and I won best Novice Maker (never won an award category)

1689904231036.png

That build thread can be found here:


This has motivated me to revisit this project and see it through to enter in this years competition.

This will be my build from (almost) scratch.

I started as I usually do, but 3D modelling the project to try and get some rough bearings on how I'm going to do this and came up with this design sized from the Universal Studios Quaffle that I own.

01.JPG

02.JPG


This is designed to have a thickness of 1" lumber so I can utilize 1" x ? whitewood to build it.

To go along with this design, I generated a technical drawing to start ordering my material.

Box.png

Lid.png


This project will involve a lot of firsts for me, but I think I'm much more prepared now than I was 5 years ago.
 

Attachments

  • 20230910_195322.jpg
    20230910_195322.jpg
    3.1 MB · Views: 77
  • 20230910_195315.jpg
    20230910_195315.jpg
    3.2 MB · Views: 63
  • 20230910_195355.jpg
    20230910_195355.jpg
    4.3 MB · Views: 64
  • 20230910_195203.jpg
    20230910_195203.jpg
    3.1 MB · Views: 61
Last edited:
June's task for me was to build the base of the box.

I started by picking up the wood I needed, and cut the pieces to size.
I picked up some styrofoam balls that I will make into bludgers, and some metal bowls from the dollar store.

After cutting the 6 pieces I needed for the box, I laid out the bowl positions to get ready to cut the holes for the balls.

20230605_202828.jpg
20230605_202844.jpg


I proceeded to drill some holes and then cut out the holes with my jigsaw:
20230605_204440.jpg
20230605_212335.jpg
20230605_212025.jpg
20230605_212305.jpg


After this dry assembly, I decided I wanted to assemble this with dowels and glue to avoid any nail heads on the outer surface.
Not having Dowel pin center points or an awl, I ended up marking the holes the hard way with tape transfer. I highly recommend just getting some center points (I did after I finished).

20230610_201456.jpg
20230610_201508.jpg
20230610_201522.jpg
20230610_201903.jpg


Eventually, I was able to fully assemble my box bottom.

20230610_140634.jpg

20230610_152130.jpg
20230610_200602.jpg

20230610_205010.jpg
20230610_205438.jpg
20230610_205516.jpg


With this dry fit complete, next step was to work on the locking mechanism.
 

Attachments

  • 20230610_201508.jpg
    20230610_201508.jpg
    1.6 MB · Views: 114
Last edited:
It was very important to me to have a functional lock on the trunk, so I gathered the materials I felt I could make work.

20230607_223236.jpg

Lock and key from Amazon

20230607_223409.jpg

Hinges, latch and catch from Lowes

And here's how I did it, I drilled two holes in the latch, installed the catch (U-piece), and slimmed one side of the locking mechanism to fit inside the gap of the catch with my rotary tool. I was very happy with this solution.

20230611_214350.jpg
20230611_214411.jpg
20230611_214510.jpg
20230611_214547.jpg
20230611_214527.jpg


After the proof of concept, I cut the holes into my box piece.

I then decided to paint the interior before assembly, as I didn't want to risk painting on the wood to be stained.

20230620_160245.jpg


It was then time to start gluing:
20230620_171649.jpg


20230620_202048.jpg

20230620_203919.jpg
20230620_204001.jpg


And the box was assembled and set to dry.
 
After the glue had dried, I found that my wood wasn't super square.

20230621_183426.jpg


So I applied some filler and sanding:
20230621_183613.jpg
20230621_194755.jpg


Now I was ready for some stain 2 coats and a clear coat later I was here:

20230624_100647.jpg


Then I filled the holes in the latch with wood putty, sanded it and painted it along with the hinges and a lid stay I picked up:

20230621_194835.jpg


And with a dry fit of the latch locked in place, I had completed my June goal, the bottom box was assembled and ready for exterior paint.
20230625_105547.jpg

20230625_105559.jpg


I noticed that the lip of the center bowl was a bit thick, so I clipped it off and smoothed it a bit with my rotary tool:
20230625_153604.jpg
20230625_155758.jpg

And then I painted the bowl a bit for now:

20230625_231144.jpg
 
Next was my July goal, to build the lid of the trunk. But I didn't have the facilities to do this. So, I went down to my local makerspace ENTS: Makerspace - Join Edmonton's Original Makerspace

I've worked at the ENTS wood shop many times in the past, and specifically when I made my beater bats so I knew I'd have access to the tools I needed. Plus the people there are great and always willing to help when you ask if they are able.

While I got my material together, I decided to take a stab at modelling the front plate and the bludger pieces for 3D printing.

The front plate was simple and I came up with this design:
1689951073635.png


After printing, I discovered that my holes were too far apart. This part of the design is very specific to the holes made for the latch and lock.

The next part was the Bludger Collar Rings. From screen grabs it's very difficult to see how the latch actually works, but from some reference I found from the Studio Tour, I was able to model up a facimile, that I'm quite happy with.

1689951219319.png


This is the first time I've modelled something with assembled parts pre-assembled. I hope it's still printable and I look forward to hearing from my printer if it's good to go.

Finally, the top part that holds in the bludgers. I decided to make all the pieces for this one look the same way as the one from the film has a piece locked into the chains, so I have 3 hooks instead of 2 hooks and a loop.

1689951384233.png


Ok, back to some building,

I went down to ENTS to do some work, after setting the table saw to 2.5 degrees I ripped the 1" x 2" pieces for the lid section.


20230719_193229.jpg
20230719_201028.jpg


20230719_203154.jpg

I discovered that I put the stop a little too close, so not much material was cut off the other side, but I don't think it will matter too much.

I used a little trick to get my sides the same, if you don't know this trick it's great to know and it really helped me. If you put masking tape on both your inside pieces, and then superglue the tape surfaces together, you will have one large block, then you can cut your shape, and when you split it apart, there is no damage to the wood and both profiles are identical:

20230719_200400.jpg
20230719_205212.jpg
20230719_205221.jpg


Next thing I did was to make a jig for holding my glued pieces together. I learned about this from a great you tube video on this subject.

20230719_221347.jpg

This is my jig, made entirely from scrap wood.

Yesterday I started the gluing process, so I stapled some end pieces on the jig so the pieces wouldn't slide off
20230720_184608.jpg


And covered the contact surfaces with masking tape so it doesn't glue to my lid pieces:
20230720_184918.jpg


I proceeded to start gluing:
20230720_185253.jpg
20230720_185609.jpg


Once all the pieces were together I strapped the pieces in shape to let the glue cure.
20230720_185938.jpg
20230720_185944.jpg
20230720_185947.jpg


20230720_185952.jpg


I'm not sure if I'll be able to make my July goal, but I'm hopeful that I will at least have it assembled by the end of July.
 
Last edited:
Fantastic work! What program did you use to design your bludger plates and collar rings? Did you print them out of PLA? Any issues with them being too brittle?
 
Fantastic work! What program did you use to design your bludger plates and collar rings? Did you print them out of PLA? Any issues with them being too brittle?

I modeled them in Solidworks. I don't have my own printer, so I'm waiting for word that they were completed. I will definitely post about it when I have them in hand. We are trying to print them in pla.

I know that my print guy was a but concerned about the support structure.
 
Yesterday I went at the lid with my sander, and got the top nice and smooth, and got the inside as close as I could.
20230723_165146.jpg


Before:
20230723_170720.jpg
20230723_170750.jpg


After:
20230723_173539.jpg

20230723_173532.jpg
20230723_173452.jpg


Ready to cut to size and begin assembly.
 
Yesterday I went in to finish up some shapes for my lid back at ENTS. I cut the lid to proper width with a crosscut sled, then I cut the long dimension to the needed size.

20230726_191437.jpg
20230726_191444.jpg
20230726_194453.jpg


I also did a small amount of scraping/plane work to the inside curve to even it out a bit and resanded.

Then I ripped the long pieces for the vertical at an approx measured angle:
20230726_195051.jpg


When this was done, I prepared more doweling and dry fit the frame of the lid.
Next up is gluing the frame and then doweling the lid in place.

20230726_212431.jpg
20230726_212421.jpg


20230726_212643.jpg
20230726_212717.jpg


It's really taking shape now.
 
Over the week/weekend, I glued the base together:
20230728_163254.jpg


Then I made a little marker piece so I could line up my dowels better on the curve.
20230728_182114.jpg
20230728_182135.jpg

20230728_191738.jpg
20230728_191752.jpg


After the glue had dried, I cut off the tops of the dowels, and sanded the whole box down.

20230729_160025.jpg


Then I cut the inset for the lid and glued that in place:
20230729_162546.jpg

20230729_181301.jpg


Then it was time for some filling and sanding again:
20230729_184009.jpg
20230729_185707.jpg


Finally time for some stain, after 2 coats I was here:
20230730_101326.jpg


After that dried a bunch, I painted the inside green:

20230730_162306.jpg
20230730_162325.jpg


Tonite and tomorrow nite I'll be doing some clear coats, and then I'll finally be ready to attach it to the bottom of the box, and finish my July goal.
 
After 2 coats of clear, I thought the lid was ready to go:

20230801_061922.jpg


Here's the initial assembly with the lock and hinge:
20230801_173615.jpg
20230801_173754.jpg
20230801_173707.jpg


Yesterday, I drilled out the rivet for the lid stays I picked up which were these:


20230527_155056.jpg


I took a stab at the bludgers, but messed them up completely, so I'll likely be modelling them how I want them.

After intalling the stays and handles, I had to take a couple of pics, here you go:

20230802_210333.jpg
20230802_210339.jpg


I have the straps, and then just painting and 3d printing stuff left, AND I'll say that I met my July goal :D
 
Been working on painting for a bit

20230806_194150.jpg
20230806_194155.jpg


20230807_161306.jpg
20230807_171436.jpg

20230807_231828.jpg
20230808_000609.jpg


20230812_222747.jpg
20230812_222757.jpg

20230812_222808.jpg


Then more detail painting:

20230813_002551.jpg
20230813_215550.jpg
20230815_061932.jpg


Almost done the lid details, picked up the metal for the straps and hopefully going to do them up this week. getting closer to the finish line :)
 
I got almost all the lid painting finished except for a bit of lining, and the teardrop feature in the corners of the diamonds.

20230815_210721.jpg


I also did some sketches for the house crest images for the colored diamonds:

House animal crests-Model-Mid Res.png

Not sure if I'm going to paint them or just get them vinyl cut.

I additionally did some sketches for the inside crests from this reference:

4833156379_96945499a6_b.jpg


Inner Crest Sketches-Model1.png
Inner Crest Sketches-Model2.png


Then I went down to ENTS again to get some work done.
I used their laser cutter to engrave the crest details on some small wood pieces:
20230816_214030.jpg
20230816_220729.jpg


I also did work on the metal strapping. I picked up some 1" x 15" 16 GA strips of sheetmetal to match the dimensions of the latch, and started working on the taper feature for the strap on the bench grinder:
20230816_195432.jpg


Then used their drill and break to drill a few holes and bend the straps to shape. The material was soft enough to bend the lid curve by hand.
20230816_210405.jpg
20230816_210431.jpg


Heres a shot of after grinding, then drilling and then forming to see the progression:

20230816_204705.jpg


After these were formed, I installed them on the box for now as a test fitting, I think they turned out great:
20230816_220613.jpg
20230816_220656.jpg
 
Wow! Fantastic work. That is really coming together.
Thank you very much. Yup it's winding down. Just a bunch more paint and the 3D printing stuff. I'm hoping a number of printing stuff will be ready for me next week. My printing guy said he'll try to make it a priority.

I also need to model my bludgers, but getting close to finishing. :D
 
After a bunch of time painting this weekend and this week, I managed to complete the exterior painting. Maybe needs some touchup and sealing and then aging but it definitely took me a good 20 hours to paint all the box part.

20230823_112317.jpg
20230823_112357.jpg


Additionally, I modelled the snitch compartment and sent the models off to be printed:
Compartment - W-Doors.JPG
Compartment - WO-Doors.JPG


And, I put together a universal half a bludger model. 2 can be connected to make a full bludger.

Bludger Half.JPG
Bludger Full.JPG
Bludger Full-Section.JPG


Going to be cutting/sanding the inside crests to size tonight, and then I'm ready to map out the inside snitch compartment piece and hopefully get the prints of my 3D parts fully printed.
 

Your message may be considered spam for the following reasons:

If you wish to reply despite these issues, check the box below before replying.
Be aware that malicious compliance may result in more severe penalties.
Back
Top