My HP Quidditch Trunk [Completed]

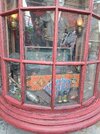
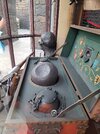
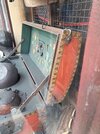
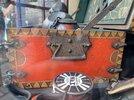
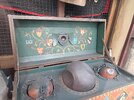
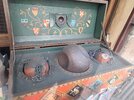
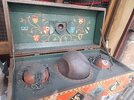
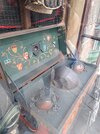
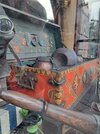
I was down at universal this past Sept/Oct, and got these pics of the quidditch set on display there. Obviously this is not the screen used version but a replica made for the park.

I have to say though, I like the direction I took for color of the box and a couple other details better and feel it better matches the movie. However, I think I may have to redo the handles for my trunk to be closer to these.
 

Attachments

  • 20230928_180140.jpg
    20230928_180140.jpg
    3.5 MB · Views: 91
  • 20230928_180245.jpg
    20230928_180245.jpg
    2.9 MB · Views: 79
  • 20230928_180233.jpg
    20230928_180233.jpg
    2.7 MB · Views: 79
  • 20230928_180228.jpg
    20230928_180228.jpg
    3.9 MB · Views: 73
  • 20230928_180217.jpg
    20230928_180217.jpg
    4.5 MB · Views: 75
  • 20230928_180215.jpg
    20230928_180215.jpg
    4.3 MB · Views: 77
  • 20230928_180213.jpg
    20230928_180213.jpg
    4.2 MB · Views: 69
  • 20230928_180207.jpg
    20230928_180207.jpg
    2.7 MB · Views: 76
  • 20230928_180201.jpg
    20230928_180201.jpg
    2.3 MB · Views: 82
I fixed one feature over the weekend by drilling some shallow holes and gluing in some rare earth magnets.

1000011415.jpg
1000011421.jpg
1000011422.jpg
1000011424.jpg


Now the snitch compartment will stay closed when opening and closing the trunk. I've been meaning to do this for awhile and happy that I was able to finish this.

Still need to work on the revised handle.
 
I got around to working on the handle design. As per the design details I could clearly see from the Universal Trunk, I sketched up the 2 pieces.

1706479323195.png


I printed my design out and mocked it up a bit on my trunk and I think it's worth trying to finish and see how it turns out.

1706479458369.png


Scaling looks decent even if the grip is a bit on the small size.

I followed a suggestion from my buddy Kokanee and placed an order from SendCutSend for the plate to be cut in 1/8" steel and the handle in 1/2" steel. I'll have to do some filing/grinding to get the handle to a round profile and then try to find a local welder to finish up the loops that hold the handle on but I'm looking forward to working on this detail.
 
This is awesome. I like how the wooden trunk is built and painted, and the mix with all different materials like metal and 3D printing!
Thank you. If I had my way it would probably all be metal and wood, but somethings are just easier to print and I don't have a full metal shop at my disposal. I don't even know how I'd make the details on the bludgers from my design.
 
So, I was able to pick up a couple of the prints the other day and did some cleanup:

View attachment 1735254View attachment 1735255

Printed in PLA, no real concern about brittleness, all features are thick enough.

Here's a closer look at the locking mechanism:

View attachment 1735256View attachment 1735257

And a look at the bludgers:
View attachment 1735258View attachment 1735259View attachment 1735260

And here's how it all fits in the trunk:

View attachment 1735261View attachment 1735262

Here is a pic of my Snitch in the snitch compartment.

View attachment 1735263

Time to do a bunch of finishing, painting, and such, down to only needing 4 more parts. Plus some hinge pins that I'm have difficulty sourcing.
hi, are the stl models available?
 
Of course, thanks for looking, I noticed a number of questions on other trunk builds so I wanted to make sure I detailed as much as possible to help anyone building their own.
Hi , awesome job, i am making my wooden trunk already and was going to model all the parts but i wanted to ask you if the stl files are available ?
 
I don't have a problem sharing some of my models for this, one model I will not be sharing is my golden snitch model.

I put it on my list to revise the bludger tops, but I haven't gotten around to finishing the revision yet.

I will post some models soon.
 
As requested, here are the STL files under my latest revisions:

THESE FILES ARE FOR PERSONAL USE ONLY AND NOT TO BE SOLD. Please respect the time and effort put into making these.

-Half Bludger

-Bludger Collar, Level, Ring

-Bludger Top Holder
-Still unrevised for the top hooks

-Front Lock Plate

-The Snitch Compartment, backing, doors, and hinges

-Corner hardware
 

Attachments

  • Bludger - Half.STL
    1.3 MB · Views: 37
  • Bludger Collar Files.zip
    1,011 KB · Views: 33
  • Bludger Top HolderV1.zip
    1.3 MB · Views: 40
  • Front Plate - R1.STL
    297 KB · Views: 37
  • Snitch Compartment.zip
    1.5 MB · Views: 40
  • Trunk Corner PieceV1.STL
    937.4 KB · Views: 33
Last edited:
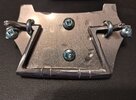
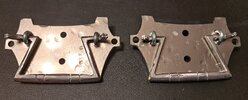
Been a bit since my last update, but I finished up my handles, so here is the process.

First I sent off the files to sendcutsend for cutting in steel and they arrived quickly:
20240131_165552.jpg
20240131_170114.jpg
20240131_170127.jpg


Next came what I would call, the Metal Bashing. I returned to ENTS makerspace to use the facilities.

I grinded down the edges I could using a bench grinder:
20240507_211338.jpg

Followed by some filing down with a hand file:
20240507_203432.jpg
20240507_202246.jpg


After this, I bent the ears up in a vise:

20240507_204414.jpg
20240507_212529.jpg


That was enough for me for one day. I returned the following week to complete the assembly. A member was generous and brought in their strip sander for me to get some curve on the hard to reach edges. Next, I drilled holes for the u clamps and countersunk the back side.
20240514_211501.jpg
20240514_212853.jpg

20240514_204006.jpg
20240514_213120.jpg


Next, I used a file to score then used a hacksaw to make a phillips head screw pattern on the ends of the handle pieces.
20240514_205318.jpg
20240514_205736.jpg


Last feature was to use the same scoring and hacksaw method to make the ornate pattern on the grip part of the handle:
20240514_214858.jpg
20240514_215648.jpg


I added a few gouges and dings to the plate using a hammer and anvil and the bashing was complete:

20240514_225826.jpg
20240514_225900.jpg


Next step was to fit them on the trunk, I needed to drill some extra holes to keep the U-Clamps intact but everything fit together well:

20240520_112409.jpg
20240520_112746.jpg


20240520_120717.jpg
20240520_120806.jpg


Finally onto the last step, painting and rusting.
Started by painting all the components flat black:

20240612_062317.jpg

20240612_181146.jpg


Then I proceeded to use the same rust simulated painting method I used on the bludgers:

20240612_204534.jpg
20240612_211301.jpg
20240612_220806.jpg


Finally ready to reassemble with the trunk, and another item finished.

20240612_223541.jpg
20240612_223456.jpg
20240612_223435.jpg


Here's a final comparison to the Universal trunk handle:

20230928_180228.jpg

20240612_223456.jpg


I'm very happy with my facsimile of the actual trunk's handles.

I think it also fits well with the onscreen look:
Closeup.png
 

Attachments

  • 20240516_104249.jpg
    20240516_104249.jpg
    4 MB · Views: 21
  • 20240514_225834.jpg
    20240514_225834.jpg
    2.6 MB · Views: 18
Nice upgrade! It looks fantastic.
Thank you kindly. It's my first time doing something like this in actual metal and I'm pritty happy with the way it came out.

These handles are much more comfortable than the previous ones, and I can stop sighing everytime I look at the side. I think I just have one small detail to fix on this, and that's the hooks on the top of the bludger holder. The loop radius is too large. When I get around to fixing that part I'll finally be satisfied with the project. Until the next one.
 
What do you think about filling in the screw heads with some kind of putty in order to look more like rivets?
I have considered it, but I end up making excuses why I'm not doing it that when I really think about it are very minor. I might still consider it in the future, but for now, I'm ok with the screw driver holes. Mainly the thought was that I did all the painting with the components off the trunk, and I'm not a fan of painting it in place, but that's just me.
 
Back
Top