My HP Quidditch Trunk [Completed]

I was back at ENTS this week, still no 3D parts printed, hopefully soon.

In the meantime, I cut a ring out of this wooden plaque with a scroll saw and sanded it to shape. This will be a ring around the quaffle to make it look nice and clean rather than the rough metal lip.
20230823_121640.jpg
20230823_195549.jpg
20230823_204602.jpg


I then cut the crests to rough size and sanded them to the proper profile.
20230823_204557.jpg
20230823_204729.jpg


I sketched up a pattern for the inside flowers where the crests will go, cut it up to 8.5"x11" sections and printed it off and transcribed it to my hardboard.
1692980657780.png

20230823_144139.jpg
20230823_144134.jpg
20230823_144126.jpg


I then painted up the crests to their matching color schemes
20230824_201419.jpg
20230824_201357.jpg


Then painted up the gold flower pattern on the hardboard, Here is a mockup of the placements of the crests.
20230825_063734.jpg
20230825_063759.jpg

20230825_063720.jpg
 
What a journey! This is such a cool project, I can't wait to see the final result. Are the 3D parts being printed in resin? Do you plan to weather/age the trunk/paint at all? I can't wait to see the final result, watching for sure.
 
I had a productive weekend, I finished up some paint work on the ring, and around the rim of the box and lid, and clearcoated the exterior of the box.

Then I glued the crests onto the main board, the board to the inside of the lid and the ring to the top of the metal quaffle bowl.

20230827_144621.jpg
20230827_144707.jpg


Then I reassembled everything, now just to wait for the 3D parts to be printed, here's where we are, so darn close.
20230827_181626.jpg
20230827_181649.jpg

20230827_181637.jpg

What a journey! This is such a cool project, I can't wait to see the final result. Are the 3D parts being printed in resin? Do you plan to weather/age the trunk/paint at all? I can't wait to see the final result, watching for sure.

Thank you very much. So there is a mixture for the printing. I'm have the corner protector printed in Resin so I can mold and cast the remaining copies and have a nice clean shape for the mold. I am also having the doors for the snitch compartment printed in resin as they are detailed and I don't want to have to do too much finishing for that feature.

The rest is all FDM printed. This is also highly because of the size of the prints.

I am planning to weather the trunk before I'm all through with the build, hoping to be able to progress further soon, I have my deadline of Sept 15th now to have it ready for the competition I'm putting it into.
 
Fantastic work! What program did you use to design your bludger plates and collar rings? Did you print them out of PLA? Any issues with them being too brittle?
So, I was able to pick up a couple of the prints the other day and did some cleanup:

20230831_192032.jpg
20230831_200113.jpg


Printed in PLA, no real concern about brittleness, all features are thick enough.

Here's a closer look at the locking mechanism:

20230831_200121.jpg
20230831_200131.jpg


And a look at the bludgers:
20230831_211413.jpg
20230831_211439.jpg
20230831_211545.jpg


And here's how it all fits in the trunk:

20230831_212611.jpg
20230831_212618.jpg


Here is a pic of my Snitch in the snitch compartment.

20230831_211732.jpg


Time to do a bunch of finishing, painting, and such, down to only needing 4 more parts. Plus some hinge pins that I'm have difficulty sourcing.
 
Update on the finishing of the 3D prints I have, I started by cleaning up the prints, and doing some "damage " to the bludgers.
20230901_154419.jpg


Then I painted all the components of the rings and the bludgers gloss black.
20230902_114714.jpg
20230902_130007.jpg


Next step was to apply Pewter Rub n buff to the ring components and the bludgers surfaces:
20230902_121417.jpg
20230902_125844.jpg
20230902_125927.jpg


20230902_181753.jpg


It was time to glue these up, so I picked up some Akfix 705 CA glue.
This stuff was a life saver and a pain in the butt. It only takes it 7 seconds to set or so. But that leaves next to no time to adjust placement.

When gluing the bludger ring latch, I had to include a rubber grommet on one side to stiffen up the latch and allow it to function properly.

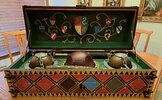
When this was done I was riding high:
20230902_195331.jpg


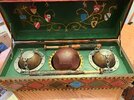
Next up, I cut the rim off the smaller bowls with my Dremel and glued them to the bludger rings with No More nails:
20230903_135702.jpg


Next up was the lock front plate. I lined it up and taped it for painting:

20230831_224807.jpg
20230901_151215.jpg
20230901_151327.jpg

20230901_181311.jpg


Then I glued this in place also with No More Nails:
20230901_181342.jpg
20230901_182613.jpg


Will just need a bit of touch up for the paint to line up, and then clearcoating.

Next, was applying a rust paint job to the bludger which involved stippling painting with 3 different colors, Burnt Umber, Honey Brown, and Terracotta. I followed a technique I saw on You Tube and was very pleased with the results:

20230903_164437.jpg
20230903_172552.jpg

20230903_183431.jpg
20230903_183441.jpg
20230903_194731.jpg


Credit to CreatingThroughChaos for their great tutorial:

And here we are.
20230903_195944.jpg


Now to talk about the corner pieces.

I got the piece printed in resin with the intention to mold the piece to save time and have nice copies.
20230829_164713.jpg
20230829_165227.jpg
20230829_171403.jpg
20230829_172633.jpg


Everything looked great and good during setup and pouring, but when I went to demold the original, I found the the silicone touching the surface of the piece was still gooey. I pulled my original out of the mold and let the mold cure, for 5 more days. Then I casted a piece in it, to find it all melted looking.

I decided to re-mold the piece after I coated it in primer + paint so I molded it again:

20230903_205527.jpg


This mold came out much better, with a very small amount of gooey, so I casted in it, and aside from a bit of bumps that can easily be sanded off, it looked good.
20230904_185114.jpg
20230904_185146.jpg
20230904_140853.jpg


So, I casted the 12 pieces that I needed:
20230904_185240.jpg


All that's left for that is to sand, and paint black and they are ready to be glued to the trunk.

PSA: I talked to a number of other makers, and they all said the same thing, Resin prints continue to Off-gas after curing to the touch for up to 30 days after printing. Because of this, it will cause Platinum-cured Silicone to not fully cure. So you have to coat the surface in a primer or other coating to allow the mold to fully form. My second mold mostly cured because it was coated in primer, but I guess the paint wasn't completely cured cause some flaked off and reacted to the silicone.

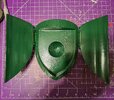
Finally, I remodelled my Bludger Top Holder after some discussions with my friend doing the printing and came up with a 3 piece assembly that should be much easier to print and to assemble, and less fragile.
Bludger Top Holder Assembly.JPG


Winded down, I should have the compartment doors and the bludger top piece prints this week. Once that's ready to go, it's on to the final stage, weathering.... groan.
 
Last edited:
Since last posting I have been able to finish up quite a lot of the build.

Firstly, I was able to get the doors for the snitch compartment resin printed and they look great:
20230905_192109.jpg
20230905_191849.jpg
20230905_191915.jpg


Next step was to paint the corner pieces and the doors. The doors are painted black on the front for the rub n buff and green on the back to match the interior color.

20230905_211902.jpg
20230906_063707.jpg
20230906_211308.jpg


Then I applied rub n buff to the front of the doors:
20230906_211331.jpg


I realized that I would need a custom hinge pin, so I modelled that up and got it off to my friend to Resin print for me.

In the meantime, I picked up the bludger top holder pieces, here's how it looked cleaned up and assembled:

20230906_213710.jpg


I also cut my chains to length and tested them out:
20230906_213419.jpg


I picked up my hinge pins, and painted the doors with enamel paints:
20230908_181801.jpg


After painting the bludger top pieces and the hinge pins black, I applied pewter and gold rub n buff respectively.
Then I glued the compartment and the bludger rings/bowls in place with no more nails and glued the corner pieces on with Akfix 705.

Here it is, looking mostly brand new.
20230909_132326.jpg
20230909_132346.jpg


Then I started the weathering:
20230909_185736.jpg


I used a combination of Burnt Umber, Tan and Black acrylic paints dry brushing, and streaking across the inside and the outside of the box, and I arrived at this as my weathered look.

20230910_195121.jpg
20230910_195130.jpg

20230910_195203.jpg
20230910_195214.jpg
20230910_195224.jpg
20230910_195235.jpg


20230910_195322.jpg
20230910_195335.jpg
20230910_195341.jpg
20230910_195355.jpg


The last bit I still need to do is the mascot symbols on the front, lid, and back of the trunk and it's all complete. Whew! that was one hell of a few months.
 

Attachments

  • 20230908_113658.jpg
    20230908_113658.jpg
    4.9 MB · Views: 53
  • 20230906_063644.jpg
    20230906_063644.jpg
    3.2 MB · Views: 40
  • 20230908_131614.jpg
    20230908_131614.jpg
    3.1 MB · Views: 46
What an awesome update, everytime I check in, there is just more and more being added, it looks so great! This is a totally amazing build, have you considered what you're going to do with it once its complete or how you intend to display it?
 
Last edited:
What an awesome update, everytime I check in, there is just more and more being added, it looks so great! This is a totally build, have you considered what you're going to do with it once its complete or how you intend to display it?
Thank you, super duper close to the finish, I'm just waiting on the custom vinyl labels I ordered for it.

I have not figured out where I intend to put it when it's complete, but I assume it's going to sit in my disney themed guest bedroom for now as I don't have enough space for it in my office.
 
I had the replica all ready and out on display for the Edmonton Expo Prop Replica Competition.

20230917_101159.jpg


Unfortunately, I did not win the award for Best Experienced maker this year. That went to fellow RPFer Kokanee which I felt put forward an amazing prop and was a pleasure to chat with at the con.

I did end up winning the Fan Choice Award, which was not expected but was a great honor:
20230917_132358.jpg


To cap the day off, I was able to get a photo done that I really wanted to since finishing this prop of my wife and I in our school gear carrying the trunk.

20230917_133220.jpg


Hope you all enjoyed the process, it was a fun but challenging project.
 

Your message may be considered spam for the following reasons:

If you wish to reply despite these issues, check the box below before replying.
Be aware that malicious compliance may result in more severe penalties.
Back
Top