TheWolfofBees
New Member
EDIT: If anyone knows why the photos aren't appearing inbetween my text on this post and instead at the bottom and could explain it to me that would be much appreciated!
Hey Friends! I've got several projects on the go right now and the most recent one is a replica of the Nimbus 2000 from the first Harry Potter Film (Harry Potter and the Philosophers Stone). I loved the design of the Nimbus 2000/2001's growing up and always wanted to attempt my own but just never got around to it. Like many I wasn't a huge fan of the Firebolt bolt prop, but I think they nailed the Nimbus line
View attachment 514513
Props to this thread by Justinas who I think did a really excellent job on his. I have been referencing some of his research on shape and dimensions which has been a huge help.
Part I : Materials
Materials, materials materials. So the base for the broom is obviously made of wood according to Harry Potter lore the Nimbus 2000 line is made from Mahogany. I've seen a few different renditions of this broom done in Pine, some of which are quite nice. The ones that I saw used a mahogany or other stain to then mimic the look with great effect. Currently I'm a little pined out from a ton of other projects I've done in pine recently so I definitely am looking to use something else, so why not a hard wood. This is the main reason I've been putting off this build, if the broom's made of Mahogany then why not just make it out of mahogany! Answer: Mahogany isn't cheap. Buuuuut after putting it off and putting it off I decided I wasn't gonna make this unless I did it right and that meant getting mahogany so I did.
Now if you know a little about species of wood you'd know that there's something like 300 different species named "Mahogany". I wasn't able to track down any reference as to which specific species was use in the film/book so I just went with the most economical.
Enter one 6ft/90$ piece of Fijan Mahogany. I like to think the wizards making the nimbus line are using this tropical wood, kind of like a fancy surfboard.
View attachment 514530
It's a little lighter than what I will want it to be in the end meaning I'll need to apply some oil to it when the time comes but for now it's just a really nice piece of wood.
Part II: Design
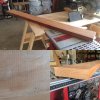
View attachment 514531View attachment 514532
Pulled out the handy paper roll and began dimensioning it out. The dimensions I'm using as scaled up for someone of my size (6'1"/185cm). The original prop was built for an 11 year old and seems to magically keep size with him as he grows so I don't feel too bad. As determined in Justinas thread I based the broom size off of Draco's (who's broom was about 10cm overall length taller than the actor in the second film) because assumably he'd have a properly sized broom since he comes from wealth and his father would have gotten him one correctly sized. This worked out to an overall handle length for me of about 120cm. The rest was more or less free handed as I do most all of my simple shape work.
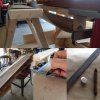
View attachment 514533View attachment 514534
After the template was cut out I taped it down and traced my handle on with a permanent marker. I chopped the board off to length on my mitre saw so not to waste the extra wood before running the non-templated side through the planer. This took down the thickness of the board from 2 inches to somewhere around 1 and 3/4.
Step III: Cutting Away
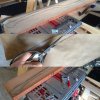
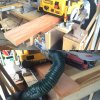
View attachment 514535
This is the moment when I'm certain that the extra 100$ I spent that one time getting the 6.5 amp Jigsaw over the 5.5 amp one was 100% worth it. I'm not kidding, this thing cuts through 2 inch thick hardwood like it's disappointed in you. Some careful cutting and a few minutes later we have the beginnings of a Nimbus 2000.
Step IV: Shaping
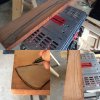
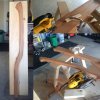
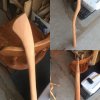
View attachment 514536View attachment 514537
After spending as much as I did on the materials for this project I wasn't about to screw it up at this stage, so no power tools to do the shaping. Using a spokeshave, hand files and a box saw I have begun the process of rounding the broom, refining the shape and smoothing things out. Surprisingly it only took about 2 hours to get it quite close to the final shape. I've been sitting on it for a few days (not literally!) so that I've looked at it enough and have all of the bits that aren't quite right stand out to me so they can be taken care of before finishing.
I'm really excited about the start I've gotten on this one. If you have any questions/comments/critiques please let me know!
- The Wolf of Bees
Hey Friends! I've got several projects on the go right now and the most recent one is a replica of the Nimbus 2000 from the first Harry Potter Film (Harry Potter and the Philosophers Stone). I loved the design of the Nimbus 2000/2001's growing up and always wanted to attempt my own but just never got around to it. Like many I wasn't a huge fan of the Firebolt bolt prop, but I think they nailed the Nimbus line
View attachment 514513
Props to this thread by Justinas who I think did a really excellent job on his. I have been referencing some of his research on shape and dimensions which has been a huge help.
Part I : Materials
Materials, materials materials. So the base for the broom is obviously made of wood according to Harry Potter lore the Nimbus 2000 line is made from Mahogany. I've seen a few different renditions of this broom done in Pine, some of which are quite nice. The ones that I saw used a mahogany or other stain to then mimic the look with great effect. Currently I'm a little pined out from a ton of other projects I've done in pine recently so I definitely am looking to use something else, so why not a hard wood. This is the main reason I've been putting off this build, if the broom's made of Mahogany then why not just make it out of mahogany! Answer: Mahogany isn't cheap. Buuuuut after putting it off and putting it off I decided I wasn't gonna make this unless I did it right and that meant getting mahogany so I did.
Now if you know a little about species of wood you'd know that there's something like 300 different species named "Mahogany". I wasn't able to track down any reference as to which specific species was use in the film/book so I just went with the most economical.
Enter one 6ft/90$ piece of Fijan Mahogany. I like to think the wizards making the nimbus line are using this tropical wood, kind of like a fancy surfboard.
View attachment 514530
It's a little lighter than what I will want it to be in the end meaning I'll need to apply some oil to it when the time comes but for now it's just a really nice piece of wood.
Part II: Design
View attachment 514531View attachment 514532
Pulled out the handy paper roll and began dimensioning it out. The dimensions I'm using as scaled up for someone of my size (6'1"/185cm). The original prop was built for an 11 year old and seems to magically keep size with him as he grows so I don't feel too bad. As determined in Justinas thread I based the broom size off of Draco's (who's broom was about 10cm overall length taller than the actor in the second film) because assumably he'd have a properly sized broom since he comes from wealth and his father would have gotten him one correctly sized. This worked out to an overall handle length for me of about 120cm. The rest was more or less free handed as I do most all of my simple shape work.
View attachment 514533View attachment 514534
After the template was cut out I taped it down and traced my handle on with a permanent marker. I chopped the board off to length on my mitre saw so not to waste the extra wood before running the non-templated side through the planer. This took down the thickness of the board from 2 inches to somewhere around 1 and 3/4.
Step III: Cutting Away
View attachment 514535
This is the moment when I'm certain that the extra 100$ I spent that one time getting the 6.5 amp Jigsaw over the 5.5 amp one was 100% worth it. I'm not kidding, this thing cuts through 2 inch thick hardwood like it's disappointed in you. Some careful cutting and a few minutes later we have the beginnings of a Nimbus 2000.
Step IV: Shaping
View attachment 514536View attachment 514537
After spending as much as I did on the materials for this project I wasn't about to screw it up at this stage, so no power tools to do the shaping. Using a spokeshave, hand files and a box saw I have begun the process of rounding the broom, refining the shape and smoothing things out. Surprisingly it only took about 2 hours to get it quite close to the final shape. I've been sitting on it for a few days (not literally!) so that I've looked at it enough and have all of the bits that aren't quite right stand out to me so they can be taken care of before finishing.
I'm really excited about the start I've gotten on this one. If you have any questions/comments/critiques please let me know!
- The Wolf of Bees
Attachments

Last edited: