Han in Carbonite (Halloween Build)

Harliquinn

New Member
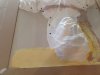
So, I guess it's my turn to build and post about my Han in Carbonite. I'd like to thank Zenix in particular for answering a lot of questions and helping me track down others to order from. My build will be using the following parts:

Han Body Kit: King Jawa
Box Kit: Zenix
Panels and Greeblie Kit: Zenix
Hero Panel Light Kit: Modeljag

I'm still hoping to get a Panel #2 Light Kit.

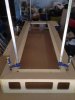
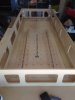
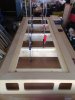
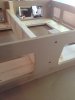
My box kit came in and I started laying things out. I decided to do something similar to QCWolf, and build a lip on my front edge so I could construct Han on a carefully fitted front panel. It will be supported by 3 cross pieces.

Day 1

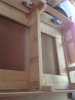
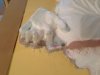
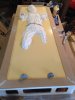
I started by gluing up the sides and then assembling the box walls. I reinforced the inside corners with metal corner pieces. I ended up with two corner supports per corner, though the picture shows only one. I was surprised that I didn't need to open up the 90 degree corner supports at the top but so far it looks fine.
image.jpgimage.jpg

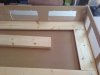
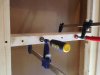
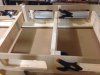
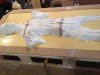
After this was done, I decided I wanted to use biscuit joints on the front borders for extra support and strength. I lined up the edges with each front border panel, marked them, and cut out biscuit holes.
image.jpgimage.jpg

Then, I cut biscuit holes in each front edge corner where they attach to each other and then glued up the front edge. That's drying right now, so I will attach the front border to the box this evening.
image.jpg
 
Last edited:
Awesome, another build.
Looks like you're off to a good start. :thumbsup

I see that this is your first post.
Welcome to the RPF Forum.
 
Yes, first time poster and new builder. Thank you. Just biscuit glued the border to the box and it went smoothly. Going to add reinforcements tomorrow after it dries.
 
Day 3

Today I cut, sanded, and fit the panel Han will be mounted to. It will sit on a lip around the edge and some cross supports for stability.


​I also cut the lip for mounting the Han Panel,on. I used 1x6's for this, so they would stick out enough to form a lip. I cut them "square" and biscuit joined the edges where they meet. I glued them down and put in about 8 screws on each side. I plan to add some angled brackets underneath for additional support.
 

Attachments

  • image.jpg
    image.jpg
    519.9 KB · Views: 186
  • image.jpg
    image.jpg
    570.4 KB · Views: 177
  • image.jpg
    image.jpg
    552 KB · Views: 179
Day 4

Today I finished the reinforcements that the Han Panel will rest on and that will keep the box structurally sound. Tomorrow, I plan to work on cleaning up the Han Resin cast while I wait for panels and such.

Peach of the supports is glued and screwed to the frame with drywall nails, countersunk to keep them flat.

so far, it's getting heavy, but not unmanageable and I know it will be sturdy.
 

Attachments

  • image.jpg
    image.jpg
    685 KB · Views: 167
  • image.jpg
    image.jpg
    622.8 KB · Views: 171
  • image.jpg
    image.jpg
    557.8 KB · Views: 166
  • image.jpg
    image.jpg
    603 KB · Views: 174
  • image.jpg
    image.jpg
    772.1 KB · Views: 158
Last edited:
Day 7

Yesterday and today I've been cleaning up the Han resin cast for mounting tomorrow. I plan to use a heat gun to give a little flexibility for gluing and screwing it down. I also used some plaster to fill in my screw holes from the supports and to smooth over the gaps in my sides and border. I've included some more in progress pictures, I hope I'll get to the bonds filling part this weekend.

Here is the trimming I did on the back of Han.

image.jpgimage.jpgimage.jpg

I'm not sure if it's canon, but I also cut out some of the flashing on Han's right hand to open up the fingers a bit. I need to apply a little bonds to smooth then out a bit after I mount the body.

image.jpg

Here are a few closeup so far the plaster for smoothing over the holes and seams.

image.jpgimage.jpg

More re to come...
 
Day 8 and 9

The last few days have been slow going. I did some cleanup on the Han resin kit and got the body glued down to the panel. I attached the panel to my frame and screwed it into the supports with drywall screws. This thing isn't going anywhere and its sturdy as it can be. I used liquid nails to glue down Han then I secured it in places with drywall screws. Some of the edges of the cast are raised up so I'll need to fill those with caulk and bondo when I'm done gluing. Overall, the resin cast was easy to work with, but I wish it had lain a little more flush with the mounting board. Here it is screwed down.
image.jpgimage.jpgimage.jpg

I followed KingJawa's instructions and cleaned it with soap and water and did a light sanding on the hands. I plan to touch up the fingers with bondo when I start to seal it.mI also used a quick bind epoxy on the feet to secure them. Tomorrow I plan to caulk the edges and maybe even lay down my first coat of bondo.

Question for the board...
I've reviewed a lot of builds and I'm curious why everyone uses gallons of glue? Is it for cost savings? Is it to get that texture? This seems odd as I can't imagine glue being easy to shape while wet. I've also seen people say "Go all bondo." I'm leaning towards this camp since I have only a little less than 1/4" to fill all over and it seems Bondo could get more accurate texturing.
 
Day 10

So, today was the day! I was going to start putting bondo down first. I used bondo to fill the gaps in the resin cast, thinking it would be better than plaster or anything. Then it was on to the Carbonite layer. had read the other threads of using glue, but I figured I would just use bondo. However, I see my mistake. Having not worked with it before, I thought bondo was more fluid that it actually was. Even using less hardener I had trouble getting it on smooth near the edges of the resin cast.

Here are some pics of the seams being filled and showing the (not good) results initially with bondo around the head. I tried to fix it with a thin bit of glue before deciding to go full glue.
image.jpgimage.jpgimage.jpg

Having read other people's horror stories around weeks of glue drying, I decided to go in thin layers and used a scraper to push the glue against the sides and against the resin cast. Using plaster to fill the screw holes, I was able to get a nice smooth layer of glue around the mold. I think his is going to work well for me, as the wood glue (Tite Bond II) seems to be drying well. I'll add a few smaller layers with some bondo for texture in a day or two.

image.jpgimage.jpgimage.jpgimage.jpg

At at the end of the day! I got a thin layer of glue around the whole thing. It should dry by tomorrow evening, and I can do some additional layers.
 

Attachments

  • image.jpg
    image.jpg
    531 KB · Views: 162
  • image.jpg
    image.jpg
    649 KB · Views: 162
  • image.jpg
    image.jpg
    685.8 KB · Views: 158
  • image.jpg
    image.jpg
    671.8 KB · Views: 164
I loved the way glue worked...it gave amazing definition and building several layers overlapping some gives it a really cool look.HIC.jpg
 
Obxfett,
That does give a good look. I was just worried that everything I read was people pouring a gallon of glue and waiting 2 weeks for it to dry. I needed to have a shorter work time, so I think the layering and spreading around small areas will work better for me. But you are right the glue works nicer. Yesterday's gluing is dry this morning so I can do another layer today.

John

john
 
For your seam filler get some epoxy putty.
Plumbers putty that comes in a stick that you cut off a piece and kneed into a uniform color.
It can be smoothed with water.
Don't get the Marine or steel versions.

Commercial brands that come in two tubs (part A & part B) are Aves, Magic Sculpt and a few other brands.
 
You're definitely booking it faster than me, nice stuff. Just hard to make myself go out in the garage and work in 103+ weather.
 
You're definitely booking it faster than me, nice stuff. Just hard to make myself go out in the garage and work in 103+ weather.
I hear that! I live in Phoenix and it's been an average of 110 here lately. I timed my build during the winter for that reason.
 
Wish I'd thought of the epoxy ahead of time. I'll have some sanding to do on the seams.

- - - Updated - - -

I don't have a choice on my build since it had to be done by October :) I'm also going to be working on a tardis at the same time.
 
Day 10

Today was a short day, but things are looking and going well. My first coat of glue dried pretty well and now I'm adding small pockets of more glue to form areas of interest. I have been able to use a putty knife to add some texturing, but I need to do it as it dries more. This should account for most of the Carbonite texturing, but I think I'll have to use some bondo for details. Here's some more work in progress pics....nothing interesting yet but gives an idea of what I'm doing...

image.jpgimage.jpgimage.jpgimage.jpgimage.jpg
 
I also had issues with the Titebond II drying..maybe I did it too thick. I ended up covering it with Bondo and I really liked the effect it gave.

Bits that need work I sanded more.

.76.JPG77.JPG59.JPG47.JPG
 
Josh
I think I will bondo thin texture layers once I have a solid glue foundation. Might do a thin layer of glue over the bondo to smooth it out a bit as well. Your texture looks great and is what I'm going for. I will go for a lot less hardener though next time.

John
 
Josh
I think I will bondo thin texture layers once I have a solid glue foundation. Might do a thin layer of glue over the bondo to smooth it out a bit as well. Your texture looks great and is what I'm going for. I will go for a lot less hardener though next time.

John

Use Rondo instead.
 
This thread is more than 8 years old.

Your message may be considered spam for the following reasons:

  1. This thread hasn't been active in some time. A new post in this thread might not contribute constructively to this discussion after so long.
If you wish to reply despite these issues, check the box below before replying.
Be aware that malicious compliance may result in more severe penalties.
Back
Top