You are using an out of date browser. It may not display this or other websites correctly.
You should upgrade or use an alternative browser.
You should upgrade or use an alternative browser.
HALF-LIFE 2 - Gravity Gun - Realistic Replica - 18.12. - VALVE HIT ME UP!
- Thread starter ThePropBox
- Start date
ThePropBox
Active Member
Re: HALF - LIFE 2 - Gravity Gun Replica - 30.08. - more CNC and painting stuff!!
Thanks a lot Strode!")
May I have a look at your projects/builds?
Stunning work! Wish my stuff looked half as good!
Thanks a lot Strode!
May I have a look at your projects/builds?
Strode
Sr Member
Re: HALF - LIFE 2 - Gravity Gun Replica - 30.08. - more CNC and painting stuff!!
Absolutely! I would be honoured! But be prepared for utter utter mediocrity.
Thanks a lot Strode!
May I have a look at your projects/builds?
Absolutely! I would be honoured! But be prepared for utter utter mediocrity.
ThePropBox
Active Member
Re: HALF - LIFE 2 - Gravity Gun Replica - 30.08. - more CNC and painting stuff!!
You don't have to feel honoured at all
Mind sharing a link to your stuff? An album in your profile doesn't seem to exist.
Absolutely! I would be honoured! But be prepared for utter utter mediocrity.
You don't have to feel honoured at all
Mind sharing a link to your stuff? An album in your profile doesn't seem to exist.
ThePropBox
Active Member
Re: HALF - LIFE 2 - Gravity Gun Replica - 13.09. - Let there be light!!
Time for a small update before I'm going to work on the crystals!
I changed the mounting mechanism of the front element and the xen-crystals to be removable even a little bit easier than before. For this I had to machine this aluminum ring which then was glued in position.


On this ring the frontal element gets mounted with three screws which are sitting between the crystals.

As there's a crystal in this element too I need to make a mold from the acrylic piece I had lasercut too.
Luckily I found the perfect fit in a dismantled computer fan I had lying around from a previous casemod


Now it was time to start soldering the two PCB's I had designed! Those will house the Arduinos which then will programmed to do all the lighting stuff!
Can't to get to it, it's so much fun bringing life into your project by adding a few leds here and there.
Both PCB's got equipped with a few cable clamps and some connectors to make the Arduinos removable.


Perfect fit!

As I had a few spare minutes to share I sat in front of the PC and hacked some code on the first controller - let there be light!


Unfortunately that's all for now guys. Hope you enjoyed it though!
Cheers and have a nice Sunday!
Mario
Time for a small update before I'm going to work on the crystals!
I changed the mounting mechanism of the front element and the xen-crystals to be removable even a little bit easier than before. For this I had to machine this aluminum ring which then was glued in position.
On this ring the frontal element gets mounted with three screws which are sitting between the crystals.
As there's a crystal in this element too I need to make a mold from the acrylic piece I had lasercut too.
Luckily I found the perfect fit in a dismantled computer fan I had lying around from a previous casemod
Now it was time to start soldering the two PCB's I had designed! Those will house the Arduinos which then will programmed to do all the lighting stuff!
Can't to get to it, it's so much fun bringing life into your project by adding a few leds here and there.
Both PCB's got equipped with a few cable clamps and some connectors to make the Arduinos removable.
Perfect fit!
As I had a few spare minutes to share I sat in front of the PC and hacked some code on the first controller - let there be light!
Unfortunately that's all for now guys. Hope you enjoyed it though!
Cheers and have a nice Sunday!
Mario
TheWolfofBees
New Member
Re: HALF - LIFE 2 - Gravity Gun Replica - 13.09. - Let there be light!!
This build is so cool, you're absolutely crushing it. A huge inspiration for future projects! Part of me died a little when you first started distressing the nice clean machined aluminum. Buuuuuut you've done such a stellar job properly distressing it that now it looks even better.
This build is so cool, you're absolutely crushing it. A huge inspiration for future projects! Part of me died a little when you first started distressing the nice clean machined aluminum. Buuuuuut you've done such a stellar job properly distressing it that now it looks even better.
ThePropBox
Active Member
Re: HALF - LIFE 2 - Gravity Gun Replica - 20.09. - Crystals! (video included)
I'm sorry, didn't see you replied!
Thanks a lot first of all! Haha it really was a struggle to make new cnc-machined parts look dirty and wasted. Have done that a million times now but I can't get used to it :/
Let's move on with the project log guys. Hope you're all enjoying your weekend as much as I do
Got A LOT to show you due to the massive amount of time I had the last week to really make some progress.
This was my first time making molds and resin castings so don't go too hard at me. Unfortunately I hadn't had such fancy equipment like a vacuum chamber or pressure-pot so yeah... there are bubbles in the crystals... but they look fine... somehow...
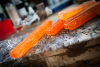
In this picture you can see the crystals what they look like when released from the mold. I used Smooth-On's Smooth Cast 326 with orange colored additives.
I think the color which came out is pretty accurate to what I imagined it to be so I'm quite satisfied with the outcome.
Unfortunately I didn't do any pictures about the mold making process but I'm sure most of you know how it's done. The master for the crystal was cut from foam which then got covered in some Bondo.

And a little mockup
The white areas and spots on the crystals is just the sanding dust making itself cozy in the gaps and edges.
Since those does indeed look kinda toyish I had to do some pre-work later on to fit the theme of a well worn gun


Since there's also lighting in the front section of the barrel I had to make another crystal to get sandwitched between the acrylic sheets later on.
Sanding is still left to be done, a few of the added glass gems will left to stick out though.
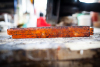
This particular parts on this image has already been threatened with some weathering, also some areas using acrylic color were blackened to give it a nice touch.

As speaking of wheatering also the main crystals have been getting some treatment.
In this shot you can see the seam line of the mold pretty clear. Of course this will be removed!

Comparison with the freshly released crystal...

... and test mounted on the barrel!

Now the fun part begins! Doing all the lighting which gets stuffed in the milled channels beneath the crystals.
Huge shoutout to my awesome girlfriend who managed to solder all the RGB-strips in no-time while I took care of sanding the crystals SHE'S GREAT, I tell you!
One strip runs around the very front of the tube illuminating the previous shown round crystal.
In case if anyone is wondering, those very strips are the NeoPixel strips from Adafruit. If it comes to lighting in your project, definitely make sure to check them out.

And each slot gets their strip...


I tried to replicate the color of the crystals as best as I could in Lightroom since my camera just didn't got the tones right.


And now some illumination shots FINALLY!!! She's alive...


I'm SO happy how the crystals turned out! Not quite as perfect as I had hoped considering the bubbles trapped in the resin.
Oh yeah... nearly forgot. Here's a video of the crystals in action!
Unfortunately I'm no video editing guy so in this video the crystals seem kinda red since my camera wasn't getting the colors right
Curious what you think guys!
This build is so cool, you're absolutely crushing it. A huge inspiration for future projects! Part of me died a little when you first started distressing the nice clean machined aluminum. Buuuuuut you've done such a stellar job properly distressing it that now it looks even better.
I'm sorry, didn't see you replied!
Thanks a lot first of all! Haha it really was a struggle to make new cnc-machined parts look dirty and wasted. Have done that a million times now but I can't get used to it :/
Let's move on with the project log guys. Hope you're all enjoying your weekend as much as I do
Got A LOT to show you due to the massive amount of time I had the last week to really make some progress.
This was my first time making molds and resin castings so don't go too hard at me. Unfortunately I hadn't had such fancy equipment like a vacuum chamber or pressure-pot so yeah... there are bubbles in the crystals... but they look fine... somehow...
In this picture you can see the crystals what they look like when released from the mold. I used Smooth-On's Smooth Cast 326 with orange colored additives.
I think the color which came out is pretty accurate to what I imagined it to be so I'm quite satisfied with the outcome.
Unfortunately I didn't do any pictures about the mold making process but I'm sure most of you know how it's done. The master for the crystal was cut from foam which then got covered in some Bondo.
And a little mockup
The white areas and spots on the crystals is just the sanding dust making itself cozy in the gaps and edges.
Since those does indeed look kinda toyish I had to do some pre-work later on to fit the theme of a well worn gun
Since there's also lighting in the front section of the barrel I had to make another crystal to get sandwitched between the acrylic sheets later on.
Sanding is still left to be done, a few of the added glass gems will left to stick out though.
This particular parts on this image has already been threatened with some weathering, also some areas using acrylic color were blackened to give it a nice touch.
As speaking of wheatering also the main crystals have been getting some treatment.
In this shot you can see the seam line of the mold pretty clear. Of course this will be removed!
Comparison with the freshly released crystal...
... and test mounted on the barrel!
Now the fun part begins! Doing all the lighting which gets stuffed in the milled channels beneath the crystals.
Huge shoutout to my awesome girlfriend who managed to solder all the RGB-strips in no-time while I took care of sanding the crystals
SHE'S GREAT, I tell you!One strip runs around the very front of the tube illuminating the previous shown round crystal.
In case if anyone is wondering, those very strips are the NeoPixel strips from Adafruit. If it comes to lighting in your project, definitely make sure to check them out.
And each slot gets their strip...
I tried to replicate the color of the crystals as best as I could in Lightroom since my camera just didn't got the tones right.
And now some illumination shots
FINALLY!!! She's alive...I'm SO happy how the crystals turned out! Not quite as perfect as I had hoped considering the bubbles trapped in the resin.
Oh yeah... nearly forgot. Here's a video of the crystals in action!
Unfortunately I'm no video editing guy so in this video the crystals seem kinda red since my camera wasn't getting the colors right
Curious what you think guys!
Attachments
-
 _MG_6426.jpg301.7 KB · Views: 129
 -
 _MG_6426.jpg301.7 KB · Views: 132
 -
 _MG_6440.jpg307.6 KB · Views: 136
 -
 _MG_6440.jpg307.6 KB · Views: 135
 -
 _MG_6455.jpg327.3 KB · Views: 130
 -
 _MG_6455.jpg327.3 KB · Views: 121
 -
 _MG_6460.jpg273.3 KB · Views: 150
 -
 _MG_6460.jpg273.3 KB · Views: 129
 -
 _MG_6470.jpg274 KB · Views: 136
 -
 _MG_6474.jpg266 KB · Views: 130
 -
 _MG_6470.jpg274 KB · Views: 134
 -
 _MG_6474.jpg266 KB · Views: 141
 -
 _MG_6491.jpg251.9 KB · Views: 137
 -
 _MG_6491.jpg251.9 KB · Views: 129
 -
 _MG_6476.jpg289.1 KB · Views: 131
 -
 _MG_6476.jpg289.1 KB · Views: 130
 -
 _MG_6504.jpg181.7 KB · Views: 127
 -
 _MG_6504.jpg181.7 KB · Views: 138
 -
 _MG_6510.jpg240.5 KB · Views: 128
 -
 _MG_6510.jpg240.5 KB · Views: 135
 -
 _MG_6511.jpg268.1 KB · Views: 141
 -
 _MG_6511.jpg268.1 KB · Views: 129
 -
 _MG_6521.jpg264.8 KB · Views: 128
 -
 _MG_6521.jpg264.8 KB · Views: 128
 -
 _MG_6526.jpg302.5 KB · Views: 136
 -
 _MG_6526.jpg302.5 KB · Views: 122
 -
 _MG_6546.jpg259.8 KB · Views: 131
 -
 _MG_6546.jpg259.8 KB · Views: 141
 -
 _MG_6547.jpg255.9 KB · Views: 133
 -
 _MG_6547.jpg255.9 KB · Views: 134
 -
 _MG_6550.jpg281 KB · Views: 128
 -
 _MG_6550.jpg281 KB · Views: 127
 -
 _MG_6576.jpg301.6 KB · Views: 118
 -
 _MG_6576.jpg301.6 KB · Views: 126
 -
 _MG_6571.jpg247.8 KB · Views: 121
 -
 _MG_6571.jpg247.8 KB · Views: 122
 -
 _MG_6573.jpg326.1 KB · Views: 120
 -
 _MG_6573.jpg326.1 KB · Views: 116
 -
 _MG_6579.jpg261.7 KB · Views: 126
 -
 _MG_6579.jpg261.7 KB · Views: 117
 -
 _MG_6594.jpg220.7 KB · Views: 124
 -
 _MG_6594.jpg220.7 KB · Views: 131
 -
 _MG_6582.jpg264.9 KB · Views: 124
 -
 _MG_6582.jpg264.9 KB · Views: 125
Last edited by a moderator:
TheWolfofBees
New Member
Re: HALF - LIFE 2 - Gravity Gun Replica - 20.9. - Crystals! (video included)
Yes.
Just yes. This is so beautiful I don't know what else to say.
It may be hard to tell from the photos but the bubble really don't seem noticeable. I really like how the light strips are coming through differently in different parts, (presumably where there are bubbles) It gives it the effect of something like quartz or other crystals where you have multiple shades/layers showing through.
---
Also this past week I picked up a used metal lathe that is proving to be very capable. Once I get it tuned up some more I think this thread is giving me some extreme inspiration for what one of my projects down the road may be on it.
Thanks for your work!
Shryyyk
Sr Member
Re: HALF - LIFE 2 - Gravity Gun Replica - 20.9. - Crystals! (video included)
I have this to say:
"HHNNNNNNNNNNNNGGGGGGGGGGGGGGGGGGGGG!"
It's been said many times before, but your craftsmanship is outstanding. I am so jealous of this build, it's actually making me hate you slightly. Only slightly though!
I have this to say:
"HHNNNNNNNNNNNNGGGGGGGGGGGGGGGGGGGGG!"
It's been said many times before, but your craftsmanship is outstanding. I am so jealous of this build, it's actually making me hate you slightly. Only slightly though!
Last edited:
dedguy
Member
Re: HALF - LIFE 2 - Gravity Gun Replica - 06.07. - PAINTJOB! need criticism!
Little late to the party but I'm happy to see I'm not the only one who uses cheap craft store acrylics for weathering. Only really into reading about prop making, don't do it so much myself. I do do painting and modifying toys though and I love doing weathering and particularly oxidation. Much like others have suggested and it appears the OP did, I use several passes of paint to achieve the desired effect. It can be a time consuming process but it's so rewarding when it finally looks just right.
@PropBox, the weathering on this is gorgeous. I previously read your Majora's Mask thread and was thoroughly impressed by it (my girlfriend now really wants one, she's a big Zelda fan). This build though is even more impressive. The gun has a myriad of distressed and weathered finishes and you have managed to make each look amazing.
@supermaRiio If it helps, I pulled out the paints I used for my rust.
View attachment 499082
EDIT: I don't think the brand matters, I just tried to get the color name.
Little late to the party but I'm happy to see I'm not the only one who uses cheap craft store acrylics for weathering. Only really into reading about prop making, don't do it so much myself. I do do painting and modifying toys though and I love doing weathering and particularly oxidation. Much like others have suggested and it appears the OP did, I use several passes of paint to achieve the desired effect. It can be a time consuming process but it's so rewarding when it finally looks just right.
@PropBox, the weathering on this is gorgeous. I previously read your Majora's Mask thread and was thoroughly impressed by it (my girlfriend now really wants one, she's a big Zelda fan). This build though is even more impressive. The gun has a myriad of distressed and weathered finishes and you have managed to make each look amazing.
ThePropBox
Active Member
Re: HALF - LIFE 2 - Gravity Gun Replica - 06.07. - PAINTJOB! need criticism!
I'm really happy to see positive responses to the crystals since I wasn't really sure about them at the beginning.
Since I applied the black acrylics the indents of the bubbles on the outside aren't really noticable anymore but there are a few inside the crystal. What I forgot to mention is that I added some acrylic stones which are used for decoration but since I needed to have a little bit of internal texture ongoing I thought I'd give it a shot. So the light is actually breaking inside those stones
Aww really, which one exactly? I'd LOVE to have one in the future but there's absolutely no space in my workshop (and even less money...) to buy one since I'm currently saving on a 3D printer I'll need for my next project.
I envy you man... I really do... Congratulations on the buy!
hahaha
Nah man, thanks a lot for your appreciation towards this build. It's really motivating to see people are enjoying this project as much as I do
It's flattering to read this, thanks a lot dedguy
If I could redo one thing on the mask it definitely would be the rust on it's metal frame on the backside since it does look kinda cartoonish imho.
Was looking at those images when starting weathering the gun and came to the conclusion I'll try to re-learn my whole rusting technique and make it look more natural. I used some special rusting patinas on the mask's back which basically is applying some iron particles-containing base color which then gets painted over with some special fluid which then evolves into a real oxidation process.
Was working with this type of rusting for the past... yeah... 8 years (holy ***** I'm getting old) and now it seems painting the rust from scratch with acrylic colors leads me to a much more appealing look when it comes to a real look.
Guess I just like to have much more freedom in choosing the exact color palette I want to go with instead of waiting which type of rust evolves from the other method I used before.
And for the wish of your girlfriend: There's a guy around this forum who created a replica of Majora's Mask and had it 3D-printed.
Can't remember his name now but I'm sure you will find his thread rather quickly. Maybe he's willing to sell one
Yes.
Just yes. This is so beautiful I don't know what else to say.
It may be hard to tell from the photos but the bubble really don't seem noticeable. I really like how the light strips are coming through differently in different parts, (presumably where there are bubbles) It gives it the effect of something like quartz or other crystals where you have multiple shades/layers showing through.
---
Also this past week I picked up a used metal lathe that is proving to be very capable. Once I get it tuned up some more I think this thread is giving me some extreme inspiration for what one of my projects down the road may be on it.
Thanks for your work!
I'm really happy to see positive responses to the crystals since I wasn't really sure about them at the beginning.
Since I applied the black acrylics the indents of the bubbles on the outside aren't really noticable anymore but there are a few inside the crystal. What I forgot to mention is that I added some acrylic stones which are used for decoration but since I needed to have a little bit of internal texture ongoing I thought I'd give it a shot. So the light is actually breaking inside those stones
Aww really, which one exactly? I'd LOVE to have one in the future but there's absolutely no space in my workshop (and even less money...) to buy one since I'm currently saving on a 3D printer I'll need for my next project.
I envy you man... I really do...
Congratulations on the buy!I have this to say:
"HHNNNNNNNNNNNNGGGGGGGGGGGGGGGGGGGGG!"
It's been said many times before, but your craftsmanship is outstanding. I am so jealous of this build, it's actually making me hate you slightly. Only slightly though!
hahahaNah man, thanks a lot for your appreciation towards this build. It's really motivating to see people are enjoying this project as much as I do
Little late to the party but I'm happy to see I'm not the only one who uses cheap craft store acrylics for weathering. Only really into reading about prop making, don't do it so much myself. I do do painting and modifying toys though and I love doing weathering and particularly oxidation. Much like others have suggested and it appears the OP did, I use several passes of paint to achieve the desired effect. It can be a time consuming process but it's so rewarding when it finally looks just right.
@PropBox, the weathering on this is gorgeous. I previously read your Majora's Mask thread and was thoroughly impressed by it (my girlfriend now really wants one, she's a big Zelda fan). This build though is even more impressive. The gun has a myriad of distressed and weathered finishes and you have managed to make each look amazing.
It's flattering to read this, thanks a lot dedguy
If I could redo one thing on the mask it definitely would be the rust on it's metal frame on the backside since it does look kinda cartoonish imho.
Was looking at those images when starting weathering the gun and came to the conclusion I'll try to re-learn my whole rusting technique and make it look more natural. I used some special rusting patinas on the mask's back which basically is applying some iron particles-containing base color which then gets painted over with some special fluid which then evolves into a real oxidation process.
Was working with this type of rusting for the past... yeah... 8 years (holy ***** I'm getting old) and now it seems painting the rust from scratch with acrylic colors leads me to a much more appealing look when it comes to a real look.
Guess I just like to have much more freedom in choosing the exact color palette I want to go with instead of waiting which type of rust evolves from the other method I used before.
And for the wish of your girlfriend: There's a guy around this forum who created a replica of Majora's Mask and had it 3D-printed.
Can't remember his name now but I'm sure you will find his thread rather quickly. Maybe he's willing to sell one
dedguy
Member
Re: HALF - LIFE 2 - Gravity Gun Replica - 20.9. - Crystals! (video included)
Thanks for pointing me in the right direction for the mask.
With rust, I think when doing the real oxidation you don't necessarily get the same sort of complexity that you can get with paints since you're just emulating one particular type of rust when often you have a variety of oxidation from dark reds to almost bright yellows. And as you say, you get ore control. For me when doing weathering I go look at examples from specific environments. A piece of iron is going to rust differently on near a river than it will in the desert, at least based on what I have seen. I'm not any kind of expert. I just spend a lot of time google image searching for reference.
TheWolfofBees
New Member
Re: HALF - LIFE 2 - Gravity Gun Replica - 06.07. - PAINTJOB! need criticism!
Whoah that's really cool then, I wouldn't have thought to do that. I just noticed you mentioned that there were some added crystals in the mix up above one of the pictures. I also just noticed that because of that the ring isn't perfectly smooth as I originally thought. That's a nice touch, adds a little dimension/natural effect to it.

The lathe is a "little" Busy Bee B-244, the date on it is May 1989. I think it has a max diameter of 9 or 10 inches. Seems like a solid little machine. I need to clean up/make some new cutting bits for it as the only usable one I have right now is pretty blunt and cuts pretty roughly. Really nice unit though, came with 3 head stock chucks, 7 or 8 tail stock chucks 5 quick change cutting tool holders and a whole bunch of other parts. When I saw It i just couldn't pass it up even though I hadn't really been planning on it. I'm super glad I grabbed it though! I picked up a bunch of different sized aluminum and steel round stock cut offs from a local metal place today so I'm trying to get some practice in. I know what you mean about space and money though, this thing has pretty much taken up the last bit of usable shop space I have right now (sigh).
What printer are you looking at?
I'm really happy to see positive responses to the crystals since I wasn't really sure about them at the beginning.
Since I applied the black acrylics the indents of the bubbles on the outside aren't really noticable anymore but there are a few inside the crystal. What I forgot to mention is that I added some acrylic stones which are used for decoration but since I needed to have a little bit of internal texture ongoing I thought I'd give it a shot. So the light is actually breaking inside those stones
Aww really, which one exactly? I'd LOVE to have one in the future but there's absolutely no space in my workshop (and even less money...) to buy one since I'm currently saving on a 3D printer I'll need for my next project.
I envy you man... I really do...
Whoah that's really cool then, I wouldn't have thought to do that. I just noticed you mentioned that there were some added crystals in the mix up above one of the pictures. I also just noticed that because of that the ring isn't perfectly smooth as I originally thought. That's a nice touch, adds a little dimension/natural effect to it.
The lathe is a "little" Busy Bee B-244, the date on it is May 1989. I think it has a max diameter of 9 or 10 inches. Seems like a solid little machine. I need to clean up/make some new cutting bits for it as the only usable one I have right now is pretty blunt and cuts pretty roughly. Really nice unit though, came with 3 head stock chucks, 7 or 8 tail stock chucks 5 quick change cutting tool holders and a whole bunch of other parts. When I saw It i just couldn't pass it up even though I hadn't really been planning on it. I'm super glad I grabbed it though! I picked up a bunch of different sized aluminum and steel round stock cut offs from a local metal place today so I'm trying to get some practice in. I know what you mean about space and money though, this thing has pretty much taken up the last bit of usable shop space I have right now (sigh).
What printer are you looking at?
ThePropBox
Active Member
Re: HALF - LIFE 2 - Gravity Gun Replica - 06.07. - PAINTJOB! need criticism!
No problem at all!
Exactly, that's the point. A fellow member here (@joberg) pointed out, back when I showed the first rust on the gun, I should consider different tones of rust depending on the metal what's beneath. That's where I started thinking myself into the model and chose what type of metal the different parts are made of.
His advice helped a lot and I was able to increase the natural look by quite a bit.
To be honest I never thought about environmental influences, another thing to consider. Thanks for the hint!!
Yeah I casted one crystal purely from resin without adding any stones or particles and it didn't came out that great.
Happy for you that you could take the chance to buy one so spontaneously.
I'm in love, this machine just looks so great. That's the exact type I'm heading for, not too small, not too big. Just right for I guess 99% of all the pieces a propmaker could wish to craft.
I don't know the price you paid but I'm sure it was a great deal considering all of the chucks and equipment you got with it.
Aw I can't stop looking at it, now I want to have one too so badly haha
I'm currently deciding between the Ultimaker 2 and the LulzBot TAZ5 whereas I'm leaning towards the LulzBot since the price is basically the same but the surface to print on is around 4-5cm's larger when it comes to its dimensions. Although the UM2 comes in a nicer enclosure.
There is a LulzBot Mini which got a great autoleveling feature which the bigger TAZ5 doesnt have. So as of now I'm waiting for the TAZ6 to be released to hopefully have this feature too.
Wanna buy it in the next two months but I'm afraid there won't be any new releases until then...
Thanks for pointing me in the right direction for the mask.
With rust, I think when doing the real oxidation you don't necessarily get the same sort of complexity that you can get with paints since you're just emulating one particular type of rust when often you have a variety of oxidation from dark reds to almost bright yellows. And as you say, you get ore control. For me when doing weathering I go look at examples from specific environments. A piece of iron is going to rust differently on near a river than it will in the desert, at least based on what I have seen. I'm not any kind of expert. I just spend a lot of time google image searching for reference.
No problem at all!
Exactly, that's the point. A fellow member here (@joberg) pointed out, back when I showed the first rust on the gun, I should consider different tones of rust depending on the metal what's beneath. That's where I started thinking myself into the model and chose what type of metal the different parts are made of.
His advice helped a lot and I was able to increase the natural look by quite a bit.
To be honest I never thought about environmental influences, another thing to consider. Thanks for the hint!!
Whoah that's really cool then, I wouldn't have thought to do that. I just noticed you mentioned that there were some added crystals in the mix up above one of the pictures. I also just noticed that because of that the ring isn't perfectly smooth as I originally thought. That's a nice touch, adds a little dimension/natural effect to it.
View attachment 531701
The lathe is a "little" Busy Bee B-244, the date on it is May 1989. I think it has a max diameter of 9 or 10 inches. Seems like a solid little machine. I need to clean up/make some new cutting bits for it as the only usable one I have right now is pretty blunt and cuts pretty roughly. Really nice unit though, came with 3 head stock chucks, 7 or 8 tail stock chucks 5 quick change cutting tool holders and a whole bunch of other parts. When I saw It i just couldn't pass it up even though I hadn't really been planning on it. I'm super glad I grabbed it though! I picked up a bunch of different sized aluminum and steel round stock cut offs from a local metal place today so I'm trying to get some practice in. I know what you mean about space and money though, this thing has pretty much taken up the last bit of usable shop space I have right now (sigh).
What printer are you looking at?
Yeah I casted one crystal purely from resin without adding any stones or particles and it didn't came out that great.
Happy for you that you could take the chance to buy one so spontaneously.
I'm in love, this machine just looks so great. That's the exact type I'm heading for, not too small, not too big. Just right for I guess 99% of all the pieces a propmaker could wish to craft.
I don't know the price you paid but I'm sure it was a great deal considering all of the chucks and equipment you got with it.
Aw I can't stop looking at it, now I want to have one too so badly haha
I'm currently deciding between the Ultimaker 2 and the LulzBot TAZ5 whereas I'm leaning towards the LulzBot since the price is basically the same but the surface to print on is around 4-5cm's larger when it comes to its dimensions. Although the UM2 comes in a nicer enclosure.
There is a LulzBot Mini which got a great autoleveling feature which the bigger TAZ5 doesnt have. So as of now I'm waiting for the TAZ6 to be released to hopefully have this feature too.
Wanna buy it in the next two months but I'm afraid there won't be any new releases until then...
TheWolfofBees
New Member
Re: HALF - LIFE 2 - Gravity Gun Replica - 20.9. - Crystals! (video included)
Good call on the crystals, really adds to the piece (I'll have to remember that should it ever come in handy!)
I'm in love with it too! It was exactly what I had in mind too, combination of that and all of the pieces it came with made me spring for it. I ended up paying 900 CAD, does need a new gear that's about 25$ and shipping (although still works without it, just catches a bit on the one axis) and a few tune ups but I'd say excellent price all round. The money for this actually came out of a 3D printer/Laser cutter fund I had going... back to the start on that one! I don't know what used markets are like in your area but for something like this or other machining tools restoring used stuff is the way to go.
Those are really nice machines. I've been interested in the ROBO R1 (much lower end machine) but has a large build volume and seems to be tune able to get really good results. It's true the Ultimaker has a really nice enclosure, but I'm sure you could fashion a really solid one for the other machine if that's what you're aiming towards!
ThePropBox
Active Member
Re: HALF - LIFE 2 - Gravity Gun Replica - 20.9. - Crystals! (video included)
You're actually kidding me right? That's around 610€...
I searched so long for lathes but I never came across one that was this low in price, especially with all this equipment you got.
Will have a look again if there are any for sale, maybe I get lucky. But what I found so far were lathes all around 900-1500€ without any additional stuff.
The big market for this is in Germany since there are a lot websites for used machines. The downside for this is that you will have to add up around 200-300€ in shipping.
Guess I will have to take a look in Canada
The build volume on the Robo seems to be pretty close to what I need. But the least amount of printable space I want to have should be at least around 220 x 220 x 200 so the LulzBot is I guess the way to go. Yeah the Ultimaker is quite nice when it comes to looks but somehow my gut feeling is saying I should go towards the other one.
The Ultimaker seems so... blackbox'ish I'm more the open source guy
Good call on the crystals, really adds to the piece (I'll have to remember that should it ever come in handy!)
I'm in love with it too! It was exactly what I had in mind too, combination of that and all of the pieces it came with made me spring for it. I ended up paying 900 CAD, does need a new gear that's about 25$ and shipping (although still works without it, just catches a bit on the one axis) and a few tune ups but I'd say excellent price all round. The money for this actually came out of a 3D printer/Laser cutter fund I had going... back to the start on that one! I don't know what used markets are like in your area but for something like this or other machining tools restoring used stuff is the way to go.
Those are really nice machines. I've been interested in the ROBO R1 (much lower end machine) but has a large build volume and seems to be tune able to get really good results. It's true the Ultimaker has a really nice enclosure, but I'm sure you could fashion a really solid one for the other machine if that's what you're aiming towards!
You're actually kidding me right? That's around 610€...
I searched so long for lathes but I never came across one that was this low in price, especially with all this equipment you got.
Will have a look again if there are any for sale, maybe I get lucky. But what I found so far were lathes all around 900-1500€ without any additional stuff.
The big market for this is in Germany since there are a lot websites for used machines. The downside for this is that you will have to add up around 200-300€ in shipping.
Guess I will have to take a look in Canada
The build volume on the Robo seems to be pretty close to what I need. But the least amount of printable space I want to have should be at least around 220 x 220 x 200 so the LulzBot is I guess the way to go. Yeah the Ultimaker is quite nice when it comes to looks but somehow my gut feeling is saying I should go towards the other one.
The Ultimaker seems so... blackbox'ish
I'm more the open source guy TheWolfofBees
New Member
Re: HALF - LIFE 2 - Gravity Gun Replica - 20.9. - Crystals! (video included)
It definitely was a lucky find, keep an eye out and something will come along eventually. Of course I need to pick up a bench grinder now so I can grind some new cutters, it really never ends haha.
Definitely being easily mod-able and and upgrade able is a perk. I currently have only a grade school knowledge when it comes to building electronics so I'm hoping with 3D printing and getting into some arduino projects I can start learning more.
Any chance you're willing to share what project you're thinking of involving the printing?
You're actually kidding me right? That's around 610€...
I searched so long for lathes but I never came across one that was this low in price, especially with all this equipment you got.
Will have a look again if there are any for sale, maybe I get lucky. But what I found so far were lathes all around 900-1500€ without any additional stuff.
The big market for this is in Germany since there are a lot websites for used machines. The downside for this is that you will have to add up around 200-300€ in shipping.
Guess I will have to take a look in Canada
The build volume on the Robo seems to be pretty close to what I need. But the least amount of printable space I want to have should be at least around 220 x 220 x 200 so the LulzBot is I guess the way to go. Yeah the Ultimaker is quite nice when it comes to looks but somehow my gut feeling is saying I should go towards the other one.
The Ultimaker seems so... blackbox'ish
It definitely was a lucky find, keep an eye out and something will come along eventually. Of course I need to pick up a bench grinder now so I can grind some new cutters, it really never ends haha.
Definitely being easily mod-able and and upgrade able is a perk. I currently have only a grade school knowledge when it comes to building electronics so I'm hoping with 3D printing and getting into some arduino projects I can start learning more.
Any chance you're willing to share what project you're thinking of involving the printing?
ThePropBox
Active Member
HALF - LIFE 2 - Gravity Gun Replica - 11.10. - She's ALIVE!!
Not yet
It's been two busy weeks for me so that's why there were no updates in the meantime. Now where it all settled down I finally got in front of my workbench again.
And I really made some progress in terms of finishing up the electronics and stuff. Not in the mood to write too much so I'd like to speak the pictures for themselves
First of all I finished the front part where I sandwiched the casted orange disc between the acrylic parts. It all was glued then.

FINALLY! Now the main assembly began
The moment I worked to for around four months now was coming closer but it just was some 85%-achievement.


Before that main assembly I had to cast this piece from orange resin.
The disc is used to cover the leds in the main barrel and act as a diffuser on the same time. Nearly forgot I had to do this.

Some quick setting molding material was mixed up and resin was filled in. Not a SINGLE bubble!!


After curing I was able to continue with the assembly. Unfortunately I didn't take much pictures of that process since I wanted to max out my concentration since I tend to forget things when I'm shaking for excitement haha.
Here's the holder for the leds in the barrel of the gun. Including the casted orange disc sanded up a little bit to get a satin finish.


After the lighting was installed I had to glue the threaded M12-rods in the machined canisters on the back to have them secured for the mounting mechanism.
Got no pictures of this assembly though

For whatever reason I did receive a ton of messages asking me what those black tube-thingy-wingys were I had mounted between the back canisters
They are actually just tubing from a 1999' VW Bora which was used for it's turbo charger.


And now... FINALLY!
The main barrel is installed with all the crystals in place!
You can't even imagine the struggle getting all the cables from the barrel into the main body of the gun. Luckily my cousin Kenny dropped by and lend me his hand.
With his help this was done in no-time! Thanks man!


And now some eye-candy shots!


Any chance you're willing to share what project you're thinking of involving the printing?
Not yet
It's been two busy weeks for me so that's why there were no updates in the meantime. Now where it all settled down I finally got in front of my workbench again.
And I really made some progress in terms of finishing up the electronics and stuff. Not in the mood to write too much so I'd like to speak the pictures for themselves
First of all I finished the front part where I sandwiched the casted orange disc between the acrylic parts. It all was glued then.
FINALLY! Now the main assembly began
The moment I worked to for around four months now was coming closer but it just was some 85%-achievement.
Before that main assembly I had to cast this piece from orange resin.
The disc is used to cover the leds in the main barrel and act as a diffuser on the same time. Nearly forgot I had to do this.
Some quick setting molding material was mixed up and resin was filled in. Not a SINGLE bubble!!
After curing I was able to continue with the assembly. Unfortunately I didn't take much pictures of that process since I wanted to max out my concentration since I tend to forget things when I'm shaking for excitement haha.
Here's the holder for the leds in the barrel of the gun. Including the casted orange disc sanded up a little bit to get a satin finish.
After the lighting was installed I had to glue the threaded M12-rods in the machined canisters on the back to have them secured for the mounting mechanism.
Got no pictures of this assembly though
For whatever reason I did receive a ton of messages asking me what those black tube-thingy-wingys were I had mounted between the back canisters
They are actually just tubing from a 1999' VW Bora which was used for it's turbo charger.
And now... FINALLY!
The main barrel is installed with all the crystals in place!
You can't even imagine the struggle getting all the cables from the barrel into the main body of the gun. Luckily my cousin Kenny dropped by and lend me his hand.
With his help this was done in no-time! Thanks man!
And now some eye-candy shots!
ThePropBox
Active Member
Re: HALF - LIFE 2 - Gravity Gun Replica - 11.10. - She's ALIVE!!
Thanks a lot, really appreciate your comment!
I'm coming in late on this one but wow!
this is absolutely beautiful. the combination of techniques coming together here is mind-boggling.
Thanks a lot, really appreciate your comment!
Similar threads
- Replies
- 4
- Views
- 281
- Replies
- 0
- Views
- 427