You are using an out of date browser. It may not display this or other websites correctly.
You should upgrade or use an alternative browser.
You should upgrade or use an alternative browser.
Glitch from Reboot (Progress Pics up) WIP (Need more ref pics)
- Thread starter Prince NEO
- Start date
Prince NEO
Sr Member
I never realized how important photoshop is in my daily life. I can't scale down my photos to upload them until I can find the install disc.
Also, I just bought the pocket watch lens, now it just has to ship from Germany.
Try using Paint.NET it's free and it's like paint and Photoshop crammed together, plus it takes very little room. And can't wait to see pictures!!!
you could open them up in windows picture viewer, make the entire window smaller, press print screen, crop it out in ms- paint. :cool
This would also work, thanks
")
You could probably find that "gear" piece off of a child's toy. I know I've seen some with pieces like that, I just can't think of one off the top of my head.
If you remember, please post a picture or let us know, thanks in advanced :thumbsup
And aside from some slight mods needed, it's the perfict scale for my Glitch since my Dad's arms a really thick compared to mine, so my Glitch is more Matrix's (Enzo's) Size. :rolleyesIt's not PERFECT, but the medium wheel could definitely be worked I think. it might be a little bit too big still, but who knows. I guess somebody else could scale up their Glitch, especially if they're more Enzo's build than Bob's.
Risu
Master Member
Yea, so that medium gear would work pretty well for yours. I got photoshop installed, so this post will be edited with pictures in a couple of minutes.
EDIT: Ok, here they are.
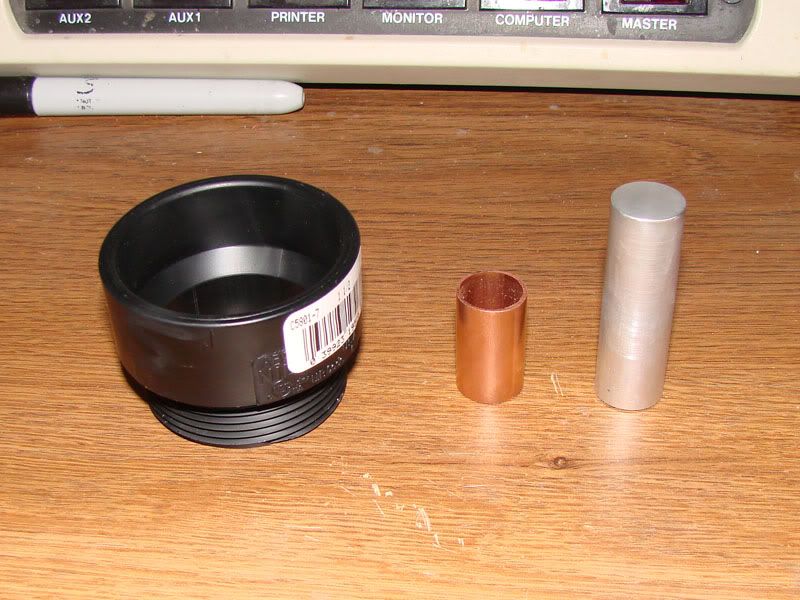

The copper looks much better in that picture than it does now. Polishing it with the dremel actually made it look a lot worse, and sucked almost all the orange out of it, making it look more like a purplish greenish brass. I think I'll just save myself the trouble and use some of that copper metallic tape instead. I won't have to use the lathe and it'll be a more stable piece in the end. Less legit, though. The aluminum polished up nicely, though, except that I need to sand a bit more of the grain out of it as it's still visible. These pictures are from before the dremel was used, btw.
EDIT: Ok, here they are.
The copper looks much better in that picture than it does now. Polishing it with the dremel actually made it look a lot worse, and sucked almost all the orange out of it, making it look more like a purplish greenish brass. I think I'll just save myself the trouble and use some of that copper metallic tape instead. I won't have to use the lathe and it'll be a more stable piece in the end. Less legit, though. The aluminum polished up nicely, though, except that I need to sand a bit more of the grain out of it as it's still visible. These pictures are from before the dremel was used, btw.
Last edited:
Prince NEO
Sr Member
Very nice, as far as dulling the copper, try getting some polish, it should to the trick, that's what we do in Band when cymbals get ground down. Isn't the ring too long though?
Risu
Master Member
The copper piece or the PVC adapter? The copper piece is 1 inch and the aluminum is 2, which (when scaled to the first image you posted) is correct. The PVC adapter is unmodified right now, it'll be cut down and heavily trimmed to be the right size. The important part was finding a 1.5" diameter hole with a beveled edge around it.
I might try to find some metal polish, but the problem isn't actually that it's dulling, it's that the color is changing to something much further from the orange appearance of the prop itself. I'd actually prefer to use some kind of orange rubber for the center band, like you see in those Gummi headphones, but I have no idea how I'd make that work or where I'd find it. Copper is sort of a "not accurate, but it looks like a cool real world version" deal.
I might try to find some metal polish, but the problem isn't actually that it's dulling, it's that the color is changing to something much further from the orange appearance of the prop itself. I'd actually prefer to use some kind of orange rubber for the center band, like you see in those Gummi headphones, but I have no idea how I'd make that work or where I'd find it. Copper is sort of a "not accurate, but it looks like a cool real world version" deal.
epilepticsquirl
Sr Member
Reboot has got to be one of my favorite shows. I absolutely love the idea of a static glitch. I whipped up a quickie 3D Model. Maybe someone can unfold it in in pepakura; kind of make it available to everyone. I'm not too sure on the exact dimensions so I eyeballed most of it.
Prince NEO
Sr Member
Very nicely done 3d model.
epilepticsquirl
Sr Member
thanks, if you can give me an overall dimension in terms of length, I can scale it appropriately. I've got the pepakura designer so I might give it a shot. If anything you'll have the cog piece.
Risu
Master Member
I definitely want to try to pep the cog piece of that. It would be 2.25" in diameter cogs included. The cogs stick out 1/8" from the main body. The beveled inside edge should be 1/8" thick and slope down less than that, smaller than a 45 degree angle. The center hole should be exactly 1.5" and the cog is 1/4-3/8" tall. (this is all scaled to how Glitch looks on Bob's arm compared to mine, and I'm just about his build. Plus, all the dimensions turned out at perfect 1/8ths as I was comparing them in the photo, so I figure it's gotta be right.
The body is 1.75" wide and 3 inches long. The bevel is 45 degrees and the face is 1/8" wide, making the beveled edge come in from the sides 1/16". Then it's 1/2 tall. The 5/8" bar sits higher than the body. The bar end of the body should be flat, the bar isn't set into it. The corners here are not beveled, but the top edge is.
And the bar is 5/8" diameter, 2" long, with a 1" orange section in the middle. It's set a bit higher on the body so that the bottom of the bar is level with the bottom of the body and the top of the bar comes up higher than the top of the body. The edge of the cog then lines up with the top edge of the body and doesn't touch the bar. I can't wait to see what you come up with! Looking again at your model it looks like you got it just about right as is.
I've decided not to use the dremel any more today because everything that could go wrong today has, and I'm afraid I might just put out an eye if I take any more risks.
epilepticsquirl
Sr Member
Ok, I'll have to double check the measurements, but here is an overlay of the wireframe and against glitch. It's not a straight on shot but it's what I based it off of. Oh and I have no clue with what i'm doing in Pepakura. I should best leave that to a pro. hehe :confused
epilepticsquirl
Sr Member
ok, so i'm redoing glitch according to risu's measurements. I'll post the two up side by side to see which one's you like better. Risu's is slightly beefier than the one I came up with. So we'll see. Gimme bout half an hour and I'll get r done
Risu
Master Member
I like what you did with the wire frame except for the beveled corners on the bar end. I especially like your gear piece though, it lines up perfectly. Looking forward to the new file. You might be able to get Dung Beetle (can't remember the exact spelling of his name) to pep it for you, depending on how busy he is.
EDIT: Wait, I need to correct myself again. Looking at the pics of crushed Glitch on the first page, it looks like there is beveling there, but the bar is set into the body at the top only which hides it when viewed from the top. When seen from the side, the beveling pokes out below the bar.
EDIT: Wait, I need to correct myself again. Looking at the pics of crushed Glitch on the first page, it looks like there is beveling there, but the bar is set into the body at the top only which hides it when viewed from the top. When seen from the side, the beveling pokes out below the bar.
epilepticsquirl
Sr Member
yea I see what you mean with the bar. It seems sometimes the bar sits outside the main body, and other time's it kind of intersects inside the box; from what I can remember from the series anyways.
Another point I wanted to bring up is the underside of the cog. I don't know if it's the darkness but it looks like the underside is beveled slightly as well. Reboot didn't have the processing power at the time to produce shadow's that well so I wasn't sure what to think of it. On my cog I put the underside bevel in there but I can take it out just as easily.
Another point I wanted to bring up is the underside of the cog. I don't know if it's the darkness but it looks like the underside is beveled slightly as well. Reboot didn't have the processing power at the time to produce shadow's that well so I wasn't sure what to think of it. On my cog I put the underside bevel in there but I can take it out just as easily.
Risu
Master Member
I think the bevel would be more comfortable, but god-awfully crap to pep. I'd leave it out and we can file it in to the finished piece if we like it that way.
It would also probably be better to make the pep file with the bar outside the body, then we can dremel out that section and set it in ourselves, again, it's just easier to pep that way.
It would also probably be better to make the pep file with the bar outside the body, then we can dremel out that section and set it in ourselves, again, it's just easier to pep that way.
epilepticsquirl
Sr Member
I think the bevel would be more comfortable, but god-awfully crap to pep. I'd leave it out and we can file it in to the finished piece if we like it that way.
It would also probably be better to make the pep file with the bar outside the body, then we can dremel out that section and set it in ourselves, again, it's just easier to pep that way.
completely agree, In the mean time here is the comparison between the two glitches. Risu's is the bigger one, and the screen overlay is the smaller one. Risu's is on the left most of the time i think. I like them both, I dunno i'm torn. I like the beefiness of risu's though. :confused
edit: the reason I just didn't scale it was because the proportions are just a tiny teensy weeny bit different from each other.
epilepticsquirl
Sr Member
aw hell, just trying to model all those dings and dents would give me nightmares.
Glitch Upgrade on the other hand...
but if anyone wants to try and unfold this puppy in pepakura lemme know. Or if you know of someone that I could use some 3D Printer time for cheap. I can imagine this thing being quite strenuous to pep.
Glitch Upgrade on the other hand...
but if anyone wants to try and unfold this puppy in pepakura lemme know. Or if you know of someone that I could use some 3D Printer time for cheap. I can imagine this thing being quite strenuous to pep.
epilepticsquirl
Sr Member
lol, I didn't even think of that
Prince NEO
Sr Member
that's very true, as for pepakura, I have a lot of experince with small closed models, and I would say: "No, oh god, never again, please." It's so hard, and it's frustrating if you use glue, it gets stuck to you, if you use tape, it comes undone every 5 seconds, I love the model made, but I personally would never try to make one again, :wackoIs that when Bob gets Glitch back? I don't like it as much.
If you wanted a screen accurate Enzo Glitch, you could just pep it, squeeze it, and coat it in resin. Problem solved. Megabyte crunched the thing like it was made of paper anyways.
But keep up the model work, you are very good at it, and as for the 2nd version of Glitch, I didn't like it and neither did my Dad, so I didn't want to make it.
Back to the model, I like it, and just about perfect for reference, if you could post a like to a place it could be uploaded, that would be great.
Similar threads
- Replies
- 69
- Views
- 5,629