Fili the Dwarf Costume Build

jessamygriffin

Well-Known Member
Fili Durin's costume is something my flatmate Feikoi wanted to make, and since I collaborated on a lot of it and she mentioned she never used her profile here to post and didn't mind if I did, here we go.

We were fortunate that it was the second Dwarven costume I'd done (Thorin Oakenshield's was first) and so the molds I'd made for Thorin's scale mail brigandine armour was able to be re-used for Fili's costume.

The costume's done, so this isn't a WIP thread, though the inevitable tinkering that always comes with costuming goes on.
But anyway, here's what we did.

Fili, nephew and heir of Thorin, the golden prince.

heirs-trio.jpgthcc_fili_03.jpg

The finished work.

YUI_2570.JPG
 
Under layer - muscle suit

I love the RPF a lot for the amazing muscle suits I see, but we are just two people living in Japan without fabulous resources. Simple and easy was the order of the day for the muscle suit. It was my idea to make this piece up - with my Thorin costume, the costume itself gives great breadth of shoulder, supported with some shoulder pads made from floor foam attached to a half-t-shirt. Since Feikoi wanted at some point to ditch the coat outer layer to show the decorated long vest, I thought having bigger arms and shoulders would help fill the costume out, as well as giving a better profile. Something broad to help the illusion of shortness or at least Dwarfiness.

body.jpg

Going from production pics of the body suits in the Hobbit, I decided to just do a double layer garment with muscles stitched in as pockets, and the back side cut and the stuffing thrust into each. The inner layer was some cheap turquoise cotton knit, and the upper some slippery synthetic lycra thing. I wanted something smooth so the shirt would slide smoothly over it. Going with a stuffed padding like this meant it could be compressed to some degree when packing, as well as hand washed and hung to dry.

2015-01-23 23.39.45.jpg

The muscle stitching was done with a zigzag that would allow stretch. The armpits were left completely open for cooling. The lower arm is held to the upper with a strap and button affair. I offered to do elbow pads, but Feikoi decided she didn't need them. If in the future the costume gets too much in terms of heating, she can cut away some of the inner cotton knit later from the chest down. We talked about abs or hip muscles, but in the end didn't bother as Feikoi stated her hips were wide enough to be Dwarven.
 
Shirt and Pants

In the Cloaks and Daggers book, it states that Fili's shirt is a silk noile, which does sound pretty nice and drapes beautifully. Feikoi picked out a brown cotton double gauze which was lovely and soft for the shirt.

shirt.jpg

Of interest was the quilting and piping on the shirt, as well as the hood. The first pic below is before the hood was attached and lacing holes added. The second is after it was finished and the third a view of the hood (after a cosplay shoot day, when it'd been in a bag and thus is pretty wrinkled.)
2015-01-02 21.18.36.jpg2015-01-23 23.27.03.jpgIMG_0101.JPG

Problems during the shirt build - not many. It's ye olde Tunic Pattern with a Yoke, with underarm gussets for ease, slit up the sides and open in the front. The piping was irksome, as was getting the proportion of the quilting correct. I did run into a snag with the hood, which wound up being pieced from left-over scraps because I ran out of fabric.But it's not very noticeable. It's a nice shirt.

It goes without saying that the entire costume was built over the muscle pad layer, otherwise it would never have fit.

Pants - Fili's pants look as if they are some kind of suede and have some fancy seaming above the knee pattern. There's actually a top and bottom to the leg, as well as more vertical seaming. And then, of course the raised patterning.

Happily, a photographer took detail pics of Fili's costume during the Costume Trail display in NZ. This combined with a display in Japan with a sister city in Wellington meant we actually had the correct pattern for all of Fili's decorative elements. (I didn't have them when I did Thorin's and thus my costume saddens me with inaccuracy.) Thus, a lot of work was done for us - all we had to do was size the patterns in Photoshop etc, and print them out for stencilling and cutting.

tumblr_nh4as93LJX1r3vnt3o1_1280.jpgtumblr_n2mf1fiIQD1tt9bfno10_1280.jpg

Feikoi decided to simplify the pants pattern with less seams. A synthetic fabric with a sort of leather look and a bit of stretch was used for the pants.

The big issue was that raised pattern on the knee. The movie costumers had a fancy set-up; they laser cut leather and sandwiched it to get the effect. There was no way we could manage that. What Feikoi decided to do was cut craft foam and sandwich it between two layers of fabric, using contact glue.

Here's the proof of concept test piece.
2015-02-08 18.00.30.jpg
The sandwiching was done before the pants were cut out and sewn.

Here's the finished pants on the dummy, and in use.
IMG_0098.JPG20150124_212125.jpg
YUI_2575.JPG
 

Attachments

  • IMG_1552.JPG
    IMG_1552.JPG
    1.6 MB · Views: 231
Last edited:
Vest - The vest pattern is odd, being that it has a back waist seam (with piping for god’s sake!). The front has long darts extending to the breast, and the back body is darted to the shoulder blades and panels below. The back panels overlap in the centre but not on the sides, I assume so that pockets/knives/whatever can be accessed more easily. And of course you get shoulder pieces with more piping, just in case the muscle pads aren’t enough to make you look as wide as tall.

325482_354277107986885_1516653969_o.jpgVest back 2.jpg

Vinyl pleather was used (best colour) and crushed up for a more worn look. Here's the mock-up pattern:
IMG_1661.JPGIMG_1660.JPG


Armour pieces were cast in resin using molds from the Thorin costume build, painted gold and aged to bronze with brown paint. The top pic doesn’t show the colour of the armour very well, but it is a bronzed colour. Plates were attached using Shoe Goo, though a good contact cement like Master’s could be used.
2015-02-08 18.00.31.jpg2015-01-22 19.56.52.jpg

Issues we ran into - the pleather was heavy, too heavy for our sewing machines. Areas where the pleather was four layers deep were done by hand. Also, to avoid too much visible machine stitching, the edges of the vest skirt panels were turned under and glued with contact glue. This hasn't worked out, as the glue isn't reacting well with the backing on the pleather and keeps popping up. But it IS heavy pleather, so Feikoi wound up just cutting the edges off and leaving them.

Another issue is the armour plating on the shoulders wants to pop up, since the plates won't bend over the curve and the Shoe Goo isn't strong enough to keep the tips of the plates down perfectly. I've run into the same issue on my Thorin armour and solved the problem via a drilled hole through the plate and fabric, and extra-heavy sinew thread.

Here's the glueing of the armour.
2015-01-23 23.26.13.jpg
And the finished piece.

IMG_0105.JPGIMG_0104.JPGIMG_0107.JPG

More on this thread later, when I have time to type!
 

Attachments

  • 2015-02-08 18.00.33.jpg
    2015-02-08 18.00.33.jpg
    2.2 MB · Views: 206
This is really impressive! The finished version looks great. I am in awe of your skill at creating/modifying patterns. That's definitely a skill I need to learn. I'll get there! I'm still really new at all this costuming/sewing stuff. :)
 
I think for recreating costumes it is especially hard when you are tall/short etc and the actor or character is a very different body type. The patterning gets hard then! We do a lot of draping, then squint at loads of photos, test the toile and tweak a lot. There was one pic of Feikoi I didn't put up where we were testing the placement of the diamond tile patterns on the vest.

For Fili, getting the proportion sideways for stocky dwarves was the big issue. I'm tall, but not as tall as Richard Armitage so I didn't have to build as much sideways. Feikoi is almost the size of Dean O'Gorman, Fili's actor, so it was mainly the matter of making girly shoulders and arms bigger.

Yup. Patterning. Drape, test, recut, test. THEN get the good fabric out. I'm not trained, so, that's how I roll, and it works very well.
 
Vambraces

Production piece below.

tumblr_nh48zgvp3z1r3vnt3o6_1280.jpgtumblr_nh48zgvp3z1r3vnt3o10_1280.jpgtumblr_nh4as93LJX1r3vnt3o4_1280.jpg

With the production patterns for decoration as seen up in the pants comment, the most tedious part of making the vambraces was done. Feikoi printed it out to test the size and it was used for the leather tooling.

2015-01-25 20.48.13.jpg2015-02-02 23.21.38.jpg2015-02-06 10.33.45.jpg

A small snag was run into with leather dye - we had none in the right colour. I wound up using a dye for silk instead, which worked out fine. It was what we had. The buckles are just silver generic ones that were around.

YUI_2575.JPGIMG_0115.JPG
 

Attachments

  • tumblr_inline_ngm64fCYre1ra0v1d.gif
    tumblr_inline_ngm64fCYre1ra0v1d.gif
    1.8 MB · Views: 124
  • 20150124_183257.jpg
    20150124_183257.jpg
    1.1 MB · Views: 121
  • 20150124_182445.jpg
    20150124_182445.jpg
    1.2 MB · Views: 123
  • 20150124_180033(1).jpg
    20150124_180033(1).jpg
    991.5 KB · Views: 121
  • 20150124_175952.jpg
    20150124_175952.jpg
    2.7 MB · Views: 124
Last edited:
Under Gauntlets

tumblr_inline_ngm64fCYre1ra0v1d.giftumblr_nh48zgvp3z1r3vnt3o7_1280.jpgtumblr_nh4as93LJX1r3vnt3o3_1280.jpg

Feikoi made the under gauntlets from a brownish pleather from an adapted glove style pattern with no fingers. Because the movie gauntlet's side seam and wrist seam was over-lapped and hand sewn, the trickiest part was manoeuvring the glove in the sewing machine. Due to time constraints, the decorative stitching up the side seam and around the knuckles was left off.

The gauntlet was tested over the muscle suit layer, as per usual for best fit.

20150124_180033.jpg20150124_182445.jpg20150124_183257.jpg

20150124_192407.jpg
 

Attachments

  • 20150124_192407.jpg
    20150124_192407.jpg
    1.1 MB · Views: 116
Last edited:
Knives

In a fit of madness, since we needed knives anyway for Fili's vambraces, I decided to make an excessive number, based on what the Elven guards pulled off him in Mirkwood forest. Onscreeen, he was divested of seven that we could see. This doesn't count his axes!

Knife Design #1

The hunting knives have Fili's crest as heir of the line of Durin on the hilt.
4fac08e4913bc1766eafe310d76f384d.jpg
There are lots of references for these online and loads of people have posted about making them, so I won't go into it too much, except to say that I followed pretty much the same process with all the knives we made.

Being unburdened with a workshop or even many tools, and because we were running out of time, I decided to keep them simple. I printed the knife patterns, glued the pattern to thin plywood and hand-cut the blade and tang with a craft knife. Yup, a craft knife - through 1/4 plywood. Yes, my hands did hurt. I whittled a dull edge on the knives, pressed the blade design in with a dead ball point pen and called them done.
2015-01-26 20.22.03.jpgIMG_1562.JPG

Craft foam from the 100 yen shop was cut for the handle and glued together and basic carving done with another craft knife (this was before we got the Dremel, sadly.) We found the cheap craft foam hard to work with and carve smoothly, though I evened the handles out with some heat later. A Japanese foam called Lionboard (though it has a different trade name now I've forgotten) worked better for smooth carving. The hilt designs were burning in with a soldering iron.
IMG_1571.JPGWT00988lg.jpg

Gesso, sanding, more gesso and the knives were painted.

Knife Design #2 - This is an odd leaf shaped blade we couldn’t find in any of the official Hobbit books. Hidden behind Fili - under the hood? Down the back of his coat? There's no clear shot, so I wound up just making up a design.

vlcsnap-2015-01-11-21h31m07s38.pngUntitled-1.png

Knife Design #3 - Balin's concept knife

0d51645163e3f1bed7ad9cb8f50e30df.jpgvlcsnap-2015-01-11-21h32m49s41.png
How the hell did he end up with Balin’s knife? It’s clearly the one you find in the concept art books, I don’t know if we ever see Balin use it in the movie.

Knife Design #4 - the under-lapel blade. This is a tiny one that looked from the very brief and blurry scene time we saw it a bit like his hunting knives with a brass hilt, so I based my design on that.
tumblr_njg4xfJW1J1r0uwumo7_1280.jpg
 

Attachments

  • 2015-01-29 20.14.25.jpg
    2015-01-29 20.14.25.jpg
    2.2 MB · Views: 140
Knives continued, plus throwing axes

There were also another design of knife - a paired set Fili holds up for the guard to take, with a floret rounded sort of pommel, but the exact design couldn’t be found in the books. It looked Ereborean in design, like Balin’s knife. But because I'd committed to so many already, I'd hit the limit and skipped doing those.

Fili's throwing axes are kept in boot sheaths, and the design again is easy enough to find on the web.

fili axew.jpg

We had 3/4" floor mats and I attempted carving those with a craft knife (again, no Dremel tool at this point) and failed utterly.
2015-01-30 15.14.54.jpg
With a 'screw this' frame of mind, I decided I'd cut them, do a little basic carving on the edges to make them sharper and just gessoed and painted them.

My design for the mini-lapel knife, based on his hunting knives.
lapel blade.jpg

Here's the progress pics for the bulk of the knives.
IMG_1567.JPGIMG_1572.JPGIMG_1574.JPGIMG_1587.JPG

I didn't bother doing the detail paint work on the Balin knife, but saved that creative energy for doing a passable 3-d style painting on the throwing axes instead to give the illusion of depth. The axes were finished with suede and a Sharpie for the line details. They also have magnets under the suede that hook to magnets in the axe sheaths to keep them from falling out. The foam axes worked out well, being exceptionally light when the whole of the costume was so heavy.

For some of the extra knives, pocket sheaths were sewn into the lining of the coat. We haven't figured out what to do with the leaf blade that goes under/in his hood yet, though.
20150202_110802.jpgIMG_0115.JPG
 

Attachments

  • lapel blade.psd
    39.7 KB · Views: 131
Last edited:
Knives and Axes, completed and painted.

The two tiny shiny knives are from the 100 yen shop, the joke theatre type that has a blade that compresses into the handle when you stab someone. We figured it'd be fun to have those and the hilts were painted to match the rest.

I wound up being inordinately proud of the paint on the axes. You would hardly know that it's just flat foam, the illusion of depth is very good, in my opinion.

2015-01-31 23.08.07.jpg2015-01-31 23.08.17.jpg2015-02-02 00.11.25.jpg

Continuing the build thread later.
 
curse my (relatively) delicate hands and forearms
JG, you are a lifesaver for cutting that plywood for me (and, yanno, ALL THE OTHER WORK YOU DID jfc). I am a weakling. I am now remembering how fun foam+dremel was though -- I gotta finish those sword hilts...
 
This is really impressive! The finished version looks great. I am in awe of your skill at creating/modifying patterns. That's definitely a skill I need to learn. I'll get there! I'm still really new at all this costuming/sewing stuff. :)

It really helps to have a dress form or another person to do draping. I taught myself pattern-drafting/scaling from Japanese goth-loli magazines, and kind of hate using commercial patterns myself. Getting a dress form and just playing with fabric on it was pretty amazing in terms of understanding how seams and darts should work, and why they are where they are. (Or if you don't have a dress form, a patient friend you can bribe with cookies works too for practice, lol)
 
Boots and Axe Sheaths

Production boots:
2014-12-29 15.07.11.pngtumblr_nh48zgvp3z1r3vnt3o5_1280.jpgtumblr_nh4as93LJX1r3vnt3o9_1280.jpgtumblr_nh4as93LJX1r3vnt3o2_1280.jpg

Feikoi was lucky enough to find suitable boots with straps already in place in the States, so not much needed to be done to the boots aside from adding the axe sheaths. They were a touch tall, so the tops were folded in to correct height.
20150124_192345.jpg


The axe sheaths were made last minute from a thin pleather with a backing of hard cardboard. A wide double leather back-strap connects the two sheaths, with stitching to make channels for the straps of the boots to pass through. (The boot straps were functional as well as decorative and could be unbuckled.)

2015-02-08 18.02.10.jpg

Feikoi reports that the pleather fought hard, hated her sewing machine, slid and bunched.

On first wearing, the pleather's stretch wasn't enough to keep the axes from falling out when feikoi knelt or caught them. Small strong magnets were purchased from the 100 yen and glued under the leather handle of the axes and for expediency and speed, corresponding magnets were duct-taped to the sheaths.

IMG_3174.JPG


Feikoi wants to make the sheaths again from something more substantial for the next wearing.

IMG_0116.JPGIMG_0117.JPGIMG_0118.JPG
 
Last edited:
The Coat part 1

The most time consuming part of the build was the coat. Fili's coat is a heavy suede with patterning along the hems of the skirts, around the cuff and up the sleeve. The Cloaks and Daggers book says that they achieved the effect with laser cut leather pressed into the suede.

2015-02-08 18.01.58.jpgDec 2014 001.JPGDec 2014 067.JPG

The Costume Trail pics show a lot more details. The coat has raglan style sleeve with the sleeve pattern disappearing up under the fur collar. The hems are stitched in a double row and the suede edges not turned under. The coat has a waist seam and a waist clasp of a fancy stitched loop and self-wrapped leather toggle. The wrist pattern is mostly covered by the turn-back of the fur cuff and usually hidden entirely by the vambraces. The 4 bottom panels only slightly overlap at the waist sides and back.

The seams were overlapped and double stitched in black, nothing turned in.

The fur collar type is unknown - Dean O'Gorman claims in the Cloaks books that it's some special kind of big cat, though he doesn't actually know.

Of interest to people who despise hot costumes - like so many of the pieces on the Hobbit (Bard's coat, Kili's, Thorin's brig armour), the sleeves are not completely attached and the armpit area is left open.

tumblr_nh4as93LJX1r3vnt3o6_1280.jpgtumblr_nh48zgvp3z1r3vnt3o3_1280.jpgtumblr_nh48zgvp3z1r3vnt3o4_1280.jpg
tumblr_nh4as93LJX1r3vnt3o4_1280.jpg

Pattern pieces below:
1. The side back and centre back body, and the front of the jacket.
2. The sleeve. The farthest left edge is the centre back, and the bottom is the front of the arm.
3. The front panel and back panels, and the lower piece is the front lapel. I didn't take a pic of the back of the collar.

IMG_1658.JPGIMG_1657.JPGIMG_1659.JPG
 

Attachments

  • 2014-12-29 15.08.13.jpg
    2014-12-29 15.08.13.jpg
    23.7 KB · Views: 153
The Coat Part 2

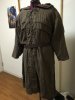
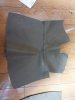
Fitting the arms with the odd decorative shaping on the shoulders was tough. It involved a lot of pinning and sketching based on eye-balling the original coat. Below is the toile test piece.

2015-01-15 21.40.48.jpg2015-01-15 21.42.06.jpg

Then came the really hard part - the pressed leather look. Some people would have given up and just painted it on. Not Feikoi.

As she did on the knee pad of the pants, the pattern was sized from the production pic that can be seen up in the pants comment, printed and 2.5 mm craft foam carved with a craft knife. Due to the large amount of decoration this took some time.

The fabric she purchased looked like a very nice brown suede, and the lining was a cotton in a traditional Japanese ikat design she dyed brown. The craft foam was sandwiched between these two layers.

Because the pressed pattern meant that the width and length of the top fabric would shrink up when pressed into the crevices of craft foam, the pattern pieces could NOT be pre cut to the correct pattern size. The pattern was traced on the fabric with a decent amount of space between each to allow for the shrinkage and any mistakes, and the final trimming cut the piece to correct size.

The process went like this: a huge plastic sheet was laid on the floor and the cotton lining fabric laid on top, inner side up and the printed decorative side down. A spray glue was used to place the craft foam pieces so the pieces didn't slide.

From Feikoi's Tumblr post on the build:

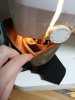
"Technically, I used spray glue to attach the foam patterns to the lining fabric, but the rubber cement (ゴムのり) I used elsewhere would have been more secure. When attaching the outside fabric, the rubber cement was applied to the lining /around/ the foam in a small section (usually diagonally, following the lines of the foam piece) and allowed to set to become tacky. Having the glue on top of the foam as well isn’t necessary – probably doesn’t hurt anything, but it’s easier without, oddly.

After that, the suede fabric was lightly and loosely laid across the glued section, and pressed carefully into the recessed areas with fingers and the wooden sticks. I would go back and jam the fabric tightly into the edges and corners with the sticks again every so often, as the glue set more. It was pretty easy to tell how it was working, since all the pressing would ruck up the pile of the suede cloth, and lightly smoothing along the top with my hand would make the raised sections stand out in color.

Warning – this may take you ages. Each of the four skirt panels took 3-5 hours to glue, and the sleeves took an hour and a half each, I believe (I did them last). This does not include the stencil design and cutting (there are three types), or the foam tracing and cutting time. The panels were laid flat and allowed to dry/cure overnight. I used 2.5mm soft eva craft foam (not lion board)."

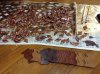
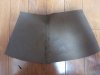
Feikoi took as much care as possible to avoid egregious wrinkling, and this process went on over days. The bottom panels alone took 3-5 hours a panel. They were first pieces done, and feikoi got faster as she went on.

2015-02-08 18.01.30.jpg2015-02-08 18.01.37.jpg2015-02-08 18.01.41.jpg2015-02-08 18.01.42.jpg

2015-02-08 18.01.51.jpg2015-02-08 18.02.01.jpg

Above - two finished panels before trimming to size.

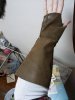
Keep in mind that the pattern was on four bottom panels, the length of the sleeves and she even did the cuffs though they were not likely to be seen.

If you go this route, it'll take a while. The craft foam is flexible but gave the fabric a certain weight and stiffness, which was not unlike the actual production coat's heavy suede.

Finishing the coat: Feikoi was working on another part of the costume, so I took up the final construction phase.

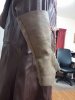
The fur I used for the collar was a smallish, cheap elf or caribou hide that seemed an appropriate texture and colour. I had to jigger pieces carefully to get all the collar and cuffs done, though the cuff fur direction ended up going sideways instead of up.

Fili’s coat seams are laid over each other and top stitched in two rows with thick black thread, so that's what I did.

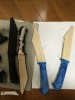
Some pockets for knives were attached to the lining, with plans for more to be done later. Since the cotton lining is effectively glued to the suede fabric, the hems were not turned under, just cut and edged with stitching. The glue will prevent much fraying.

The fur collar and cuffs aren’t backed with anything - the leather was thick enough it didn’t need it - and are only zigzag stitched on at the moment.

We ran out of time to do the toggle closure, and currently the coat is closed with a giant baby safety pin that no one sees since it's mostly covered by the fur collar and the belt.

- - - Updated - - -

The Coat Part 3 - Finished (for the time being)

IMG_0111.JPGIMG_0109.JPGIMG_0112.JPGIMG_0113.JPGIMG_0114.JPG

Done posting for the night. Next - the inner belt, the outer belt, wig, moustache and beads (we cheated on beads) and final cosplay pictures. Probably not all in one night.
 
Last edited:
I am in awe of your skills! The paint job on the axes is stunning - I never would have known it wasn't a raised pattern if you hadn't mentioned it! Everything looks so authentic. You've chosen great materials!

I do actually have a dress form and have started doing a tiny bit of draping (so far just a long skirt with soft pleats/folds, but I also have to drape the bodice for the costume at some point so that will be more difficult!) but am just starting to get into it. I am not great at reading/modifying patterns yet, but I'm learning! I should actually take some lessons at some point, instead of just trying to learn on my own from online tutorials and trial and error, lol.
 
Trial error works so well for me! If you have the crappy fabric to spare... Yard sales. Old sheets. Things like that, that you don't mind scragging.

Draping bodices can be tricky. Breasts. PRINCESS seams that go over them correctly. That sort of thing.

As for lessons, well. My mom taught me enough to go on with, so that when I wound up in home ec class I was impatient. Though I did learn the importance of pinning nicely. You get so much online from tutorials. For harder projects (my Sherlock coat, for example) I bought a tailoring book and sweated over it. It was invaluable. People learn things differently. I like books and visuals - classes tend to be slow. Other people work better if it's shown them directly in person. Whatever works for you!

Ain't that Fili coat great though? It's such a great piece.

The good thing about the axes - we talked about molding them. This cheap option of foam worked well - if we lose one, it's no great matter. (I made six just in case we did.) And they are light weight. It would be terrible to have the trouble of sculpting and molding the axes in plastic or even wood only to lose or break one. Also, with the magnets in them, we use them on the fridge.
 
I just ran out of mock-up fabric (I found cotton broadcloth on sale for under $2/m a couple of years ago, and bought 10m, but I finally used the last of it on Bilbo's vest) so I'll have to keep an eye out for more. Luckily, it's getting into yard sale season here so I will have to see what I can find.

I'm building this particular bodice mostly over top of an existing corset, and most of it will be covered by detail/armour(ish) pieces so hopefully it won't be too tricky. But I do need one sleeve, and to figure out how to attach the sleeve to the rest of the bodice. I will have to do some tests. But it's not urgent - if I can get it done for the next con I might wear it there, but my priority is my husband's Baymax (the white inflatable version). I have no idea where to even start with that one, lol!

I tend to learn best in person, though some of the tutorials I've found online have been great. But I find for more tricky stuff I can't always figure it out from tutorials and videos. I have some very knowledgeable friends (and my mom!) who have been willing to help me out so far but I don't want to abuse their generosity too much!

OMG I love the idea of putting them on the fridge. I would totally do that, except that my cats (okay, just one of them) would probably run off with them and destroy them, lol.
 
Inner Belt

This is a piece rarely seen, as it's over the shirt and under the vest, coat and the other belt. The pattern for it can be seen in the book page below in the middle above the vambrace pattern. It looks like a thick woven piece and has a pattern, possibly painted upon it.


Biwz3sNCEAAu9_l.jpg large.jpgthe_hobbit_braids_dori_fili_nori_ori_1920x1080_38500 - Copy.jpgUntitled-1 (2).jpg

A cheap canvas belt was purchased and painted brown. Feikoi cut a stencil from cardboard and painted the pattern in black acrylic. From her blog post:

"As for the belt stencil, a word to the wise – enough paint will eventually make your stencil very soggy, even if you use cardboard like I did, so make multiples or maybe even coat it with something waterproof. In the stencil pictured, I used the pattern on the right, simplified to remove the dots inside the triangles and connecting the crown points to the diagonals. I then cut and removed the white sections, leaving a somewhat delicate stencil (hence the disintegration)."

20150123_131048.jpgIMG_0100.JPG
For wearing, the modern buckle was moved to the back so as not to be seen.

The Belt

Production Costume Belt below

Thanks to the Costume Trail pics, you can see the belt quite clearly. All different types and shades of brown leather, laced down to a backing of thin leather and each other with thin strips in black. A section underlaps in the front while the double belt tongues overlap and are tucked into decorative loops. The buckles and findings are dark silvery metal, pitted.

tumblr_nh4as93LJX1r3vnt3o5_1280.jpgtumblr_nh4as93LJX1r3vnt3o7_1280.jpgtumblr_nh4as93LJX1r3vnt3o10_1280.jpgtumblr_nh48zgvp3z1r3vnt3o8_1280.jpg

2015-02-08 18.02.08 1.jpg
 
This thread is more than 8 years old.

Your message may be considered spam for the following reasons:

  1. This thread hasn't been active in some time. A new post in this thread might not contribute constructively to this discussion after so long.
If you wish to reply despite these issues, check the box below before replying.
Be aware that malicious compliance may result in more severe penalties.
Back
Top