Bard the Bowman costume build - The Hobbit movies

The Bow continued

After the curving and painting was done, the next bit was to add the leather for the grip and the tips of the bow.

Happily, my father had given me his original 1961 copy of Leather Braiding by Bruce Grant.
leather.jpg
It's a really authoritative book, and there's a reprint available on Amazon as well here, if that's something people are interested in. I needed it mainly for the grip and for the Turk's head braid that finished it and the tips.
bow6.jpg
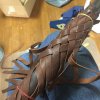
I cut some leather thongs from a thin ladies' dress shoe leather that I'd bought cheap and settled in with some elastics and ties to start. Some flat leather pieces were attached with glue beforehand to cover the joins and the nuts and bolts that hold the parts of the bow together, unglued at the tops so I could still bend it back to access the bolts. And the weaving began.
bow7.jpg
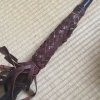
When I was mostly finished, I went back over the weaving with an awl to lift and tighten the leather so it strapped closely to the bow. This took a bit of time, but I didn't want the leather to be sliding around everywhere. I probably should have started with wet leather so it would dry and tighten even more, but it wound up not being necessary.
bow6.jpg
The Leather Braiding book talks about using sinew to tie off weaving of this tight, wetted so it shrinks as it dries and clamps it down. Being that I only had synthetic sinew, I used heavy thread in black, cut off the ragged ends, bent them back and added spots of glue to keep it in place.

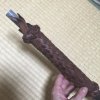
Next was the Turk's Head knots that circled the bow and covered the cut ends of the weave. It's hard to explain the Turk's Head, except to say it's your basic three strand plait but with the ends of the leather worked back into the braid and then cut off so they are hidden and the braid looks like it's all of one piece. I gotta say, it is a bear to do, and my version was not perfect. Close enough, though. Below is one example, before I cut off the re-woven end of the leather.
bow5.jpg
However, it was still too loose and prone to sliding, and I was afraid it would slip off and expose the cut ends of the woven handle. My old friend Hot Water came to the rescue, to shrink (and incidentally harden and darken) the Turk's Head knots. It wound up shrinking and darkening part of the grip as well when I poured water over it, which was fine since the leather was a touch too light. The pic below is after the water-shrinking when the leather was still wet and you can see the Turk's Head knot tightened up beautifully.
bow2.jpg
Next was the tips of the bow. I'd actually managed to angle cut the tips to be thinner and more like a real bow, but unfortunately it left me with the exposed curved inner side of the PVC pipe. Thank goodness for these tip covers - they hid the essential pipeness of the pipe.
bow2 (2).jpg
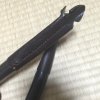
For these, I wrapped a piece of the same fancy shoe leather around, marked where it should overlap, and hand-stiitched it into tubes which slid over the tips. Again, hot water helped shrink the leather until it was impossible to slide off again. More Turk's Head knots, in a thinner strands and finished with the same hidden ends and hot water finished the tips.
bow4.jpg
bow3.jpg
The string is a round covered elastic I had bought to make hair ties with - it comes in 1 m lengths at the 100 yen shops in Japan. I'll be replacing it at some point with light brown, which is more like Bard's bow string. But for the look of it, I looped the ends, glued about 5 cm and wrapped it with thick yellow thread like Bard's. The elastic here is double looped over the bow tip, but that's mainly because I'm in mortal fear of it slipping off and whacking someone when I pull too hard. The elastic is very stretchy, and even when I pull back with an arrow and release, the arrow just flops. So, it's completely un-dangerous and thus should satisfy any convention management.

I guess the next part of the build thread will be about arrows, the quiver and boots.

I have mocked up some arrows, but I need to find longer dowels, sculpt arrowheads and nocks, and dye the feathers I ordered whenever they come in. I can't find brown or rust coloured feathers in Japan that aren't $3+ a feather. The arrows are not going to look very professional, I'm afraid, but since they are for a cosplay with a non-functioning bow and I wouldn't trust the dowels to hold together if fired from an actual bow, I'll learn to live with it. Arrow-making is tricky.
IMG_2255.JPG

Ditto the boots - I need to find Ugg knock-offs in my size here. This isn't an easy task.

None of the above are up for immediate making, so the thread will update sporadically from here on, I guess.

Next update - probably Bard's Quiver!
 
The costume so far:

Make-up, Costume and Hair test #1.

pic8.jpg
You can see the air-brushed fake fur when I open the coat too far. Thankfully, Bard never takes off his coat and if there's a wind to majestically blow my coat tails out, I'll just have to hope the ugly bits don't get too exposed.
poic6.jpg
Here's the interior of the coat with that lovely, soft and fluffly clean fake fur. The real edges the coat around all the hems and edges at least 8 inches deep and more on the lapels and on the back slit edge of the coat. I found that the back skirt interior could be seen between my legs, so the real fur covers more of that exposed area.
2015-03-30 20.42.19.jpg2015-03-30 20.42.43.jpg
Other issues I found from Test #1 - the elastic on the bow. With a real bow, when I draw it back, the string pull is even and helps support the bow. But with the elastic being so stretchy, my arm got a bit tired holding what is essential a weight at arm's length with no support. Also, the draw ended up being un-even, even though I'd marked the centre nock point! The bottom elastic just stretched more than the top, probably because I was letting the bow sag against it. So that's something I need to be aware of in photos in the future,
pic7.jpg
I'm doing the inside draw like I'm used to here, though most photos of Bard show him doing an outside draw, the back of the hand toward the head and fingers out (to keep his hair and ear being whipped off by the string, I assume. Must be amazingly skilled to get such accuracy when he has no anchor point. Anyway.) I'll need more practice. Granted, I'm not here to discuss Bard's style with his bow - the actor himself said that's what they told him to use as it allowed an deep (and impressive I assume) draw. Well, I bent the bow to look like his, I have to draw past my face in the same style as Bard, though I'm not crazy about it.
 
Last edited:
Test #2 - Moustache worked out better (it's cut from on old lace beard; ditto the chin patch.) However, I either need to darken my skin tone or lighten the beard, the contrast is too much.

I also found I need a really opaque black hairspray to fully cover my red hair. So that's progress. Bard's hair isn't black, but I'm reluctant to use a demi-dye, since I'm pretty sure it'd still darken my hair permanently. Thus, in the pics below, Bard has an odd burgundy tint. Couldn't be helped.
pic2.jpg
pic3.jpg
pic4.jpg
Pic1.jpg
pic5.jpg

Anyway, pretty happy with how deliciously dirty the costume looks, and am looking forward to making the quiver and boots (but not looking forward to sculpting arrowheads and fletching arrows.)
 
Last edited:
Small informational update from the Cloaks and Daggers books - Bain has the same type of gloves that Bard does, and his are apparently made from a fluffy soft Australian possum!
 
Everything is looking really good so far! I'm loving this build. :)

Are you able to get brown hairspray too? Could you use it over the black to possibly hide more of the red and give a look closer to the colour in the movie?
 
I did get this brown spray, two shades of it, a Japanese product meant to help cover up greys? It's what I used for the second make-up test. I think it was just... transluscent or something and just not going to cut it. Sigh. The test failed. That's why they are tests.

For the first test, I used a black costume/Halloween stuff I got from Amazon.jp, much more opaque. At the same time I picked up what I thought was a brown in the same brand but it wound up being bronze and slightly glittery. Maybe if I spray that over the black and comb through? I don't know. Either I need to read the product descriptions more carefully or I need to shop for colour costume hairspray at an actual shop. Brown would be best, though that black worked out really well for coverage, since I could sort of comb it through. I really ought to have longer hair, but am reluctant to get a wig. It's nice not wearing a wig and sweating to death or suffering the headache of python-squeeze for once.

I also have some Ben Nye hair white stuff that is people use to colour beards for Santa and similar Bard but for some reason I can't find it. For the second test I just grabbed this old white clown greasepaint and blobbed it on with fingers like a class act.

For make up test The Third, I'd be trying some actual sideburns and stubble from hair and spirit gum.

But otherwise, it's not too shabby. If I had hazel eyes too... but no, that's going too far, I hate contacts.

Glad you like it, thank you!
 
I guess being in Japan makes everything more difficult! Sometimes I feel the same about being in Canada!

I'm lucky for my female Bilbo costume that I'll be able to use my own hair, since it's about the right colour, and has some natural curl to it (and I recently cut eight inches off, which I kept so I can use that for the foot hair, lol). I'll have to do some tests to see exactly how I want to wear it. But yeah, I often have to use a wig. It's always nice to take that off at the end of a con!
 
Right, The Boots, WIP

The Cloaks and Daggers book says this about Bard's boots:

Bard's boots were essentially Ugg boots, all fur with wrap-around straps. We inset a gripped sole within a camera-friendly leather one..."

Oh happy day, cheap boots! Adapted boots, with a leathery furry cover! You can see pretty clearly how the Eastern-style curly toe is nothing but the sole leather curled up over the boot itself, which made the making of these fairly easy. The lower leather portion is slightly gathered moccasin-style, to the fur uppers.

16868456699_beede4e0ff_o.jpg

With the true spirit of cheapness the filmmakers themselves started with, I figured on just adapting a cheap pair of shoes. Ugg boots are common enough in Japan, for ladies. If only they carried ladies' sizes above 25-26 cm! I found a pair of these terrible crepe-soled suede low boots in a recycle shop for about $3 that needed some restitching on the uppers. They didn't have the gathered moccasin-look of the originals, but I decided I'd rather just use these for ease.

Since I still wanted calf-length boots to help fill out the gaiters, I cut two tubes of the same material I made the gaiters from and attached them with synthetic sinew. Fur side out for no particular reason - I'm never going to wear these for fashion purposes, they are going to be strictly costume boots.

2015-04-19 19.11.38.jpg

Adding to the economy-attitude, there were enough scraps of fur left over from the lining of the Bard coat to cut two uppers. They were attached with some contact glue.

2015-04-22 20.08.03.jpg

The new soles were cut from 5 mm dark leather and the smooth leather finish ground away with a wire brush attachment and my hand drill. The same brush attachment ground off the dirty layer of the suede shoes' soles and roughed them up for glueing.

2015-04-22 20.08.17.jpg

Hot water poured over the new soles' tips leather side to curl them up naturally. Once dry, I used Shoe Goo to attach the new soles. Hope the Shoe Goo holds up! It ought to be enough for photo shoots and conventions.

IMG_2725.JPGIMG_2726.JPGIMG_2728.JPG

Anyway, the next bit for the boots is to trim the sole edges down a bit more and some paint - warm colour for the fur and some light grey-brown tones for the suede and the new sole.
 
Boots and Gaiters - finished.

Rather than go to the bother and expense of making new gaiters, I decided I'd just stick with what I'd made and touch them up further with paint.

I also worked on the soles and suede of the boots to match the production ones better.

Boots before and after:
IMG_2728.JPGIMG_2729.JPG

The gaiters before and after:
IMG_2737.JPGIMG_2738.JPG
IMG_2743.JPGIMG_2742.JPGIMG_2740.JPG

Still not perfect, but passable now.

IMG_2744.JPG16868456699_beede4e0ff_o.jpg

I guess the next build will be the quiver, and then the arrowhead sculpt (sculpting, not my favorite thing). I've run into a snag since I can't get hold of more feathers in a big size for a reasonable price. I've got four arrows made, and had to order some more from China. They won't get here before the event I plan on wearing this outfit at in a week, but that's about par the course. If I've time, I'd love to tackle the spear-size Black Arrow!
 
Never let it be said that I'd let lack of the right materials or general ignorance stand in the way of making something.

The Quiver WIP

The Cloaks and Daggers book says this about Bard's quiver, that since the rest of his costume was simple and 'drawing on Mongol influences, supplemented the tall bow with a quiver and arrows that had a slightly Eastern character.' (Richard Taylor, Weta Workshop Design and Special Effects Supervisor).

The quiver has two tones of leather, two short riveted straps with D-rings that support the baldric strap. The extra chunk of leather on the upper shoulder of the chest strap is interesting, looks like something to stop rubbing and chafing. The baldric has a dull brass buckle and a pattern pressed in. The interior of the quiver has some padding to keep the arrows from being too noisy rattling around, always a consideration for a hunter. The shape of the quiver is narrower at the bottom than the top.

tumblr_mxuz4axt4Q1sml467o1_1280.jpgB24dyXhIIAETPjG.jpg large.jpgIMG_2959.JPGbg_pePGd.jpg

Ideally, I'd have a nice chunk of med-heavy weight hide that would support itself, unfinished or at least in the right colour. What I had instead was either the wrong colour or too light. So be it.
 
I had a nice piece of plain soft thin deer hide that could be dyed down and scraps of heavier leather for the top and bottom of the quiver.

For support I had thought to use a shipping tube, but it didn't have the right slight cone shape. I wasn't able to find any plastic sheeting of the right weight or size. So I reluctantly decided I'd use Wonderflex to shape the quiver and work the leather onto it. I hate using up Wonderflex for something so simple, but it needed to be done and I don't have the money or time to go and get the right hide right now. The event I'm wearing the costume at is coming up in six days.

A pattern was worked up in cardboard to check size and length and the leather, Wonderflex and a sheep-fleece fun fur for the interior were cut.

2015-04-26 20.03.04.jpg2015-04-26 20.02.20.jpg

Ideally, I'd get to dye the leather before working it, but I'm still waiting on the delivery!

The decorative top and bottom in the heavier hide were hand-stitched with fake sinew before the sides closed with my sewing machine. The bottom was done last before I turned to the Wonderflex. It was slightly tricky apply the overlap seam and the bottom with the heat gun while keeping the Wonderflex from buckling.

2015-04-26 23.50.24.jpg2015-04-27 11.13.04.jpg

With that done, I wet the leather and began to ease it over the Wonderflex tube like wrinkly sausage skin. Or whatever, insert rude joke here.

2015-04-27 11.25.38.jpg2015-04-27 12.23.01.jpg

With the leather in place, I wet the hide again and went over it with a heat gun to help shrink it in places where the leather was a bit loose. *Word to wise, be certain to support the Wonderflex so it doesn't stretch or buckle at this point. I had to redo one section twice.

The last bit of stitching went around the top with another piece at the top to help hide the Wonderflex and give some extra support to the pointy tip. And that's it for today, aside from punching and riveting the straps for the D-rings Oh, and dyeing the hide, and tooling the belt when it finally comes in (hopefully before th event!) I have an extra belt to use if it doesn't, happily. When the straps are down, I can put the sheep fake fur inside and a pad to cushion the arrow tips.

2015-04-27 12.23.10.jpg2015-04-27 12.23.22.jpg
 
Last edited:
The dye and belt blank came in just in time, though too late in the evening to start tooling the baldric for the quiver without disturbing neighbours. I did manage to get the dye and finish on the quiver. Not as smooth a finish as I could hope on the deerskin. Bard's quiver should look a bit battered anyway - that's my story and I'm sticking to it.

bg_pePGd.jpgIMG_2962.JPGIMG_2963.JPG

It's a bit hard to tell from movie or the Weta book which brown it ought to be, I'd hoped for a slightly more reddish tone, but am not unhappy with what I achieved.
 
I think everything is looking really good so far. I'm super impressed with how it's turning out!
 
Not everything works out, I find. I had hoped to save a little time by making a stamp for the leather patterning for the quiver chest strap.

2015-04-29 12.51.27.jpg2015-04-29 13.10.18.jpg
But when I tried it, it skipped around too much (too big?) I cut it down, tried again and it just didn't cut it. Perhaps because it was only wood (working with what I have, as usual), or maybe I needed something to press it like a billy-o into the leather, something industrial and super heavy. Anyway, it saved me not a whit of time. as I had to go over the patterning anyway with leather working tools.

Well, with that tedium done, I stained the leather (slightly different shade from the quiver, I wound up using three types of leather for the project and they all took dye differently/). The quiver was reinforced at the strapping points and the buckle attached. One quiver, done.

A good thing about over-engineering a cosplay item - I'll be able to use it for actual archery. I've always wanted a nice quiver.

2015-04-29 20.05.25.jpg2015-04-29 20.06.23.jpg2015-04-29 20.08.32.jpg

2015-04-29 20.09.35.jpg2015-04-29 20.09.57.jpg2015-04-29 20.10.07.jpg

And that's the quiver done. Next big thing before Sunday - sculpt the arrowheads and nocks. I think the arrowheads will be tricky, I'm worried about the tips breaking off. Sculpey? Cast them in resin? Not bother and carve them from craft foam? Can't decide.

Still no feathers from the order from China yet. Sigh, I will live with the four I managed, then.
 
Last edited:
At this point, you're probably further ahead to make foam arrowheads since you have very limited time, and figure out something else for your next event. I'd be worried about Sculpey being too fragile. I'd go with whatever's quickest and least likely to break right now, and make something better later.
 
True. I at least need to make nocks, I don't have to make more than one arrow head for posing! Still. I'll have Saturday to fool around with it. I may test one in Sculpey, make a cast of it and mold a resin one just to see what'll work. I know from my flatmate's work with Fili's pipe how fragile Sculpey can be, but it's fine for doing some casting. I also have some polymer clay.

Nocks first, though! People can see those sticking out of the quiver.

Just for funsies, I'm also making a normal size Black Arrow to put in the quiver. No time for a full-size harpoon version. Combine a bit of book-canon with movie'verse.
 
Bag, pockets real and in potentia, and arrowheads.

Into the home stretch of the Bard costume, which I’ll wear the day after next. Nocks for the arrows have been made (not crazy about them but good enough, they can be pulled off later if I can't stand them a second longer), the arrowhead has been crappily sculpted and the silicon for the mold has been poured.

IMG_2980.JPG
Not necessary for the character but useful for the convention is the shoulder bag. I used some brown wool that I’d picked up as a possible Bard-shirt, but it was too itchy. It’ll be nice going ‘round the convention with a bag that Bard might plausibly use (though cleaner) instead of something modern that would clash. The fur was another thing that I’d picked up for possible use on Bard’s boots, but wound up not using again. Looks fine as a flap for the bag!

IMG_2981.JPG
Best of all, I did put a pocket on the inside of the bag. I won’t have to rummage to the bottom of the bag under the fanbooks I’ll buy looking for pens or change. I plan on attaching a pocket to the inside waist of the Bard coat, too. You can never have too many pockets.

IMG_2980.JPG


IMG_2981.JPG
 
Last edited by a moderator:
I'm super excited to see this costume finished! It's coming together so nicely. :)

I love having bags and pockets in my costumes! I bought a backpack to use for my Bilbo costume (though I won't get it in time for next weekend's convention, but it'll be great for the one after that). At least my jacket has a couple of pockets in it. I'd like to try to put a couple of pockets in my vest but I'm a novice sewer and welt pocket tutorials look really confusing! I might not have time to figure it out before next weekend. And while I'm currently using a skirt I found at a thrift store (due to time constraints), I definitely want to put pockets in if I end up making a new one for the next con.
 
Back
Top