BlackFeatherCre
New Member
Introduction:
Hi,
I am a 25 year old modelmaking student at the University of Bolton and this post will describe the process of one my assigments. The idea behind this project was to take a prop (from either film, television, stage or literary sources) and re-design/ reimagine it for a hypothetical production. Being a fan of classic gothic horror stories I looked at the character Dr. Abraham Van Helsing from Bram Stoker's novel Dracula and imagined what type of a kit this long-time monster hunter would have. This is my first ever post on this forum, and I hope you people will enjoy it. I am looking forward to the feedback, so the they journey begin.
Part 1: Design
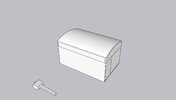
For the design I started out by "studying" the character a little bit closer. Van Helsing was a dutch doctor of many disciplines (amongst them medicine, philosophy, and litterature), which meant he was highly educated and experienced. For me this meant the the "kit" that I was going to design had to reflect the character of a man who was very efficient, and knew exactly what he wanted. The idea behind my kit was that this wasn't something that he would bring to out on his "raids". This was more or less a mobile lab/ office he would bring to the various hotels/ inns amd other places he would stay. This meant this kit didnt have to be pocket or backpack sized.

I started by making my first sketch in SketchUp. I based my design on old steamer trunks. Van Helsing's various tools (wooden stakes, mallet, daggers etc.) would clip or be strapped into the lid of the trunk, whilst the bottom would act as a writing desk, book shelf, chemical rack, and sample storage.
The design was also inspired by other sources such as professor Broom's box from Hellboy. I lot of design elements such as storage in the lid and the drawers made it into the final design.

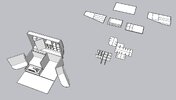
For the next sketch I wanted to make better use of the space in the box. The front was very "unused" and even the lid had a lot of negative space that could be filled.
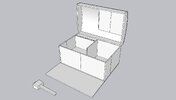
This is also what became the final design before I started production.

The drawer holds a Colt "Peacemaker" Single Action Army, and six silver bullets. On top of the drawer we have a small storage space for diaries, encyclopedias and other types of useful letterature. Behind the books we have a storage for vials with various urbes and poisons. On the right to the books there will be a rack for chemistry containers and other scientific glassware. The unfolding front sides leaves room for wooden stakes, holy water flask, flashlights and anatomical drawings of different beasts. The front "flap" acts as a make shift writing desk extension.
As I mentioned earlier the lid will hold some classic vampire hunter tools like a dagger, a mallet, a small shovel and a crucifix/ rosary. In addition the shelves in the lid will hold trinkets, talismans, personal items and a assortment of coins. As a small easter egg I was thinking of putting the paiting of mother Mary that professor Broom has in his box on one of the cabinet doors in the lid.


Hi,
I am a 25 year old modelmaking student at the University of Bolton and this post will describe the process of one my assigments. The idea behind this project was to take a prop (from either film, television, stage or literary sources) and re-design/ reimagine it for a hypothetical production. Being a fan of classic gothic horror stories I looked at the character Dr. Abraham Van Helsing from Bram Stoker's novel Dracula and imagined what type of a kit this long-time monster hunter would have. This is my first ever post on this forum, and I hope you people will enjoy it. I am looking forward to the feedback, so the they journey begin.
Part 1: Design
For the design I started out by "studying" the character a little bit closer. Van Helsing was a dutch doctor of many disciplines (amongst them medicine, philosophy, and litterature), which meant he was highly educated and experienced. For me this meant the the "kit" that I was going to design had to reflect the character of a man who was very efficient, and knew exactly what he wanted. The idea behind my kit was that this wasn't something that he would bring to out on his "raids". This was more or less a mobile lab/ office he would bring to the various hotels/ inns amd other places he would stay. This meant this kit didnt have to be pocket or backpack sized.
I started by making my first sketch in SketchUp. I based my design on old steamer trunks. Van Helsing's various tools (wooden stakes, mallet, daggers etc.) would clip or be strapped into the lid of the trunk, whilst the bottom would act as a writing desk, book shelf, chemical rack, and sample storage.
The design was also inspired by other sources such as professor Broom's box from Hellboy. I lot of design elements such as storage in the lid and the drawers made it into the final design.
For the next sketch I wanted to make better use of the space in the box. The front was very "unused" and even the lid had a lot of negative space that could be filled.
This is also what became the final design before I started production.
The drawer holds a Colt "Peacemaker" Single Action Army, and six silver bullets. On top of the drawer we have a small storage space for diaries, encyclopedias and other types of useful letterature. Behind the books we have a storage for vials with various urbes and poisons. On the right to the books there will be a rack for chemistry containers and other scientific glassware. The unfolding front sides leaves room for wooden stakes, holy water flask, flashlights and anatomical drawings of different beasts. The front "flap" acts as a make shift writing desk extension.
As I mentioned earlier the lid will hold some classic vampire hunter tools like a dagger, a mallet, a small shovel and a crucifix/ rosary. In addition the shelves in the lid will hold trinkets, talismans, personal items and a assortment of coins. As a small easter egg I was thinking of putting the paiting of mother Mary that professor Broom has in his box on one of the cabinet doors in the lid.