Doctor Who "Face Of Evil" Tesh gun build

nathanalaneller

Well-Known Member
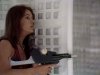
I bought a set of lights & found they blink like the Tesh Gun prop from the Doctor Who episode "Face Of Evil".
Ultra LED.JPG

I started off by making the two spheres in the middle of the gun.

d04-4q-c406.jpg


At first I thought it was a one piece crystal inside a plastic sphere.
After reviewing screencap's & an actual prop image I got from a friend. The crystal is a collection of acrylic decorative rocks for flower vases.

DSCI0615.JPG DSCI0619.JPG

I used a custom Christmas ornement from Hobby Lobby. The pipe is a 1/2 PVC for the stem. I dremeled the aria, super glued the pipe then slowly dremeled a hole flush to the pipe.

DSCI0621.JPG DSCI0622.JPG DSCI0623.JPG

I glued the sphere together then added acrylic rock from Hobby Lobby. I had to use a massage vibrator to set the crystals in tight.

DSCI0624.JPG DSCI0625.JPG

I couldn't get the light threw the crystals so I used 1/4 OD Polyethylene Tube, cut it down the middle & inserted the LED. The foam is to hold the LED & the loose crystals.

DSCI0629.JPG
 

Attachments

  • d04-4q-c547.jpg
    d04-4q-c547.jpg
    60.9 KB · Views: 472
very nice! I built one of these as a kid using cardboard and ping pong balls. I love classic Who props. I've got a couple I'm working on.
 
Update:
I just estimated out the angels to the gun using the sphere as a size reference. I drawn out a box frame on a cardboard paper & tried to follow as close as possible to the image. I cut it out & stenciled it to a ply board then cut out 2 side pieces.
Tesh gun meserments.jpgDSCI0631.JPGDSCI0633.JPGDSCI0634.JPG

Now here is were I'm stuck, how do I make the box form?
I don't have a band saw or table saw to cut angled pieces of wood.
Dose anyone have any tips on how to cut angels in wood with a router, dremel, hand saw, or a black & Decker scroll saw (I think that's what is called)?

th

I plan to wood glue all the sides together except for the bottom, that will be wood screwed to get to the battery box.
 
Last edited:


You can cut angles with that jig saw. but you would probably want to use a clamped strait edge to get a strait cut. a guide for the bottom plate of the saw. and the parts your cutting look like they would be short pieces. so safety Is a big factor.
 
Last edited by a moderator:
Update:
Before I tell you what I have so far, I have to tell you my home computer has malfunctioned in some way. It wont load properly. It ether freezes on the loading setting screen or it uses a window to type in the name & password to log in, loads then I can't use any of the programs on the desktop or access anything else not even the log off or shut down button.
(I don't want to reinstall the software until I get all my Documents out first.)

Anyway, back to the prop.
I drawn out the sides of the gun, cut them out then cut the angels the best I could using my dermal & sand then down with sander.

DSCI0639.JPG
DSCI0640.JPG
I had trouble with the parts that held the lights. I put the lights on the block to measure them & had spaced them wrong. When I cut the holes & put the lights in they had a big gap between them & there suppose to be touching. I sand down one of the holes closer & had to cut down the sided, along with the rest of the sides I had cut out after the fact.
DSCI0637.JPG
DSCI0644.JPGDSCI0642.JPG

The front tip is fore glued together wood cut outs.
DSCI0641.JPG
DSCI0645.JPG


To screw down the bottom panel I had to cut out fore block pieces to glue & to screw into.
DSCI0646.JPG
DSCI0648.JPG


I cut out the stock & painted it silver. (You think I should use PVC pipe or some sort of plastic for the end of the stock?)

In the screencaps of the back of the gun stock it looks like a plastic piece slid into a cut & bolted down. Ether that or its a..... something I don't know & can't describe.
DSCI0649.JPG


I was thinking of making the guns stock able to bolt on, but the blocks I put in to bolt the bottom panel on blocked off the area. So I thought making it so I can slide on the stock, but it would mean making another stock, cut accurate lines in the wood to slide into, So I decided just to dermal into the back a little & glue the stock in place once I have painted the rest of the gun.
DSCI0650.JPG
DSCI0652.JPG
 
Last edited:
Back
Top