The Rock VX Gas Canister Build

Hi there! I am very excited to follow your lead and make my own!! Would you suggest a formed plastic acrylic for the lid and top cage, or would a 3D printed carbon fiber be sufficient? Also - the attached clips/plugs that suspend the pearls... are they secured enough with the four clips?
 
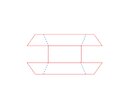
atyslau - Happy to answer any questions about the project. I am not confident that I understand what you are referring to with "formed plastic acrylic" (vacuum forming?), but the approach I used for the "cage" was to created a 3D model then I printed it in PLA with a high infill rate (I don't recall the exact %). The cage was printed in two parts and then metal dowls were inserted into the uprights of the cage and the two parts are screwed together. While I also reinforced the PLA print with some epoxy, I expect that a carbon fiber print would likely be just fine on its own.

Below is the cage after the two printed parts were assembled
IMG_4008.JPG


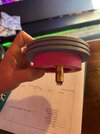
The "lid" that the strands hang from is made from layered sheets of acrylic (1/8") and a 3D-printed part at the bottom. The bottom part is not actually weight-bearing in my build as the clips are are attached to wire cable that just pass through the brass pieces and are mechanically anchored in the acrylic layers (I don't have any photos of that anchoring to show). The very top part is cast in resin from a 3D print I made, but that could be simply printed.

In the photo below, the top four layers you see are acrylic, while the bottom part is 3D printed and attached to the upper acrylic layers via bolts.

IMG_4040.JPG

here is a full view of the bottom of the lid before the strands were attached, hopefully this better shows what I am talking about.
IMG_3968.JPG


As for how the plugs are connected, I had a fair amount of heartburn about that potential point of failure. To add some additional strength I ended up epoxying the clips together, and then still didn't feel overly confident, so drilled a small hole horizontally through the plug connection point and inserted a M2 bolt to give some mechanical strength. In the second photo above I believe that is after I had epoxied the connections but before I added the M2 bolts

Hope that helps!
 
This is an absolutely amazing build! Fantastic work!

If you do not mind, I could use your help. I have a couple questions regarding your work on the case.
What did you use to make the stencils for the exterior?
What font and font size did you use?
Do you know the specific paint names/codes for the grey, green, and yellow?
Hey ctanx - Thank you!

Answers to you questions:

Stencil & Font
  • I made the stencils for the case on a vinyl cutting machine (specifically a Silhouette 3, but pretty much any vinyl cutting/scrapbooking machine would work).
  • The font used for all of the lettering besides the big "VX" is called "Rubric" and it is available for free online. I can't recall what I used for the big "VX" but whatever was the initial font I started with, I believe I ended up adjusting it a bit to get the right the look.
  • I don't have the specific point size, but the larger text line is 7/16" tall and the smaller text is 5/16" (about 11mm and 8mm respectively if you are outside the US)
  • I have attached a PDF of the lettering I made for the prop if you would like to use it. Please assume that the absolute size of the lettering may not be correct in the file, but it should all be in the correct proportion.

Paint
  • The case was primed with a rattle can of basic Rustolium grey primer
  • The main body: Krylon Matte Deep Grey
  • The yellow stripes: Rustolium's "Golden Sunset", unfortunately I no longer have the green color. It was also Rustolium and I am pretty sure it was just their basic green that can be found at any hardware store.
  • Lettering: I airbrushed the lettering to minimize paint bleed on the stencils and get the right look. For that I used Testor's Enamel Yellow. I believe I used Gloss Yellow [1114TT], but it could have been the Flat Yellow [1169TT].

Hope that helps!
 

Attachments

  • VX Canister Lettering.pdf
    76.9 KB · Views: 107
Wow... That was incredibly helpful!
I sincerely thank you so much!
People like you who are willing to share their knowledge are what make this community amazing!
I cannot wait to start my own cannister build!

Thank you again!!!
 
What did you use for the wire rings around the grommets?
I tried a few different things, but I ended up just making the rings out of steel wire and soldering them closed. I had a thicker exacto-knife handle that had the right diameter and just wrapped it around that to make the rings, then cut them. I am sorry I don't recall the exact gauge I used. I have since found some ready-made split rings in the jewelry making section of a hobby supply store that I think I will use if I ever make a v2.0 of the build. The one thing to keep in mind is that you'll need to solder the magnetic wires to those rings, so I don't recommend trying to use a stainless steel ring or something like that.
 
I tried a few different things, but I ended up just making the rings out of steel wire and soldering them closed. I had a thicker exacto-knife handle that had the right diameter and just wrapped it around that to make the rings, then cut them. I am sorry I don't recall the exact gauge I used. I have since found some ready-made split rings in the jewelry making section of a hobby supply store that I think I will use if I ever make a v2.0 of the build. The one thing to keep in mind is that you'll need to solder the magnetic wires to those rings, so I don't recommend trying to use a stainless steel ring or something like that.
Thanks

Ive found some pre-tinned copper wire that should be perfect.
 
Gathering supplies to attempt this, minus the casing (for now) What size rubber grommets worked best for you?
 
Gathering supplies to attempt this, minus the casing (for now) What size rubber grommets worked best for you?
I used 1/2" grommets for my build. To allow the glass pearls to better sit against the grommets, I used an exacto knife, and later a counter-sink bit to carve a concaved shape into each side of the grommet. Since I can't imagine that description will make sense to many people, I made a rough drawing of what I am talking about. The blue dash lines represent the cuts I made in the grommet. This isn't completely necessary, but I found the pearls to lay better with the concave for them to sit in.
 

Attachments

  • grommet.jpg
    grommet.jpg
    38.1 KB · Views: 30
That is sick. Can you build one for me?
Thank you! I normally keep specific discussions about commissions to DMs, but since I have had couple dozen inquires since I posted this, I'll provide a quick FAQ with some ballpark information for anyone who is potentially interested:

Q: Would you build one for me?
A: I am not a professional builder, but I am open to a commissioned build provided I have the time to do so.

Q: What would the cost be?
A: Not cheap. I always tell folks up front that this is a labor intensive build, with a fairly high material cost...and, I'll be honest: building the goo-filled pearl strands sucks. While there are some variables in the ultimate price depending on some of the materials used and if someone wants the outer case as well, the base cost to build what I have shown in the post would be around $2,300 before tax and shipping.

If that is outside of your budget or feel that isn't a worthwhile value proposition for you personally, I take no offense. If you want to try building your own, I am always happy to share my build files or lessons learned.

Q: If I commissioned a prop, how long would it take to build?
A: It depends on my availability, but I wouldn't take a commission unless I was able to start work fairly quickly. I would say about 4 weeks.

If you have questions about potential commission, please reach out by DM vs. commenting on this thread. Thank you!
 
What did you use to put into the pearl before securing it to the grommets?
What size diameter and length did you use for the center tube and the ones with the anchor points?
 
Just a quick bump as I’m finally finishing mine. I found out what the brass things are that hold the string of pearls, they are old switches if anyone is interested
 
Just a quick bump as I’m finally finishing mine. I found out what the brass things are that hold the string of pearls, they are old switches if anyone is interested
I believe they are Claire 97564-8112 pushbutton switches. I didn't use those for the build I posted, but I have since acquired a set if make a second attempt at this monster
 
What did you use to put into the pearl before securing it to the grommets?
What size diameter and length did you use for the center tube and the ones with the anchor points?
Hey AsyStole, I don't believe I understand the question. I mentioned in my post that monofilament fishing line passes through all of the pearls and essentially supports the weight of the strand, I don't recall the specific size I used, but it wouldn't matter too much so long as it has high strength. There isn't any tube that passes through the pearls, only the monofilament. Also the grommets are basically free-floating between the pearls. THe monofilament passes through them but with the exception of the very bottom grommet of each strand, they are help in place by the weight of the above pearls. That also gives the strand important flexibility. The bottom grommet is attached with epoxy..
 
Sorry for the confusion. I meant the size of the rods that support it. Maybe I missed that in the post.
 
Back
Top