You are using an out of date browser. It may not display this or other websites correctly.
You should upgrade or use an alternative browser.
You should upgrade or use an alternative browser.
DK's Star Wars Props and Blaster Builds
- Thread starter dkraude
- Start date
-
- Tags
- blaster collection star wars
Making really good progress on my DLT20a
The front barrel assembly is pressure fitted to the stg44 denix. If you remove the top screw both barrels will detach from the main receiver with some persuasion from a rubber mallet. No cutting necessary, yet.
I then can detach the top barrel that will be reinserted and attached with the original screw. I needed to make a new offset adapter as the center point of the bottom barrel hole would not be center of the heat shield in its current position. The offset threads into the longer inner barrel which has od threads for attaching the barrel tip and locking the entire barrel assembly to the receiver.
Aluminum CNC stock greeblies coming along as well.
an off centered barrel adapter...how ingenius is that!!!
dkraude
Well-Known Member
I wish I could take the credit Peter. I have been helping out here and there when I have had time to stop by the machine shop but with my limited CNC experience, I am mostly a spectator.Love the aluminum greeblies! Are you milling those yourself?
dkraude
Well-Known Member
Nicely done! I really like color and varnish detail. Excellent work!Its interesting to see how differently people see the Snare rifle from Zuckuss. My first attempt of clamps looked like yours. But I changed the design after having a closer look on some screenshots from the movie. It is so hard to tell if its right... most probably not.
View attachment 1488750
dkraude
Well-Known Member
It's been awhile since I have updated my build thread. Working on quite a few blaster projects atm.
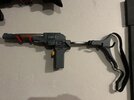
WIP - Finally made some time for my Boba Fett Pre Pro Sling Gun. I love this thing!! Thank you Markus for hooking me up with the vintage Kaiser shoulder stock, telescope and Rotring Sec-o-Mat.
Need to add painters tape and symbols on the stock as arrows and a dash.
WIP - Finally made some time for my Boba Fett Pre Pro Sling Gun. I love this thing!! Thank you Markus for hooking me up with the vintage Kaiser shoulder stock, telescope and Rotring Sec-o-Mat.
Need to add painters tape and symbols on the stock as arrows and a dash.
Attachments
dkraude
Well-Known Member
I have always wanted to tackle an E-22 Shoretrooper Rifle but as most of you know, I really want my builds to be all metal. I had to make some concessions but came up with a solution I am extremely happy with. (Electroplated / Metal Plated Parts).
Started with an sterling airsoft to use as the main receiver. Modification needed to be done for the double barrel assembly. I cut the barrel off and tapped into the main receiver to thread a 5/8" all thread. It was a good start to the main structure of the blaster.


Started with an sterling airsoft to use as the main receiver. Modification needed to be done for the double barrel assembly. I cut the barrel off and tapped into the main receiver to thread a 5/8" all thread. It was a good start to the main structure of the blaster.
dkraude
Well-Known Member
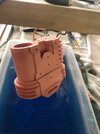
Once I had the frame, it was on to the electroplating process. I found a design of 3d printed parts that I feel scale correctly. Prepping the parts took quite a bit of sanding but was needed to ensure the copper that would plate over them plastic did not have any print lines.I also debated whether or not to use a larger diameter barrel and install my own t-tracks but decided on just electroplating the barrel with the t-tracks to coat the entire parts with metal.
Attachments
dkraude
Well-Known Member
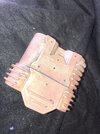
Here is the butt stock after it had been copper plated and nickel plated. I learned by trial and error that the closer the part was to the conductor, the quicker the plating process occurred which resulted in some burning. I actually ended up liking the result as it gave part a realistic distress marks of heat scorching. This is noticeable on the lower rear section of the stock.
Came out wonderful!It's been awhile since I have updated my build thread. Working on quite a few blaster projects atm.
WIP - Finally made some time for my Boba Fett Pre Pro Sling Gun. I love this thing!! Thank you Markus for hooking me up with the vintage Kaiser shoulder stock, telescope and Rotring Sec-o-Mat.
Need to add painters tape and symbols on the stock as arrows and a dash.
DUUUDE...I knew you´d wanted to build an E22, but was unaware that you already had it in the works!Now on to the assembly. I picked up 2 led arrow lights from Field Marshall. One for each side. These were what he had sold in his Death Trooper E11D kit.
View attachment 1554982
View attachment 1554981
Seems like you went with the reciprocatory (sp?) props files from ETSY, right?
Last edited:
dkraude
Well-Known Member
Good eye! You definitely know your stuff.DUUUDE...I knew you´d wanted to build an E22, but was unaware that you already had it in the works!
Seems like you went with the reciprocatery (sp?) props files from ETSY, right?
Yes, I purchased the files from ReciprocationProps. I ended up using the couplers, barrels, stock, and a modification of the main body / receiver part as I wanted to use the S&T Full Metal Sterling Arisoft as the base.
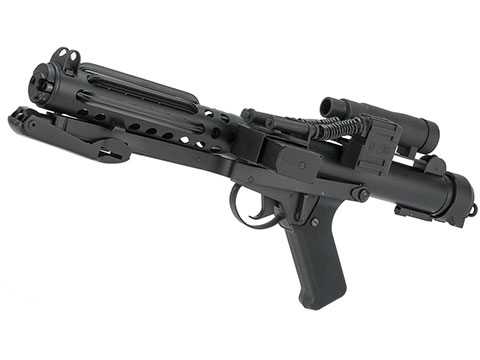
S&T Full Metal Custom Sterling Airsoft AEG SMG with Heat Sink and Scope
Shop Length: 500mm / 680mm (folded / extended) Weight: 5.89lbs GearBox: Full Metal 9mm Custom Type Hopup: Yes, Adjustable Firing Modes: Safe / Semi / Full-Auto Magazine Capacity: 55rds Inner Barrel: 190mm Motor Type: Short type Battery: 7.4v LiPoly brick type recommended (Battery compartment...
Attachments
") I've not had much luck getting a decent application of copper though. Are you using commercial products? (Caswell?)
I've not had much luck getting a decent application of copper though. Are you using commercial products? (Caswell?)Similar threads
- Replies
- 32
- Views
- 1,668
- Replies
- 0
- Views
- 190
- Replies
- 12
- Views
- 734
- Replies
- 2
- Views
- 618