DK's Star Wars Props and Blaster Builds

Dig the electroplating man! That came out looking awesome! I've been playing with this lately, makes one feel like an alchemist. ;) I've not had much luck getting a decent application of copper though. Are you using commercial products? (Caswell?)
Hi Peter, Good to hear from you!

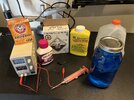
I had purchased a small quantity copper sulphate solution from Caswell to experiment on a small part and realized that it was going to be too expensive to continue doing so for the larger parts. So I researched and discovered I could make it myself for a much more reasonable price.

A combination of Distilled Water (Local Grocery Store), Root Kill (Local Hardware Store), Sulfuric Acid (Local Auto Store), and Miralax (Local Pharmacy) You will also need some baking soda to neutralize your parts after the bath. Total cost of about $50 has produced me 3 gallons and I still have plenty of material to make more.

I have had successful results with this Recipe:
8 Liquid Cups Distilled Water
1 Dry Cup Copper Sulfate (Root Kill)
60 ml (Use a syringe) Sulfuric Acid (Battery Acid)
1 teaspoon Miralax

!!!!CAUTION!!!! (Use protective equipment - Gloves, Goggles, Respirator)


!!!!CAUTION!!!! (Use proper disposal methods after use)


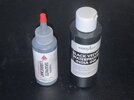
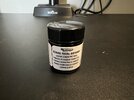
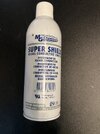
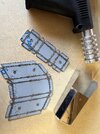
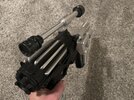
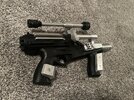
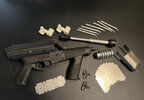
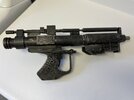
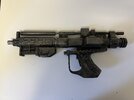
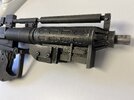
In order to prepare your plastic parts to plate properly, I have tried different options:

Option 1: Mix my own graphite paint with India ink and Graphite (Not very consistent)

Option 2: Purchase MG Chemicals Total Ground Conductive Paint (Great results but time consuming application with a brush)

Option 3. (My preferred method) Purchase MG Chemicals Super Shield Nickel Conductive Spray Paint (Great Results with Easy application) Works for coating copper.

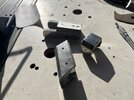
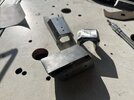
Cannot emphasize enough, the plating will adhere to the surface and not hide imperfections but accentuate them. Proper sanding and filling must be done prior to applying the conductive paint and performing the bath.
 

Attachments

  • IMG_4405.JPG
    IMG_4405.JPG
    2.7 MB · Views: 98
  • IMG_4406.JPG
    IMG_4406.JPG
    2.2 MB · Views: 120
  • IMG_4407.JPG
    IMG_4407.JPG
    1.5 MB · Views: 116
  • IMG_4409.JPG
    IMG_4409.JPG
    2.1 MB · Views: 85
I did pretty much the same (but copper cia electrolysis from some wire). My results were no where near as good, but also using home made conductive paint. Guess I need to try out the MG! Thanks for the detailed write up!
 
I did pretty much the same (but copper cia electrolysis from some wire). My results were no where near as good, but also using home made conductive paint. Guess I need to try out the MG! Thanks for the detailed write up!
The super shield conductive paint definitely worked the best for me. But there may have been other factors contributing to your results? Do you mind me asking: What electronic settings did you have your dials set to? How big was the part? How long did you bathe it for?
 
Luke Skywalker Long Rifle:

Update on an item I have been wanting to add to my collection for some time. Still a work in progress as I need to make a few adjustments the greeblie configuration and find myself a new RCA tip but I am happy with how it is starting to come together.

IMG_5976.JPG

IMG_5977.JPG
IMG_5986.JPG
IMG_5981.JPG
IMG_5980.JPG
 
This post has been long overdue. A few projects that I have made some progress. Starting with:

1: Naboo CR-2 Heavy Blaster. A project conceptualized way back in 2020 when I came across the build of the same prop by Odiwan72. Thank you Markus for all your help with sourcing specs for the parts. Could not have done this without you. Resin Cast of the Calico, extra handle and all other metal parts machined and cast. The handle and receiver shrouds were laser cut aluminum with perforated joints to allow precise bending at the appropriate locations. I used aves putty to fill in the interior and custom molded the shrouds around the calico using Syrian wrap to protect the calico and prevent bonding to the receiver. Unfortunately, the joints needed to be filled with jb weld and I needed to prime and paint the shrouds, rather than polish the aluminum.

I still need to attach the pair of AK47 swivel's and find myself a decent shoulder strap. It is good enough to finally get displayed and get it off of my workbench.


CR-2 1.jpg
 

Attachments

  • CR-2 10.jpg
    CR-2 10.jpg
    1.9 MB · Views: 90
  • CR-2 5.jpg
    CR-2 5.jpg
    3.6 MB · Views: 108
  • How it all started.jpg
    How it all started.jpg
    394.3 KB · Views: 93
  • CR-2 8.jpg
    CR-2 8.jpg
    4 MB · Views: 95
  • CR-2 7.jpg
    CR-2 7.jpg
    2.7 MB · Views: 94
  • CR-2 6.jpg
    CR-2 6.jpg
    2.4 MB · Views: 84
  • CR-2 4.jpg
    CR-2 4.jpg
    2.3 MB · Views: 88
  • CR-2 3.jpg
    CR-2 3.jpg
    3.3 MB · Views: 78
  • CR-2 2.jpg
    CR-2 2.jpg
    4.1 MB · Views: 86
  • 30744BA2-6915-4D7A-B8B0-2D826C0C5B1C.jpeg
    30744BA2-6915-4D7A-B8B0-2D826C0C5B1C.jpeg
    1.5 MB · Views: 68
Last edited:
2: Shoretrooper E22 Blaster: Another project that took over a year to complete. Mostly, waiting on parts to be machined. I learned how to electroplate 3D printed parts on this one as the double barrel parts were too costly to have machined. It was an interesting experience. For the base, I used an S&T airsoft. I picked up an extra E11 barrel muzzle from Blaster Factory along with the electronic bowtie's used on each side. These were extra stock from his Death Trooper E11D run. Also found a Surefire M300c tactical flashlight

 
Last edited:
Aww man! That looks awesome!! Thanks for sharing :)
Thanks Matthieu,

I am not too good about sharing what I am working on but it's my New Years Resolution to improve. Will probably last until the end of January like most of my other NY resolution goals. :)
 
Holy Smokes, I just realized I hadn't share any finished photos of my DLT20A build. I chose to stick with the Gun Metal Grey for now but wondering what are your thoughts? Weathered Black or Gun Metal Grey?


I dig the gun metal, but for accuracies sake, I´d still choose black

GREAT WORK!
 
how much of this one is metal vs 3d printed. are you planning on using your electroplating?

looks like a promising start
 
how much of this one is metal vs 3d printed. are you planning on using your electroplating?

looks like a promising start
Thanks man. All machined parts for the DLT-20A. I have only used the electroplating technique on a few parts on the E-22.
 
Back
Top