Destiny Titan and Hunter class Costume Build

Helpful Nerd

Sr Member
Alright so my buddy mwilliams5375 suggested / challenged me to make a costume from Destiny. I have not yet played and only watched him play a bit. But the plan is to tackle a costume for Titan and Hunter class. Doable, but lots of work ahead of us.

Hey mwilliams5375 post some pics please...and we can get started on this thing. I have plenty of cardboard :lol
 
Here's the complete armor set from the first raid, The Vault of Glass, for the Titan class.

1000px-Battlecage_of_Kabr.jpeg1000px-Kabr's_Brazen_Grips.jpg1000px-Kabr's_Forceful_Greaves.png1000px-Kabr's_Wrath1.jpg1000px-Light_of_the_great_prism.jpg
 
That is awesome. I'm thinking a combo of cardboard and EVA foam seems appropriate for this build.

Don't forget to post pics for your hunter too.
 
My personal Hunter, which I will hopefully be basing my cosplay build on.

Screen_Shot_2014-09-24_at_1.11.59.png1000px-AcolyteRungGauntlets.png1000px-Gravebreaker_1_3_(Chest_Armor).png1000px-Gravebreaker_1_3_(Leg_Armor).png

NOTE: The chest piece on the Hunter is from a female. I gotta find a male variant of it.
 
I'm still debating on my cloak though... so many choices. haha

I wouldn't worry too much about the cloak yet as there is a helmet / mask for us to work on. I think the helmet / mask should be the first thing we tackle. And work our way down to other armor and then fabric stuff is last. What do you think?
 
Whatever is easiest.

I agree man. I think it just comes down to breaking this project down into bite size pieces. But, you can start wherever you want. While we work out the details to make our life casts. I decided to get started on the MK .44, Duke I think it's called.

Here's some progress pics.

Destiny MK44 Template Parts.jpg.jpg

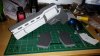
Punished Props has a free MK 44 template blueprint. Downloaded the PDF, then cut the image into parts so I could print each piece on 8.5 x 11 paper. And cut out the parts.

Destiny MK44 Template Parts Assembled.jpg

Used blue painters tape to tape together said template parts.

Destiny MK44 Traced Template on Foam.jpg

Cut out the trigger and cylinder section out, and cut the hammer off. I'll be making those pieces separately. I Traced the gun shape onto the foam.

Destiny MK44 Sanding Foam.jpg

Had to sand the textured edge off each side of the pieces of EVA foam that have to be glued together for the main body of the gun. EVA foam dust, it's my favorite thing to get all over the place. :p

I glued the two sides of the EVA foam together and later today I'll be cutting out the shape and starting on the detail pieces.

My next tool is an orbital palm sander. For real! It didn't take all that long to sand the textured sides off by hand, but I really don't want to do it again by hand.

Mr. Williams, I'll be working more on this later tonight and will post more progress pics shortly.

And a shoutout to Punished Props for releasing this free template, very awesome of you to do so! Thanks for that!
 
Last edited:
I made more progress on the MK.44 over the weekend.

I cut out the gun body from the 2 foam pieces I glued together and cut out the cylinder and trigger area. The jigsaw worked better than a I thought, considering I didn't use a fine tooth blade. The edges are pretty smooth. I'll need to do some sanding but nothing major.

cut out gun body, trigger area and cylinder.jpgcut out for the cylinder.jpg

I traced out and cut the detail pieces on thinner foam and glued them to the gun body.

added detailed pieces.jpgmore detail foam.jpg

I used a cardboard mailing tube for the Cylinder piece, just cut off what I needed from one end so I could also keep the mailing tube for mailing something later. Then test fit the cardboard tube, and glued the detail piece onto the cylinder and then test fit that piece again.

another cylinder test fit.jpgglued cylinder detail piece.jpgtest fitting cylinder piece.jpg

I traced and cut out the grip pieces. The EVA foam floor mats that I am using have a cool pattern on one side and I figured I would make use of that side for the grips, so it has a texture like some real grips.

grips glued on.jpggrips traced on foam.jpg

At this point I have to start sanding / shaping the foam around the grips and smooth out certain areas and sculpt the foam with the dremel to get the grips where I want them. I also have to make some round plugs for each end of the cylinder and add some more detail foam pieces to the gun body.

It's coming together.
 

Attachments

  • grips cut out.jpg
    grips cut out.jpg
    379.5 KB · Views: 164
That looks pretty solid. I've been quiet for obvious reasons, but I've been working on getting materials together for the lifecast so we can start work on the helmets.
 
That looks pretty solid. I've been quiet for obvious reasons, but I've been working on getting materials together for the lifecast so we can start work on the helmets.

Thanks man, it's coming together. I've been shaping the foam around the edges of the grips today with my dremel. I'll post some pics soon.

Just keep me in the loop regarding the life casting. And we'll tackle that next.
 
Here's my progress on the MK.44

I started shaping / sculpting the grips on the gun, as well as added a couple beveled edges to the top of the gun (no pics of this sorry) but I'll take more pics.

That's where I'm at so far.

Still need to add some more foam pieces, then start painting.

It's coming along.

dremel sculpting 1.jpgdremel sculpting 2.jpgdremel sculpting 3.jpg
 
This thread is more than 9 years old.

Your message may be considered spam for the following reasons:

  1. This thread hasn't been active in some time. A new post in this thread might not contribute constructively to this discussion after so long.
If you wish to reply despite these issues, check the box below before replying.
Be aware that malicious compliance may result in more severe penalties.
Back
Top