Cormac's Hulk Build 2015

Cormac

Active Member
Hi there,
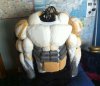
First time poster here. I've had some experience building costumes before but nothing on this scale. I'm currently working on a hulk costume. I'm using similar techniques to Biopredator in his 2012 build (see http://www.therpf.com/f78/biopredators-2012-halloween-costume-contest-entry-incredible-hulk-164942/). I won't be sticking strictly to his design however. rather than a con i'll be wearing this at halloween and may need to be fairly mobile and able to get around town. for that reason i'll be scaling back the suit.

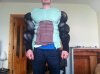
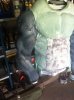
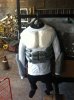
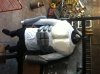
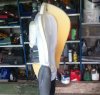
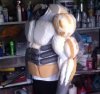
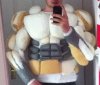
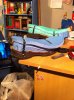
I have already made a good start on this. I've built up the majority foam muscles and have my booster feet made. Given that i'm a little over 6 foot tall the suit now stands at just around 7 feet tall and can squeeze through a standard door without too much trouble.

I've taken a good number of pics as i went along so this will eventually become a WIP thread. For now though I have a few questions that need answering.

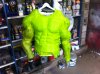
-having read a number of old threads about builds similar to this i've found that wrapping the foam in a "skin" of fabric seems to be the way to go. They all seem to gloss over what type of cloth to use though. does anybody have any recommendations as to what to use? are there any that are particularly suitable/unsuitable for coating with latex?

-i've never worked with liquid latex before. I've seen a lot written about people diluting it or mixing it with paint/pva glue. can anyone clarify what should i be doing in this regard for my purpose. also does anyone know how to ballpark the amount i need?

I'd appreciate the help.
thanks,
Cormac
 
Last edited:
Re: Hulk Build + skin questions

As mentioned above here are some of my early progress pics. I won't be getting entirely up to date with this but i'll make a start.

to begin with i bought a lightweight, spandex running top and pants. I'm living in Ireland so i went to Penneys (that's Primark in the UK) and got them for less than €10 each.

In place of a mannequin or duct-tape double i took my wetsuit and stuffed it full of whatever i could find, old clothes, sheets, a sleeping bag etc. I figured that this would be a reasonable representation of myself. i was worried that the weight would be a bit much for the neoprene so i decided to work on solely on the upper body at first. and leave the legs empty.


Hands
As i was still sourcing the upholstery foam i began with the hands. I made these from grey pipe insulation and a pair of work gloves. I carved each section of foam using a combination of stanley knife blades and a swiss army knife. This was very much done by eye.
raw glove.JPG
In the above picture you can see some of the individual fingers as well as the glove. I want this costume to be as easy to wear as possible so i carved as much foam from between the fingers as possible. i then stuffed the glove with newspaper and glued the fingers in place using my hot glue gun. I took some of my remaining foam insulation and used if to pad out the back of the hand to give it enough bulk to match the fingers. the results are below.
glove back.JPGglove palm.JPGglove wrap 1.JPG

The gloves are quite comfortable to wear. the fingers are a little stiff but i can still curl them into a tight fist for those all-important Hulk Smash photos. The dexterity in them isn't bad either considering. I can't tie shoes or anything but opening a door or holding a glass is pretty easy.

You can see where i glued cloth over one finger as a test. i'm happy with the results as you can still see some of the detail but the rough edges are hidden.

this is as far as they have progressed for the moment. I'll continue the cloth wrap once i'm happy that the scale matches the rest of the costume.

Upper body
I was still waiting on my upholstery foam so i progressed as far as i could with the pipe insulation. I used this to create a base for my forearms. A series of cuts along the length of the foam allowed me to open it out until it wrapped around the forearm of my mannequin. this foam is reasonably sturdy so i was able to extend out beyond my elbow.
forearm grey 1.JPGforearm grey 2.JPG

The hands look a little over-sized at this point but more mass will be added to the arm soon.

After the second arm I began work on the abdomen. Very simply put i cut out lengths of insulation foam and rounded the ends. These formed the 6-pack and (what might be called) the obliques. a flat side was cut into each of these to make gluing to the shirt easier. This was done with a glue gun.

grey foam 1.JPG

Apologies for the sideways pics.
This shows the upper body as i left it before sourcing upholstery foam.


This is as far as i have time to get at the moment. More to follow tomorrow.


If anybody can help with the questions in the first post i'd appreciate it.

Thanks for reading.

 
Re: Hulk Build + skin questions

Here we go again. in this post i'll hope to get up to date on the upper body.

By this point i had sourced some upholstery foam and spray adhesive. In terms of value my best option was to buy a single large sheet of 1" foam. This was roughly 2.5m x 2.5 and cost €35. The spray glue I got is called "Moff stick" and has given very good results.

I followed a similar technique to Biopredator at this point. I decided to begin by blocking out the torso. This involved cutting out a rough shape for each before attaching to the running top. once i had the blocks attached I began carving the form of the muscles.
I would say at this point that i quickly learned to ensure that the glue is totally dry before attempting to cut the foam. Otherwise your blade will just become clogged.

Following the chest i added trusses to the arms/shoulder and the back. these blocked out the overall shape and gave me an idea of the kind of size each muscle needed to be.

attachment.php
attachment.php
attachment.php


From here it was a case of attaching roughly cut sections of foam and carving them to give the desired shape. The trick here was to add the majority of the material to the outside of the arm. as a result the perceived centre line of the costumes arm is the outside of the wearer's arm. This adds bulk while keeping it relatively comfortable to wear.
In order to make the arms look longer than they are I was trying to create the impression that the hulk's arms are slightly bent while my own are straight. This meant adding quite a lot of material to the back of the arm.
attachment.php
attachment.php


The same process went for the other arm and then the back. With the back i deliberately left hollow channels beneath the surface. These will eventually allow me to channel air through the suit to help cooling. I imagine a couple of laptop fans and some cleverly disguised gaps in the skin will allow me to keep a decent air-flow through the costume.


back rough.JPGback cover.JPGIMG_3287.JPG

you can see the shape developing on the back in the final picture. I then cut the back open down the centre to allow me to get into the costume.
The rest was just a lot of carving and smoothing. The results can be seen below.
attachment.php
attachment.php
attachment.php


I'm pretty happy with the results so far. I'm sure there'll be more smoothing as i begin to put the skin over the foam. I'm interest to see how this behaves. I don;t really know how good it will be at taking the rough edges off the foam. I may have to use more than one layer of cloth on some of the sharper pieces to give a realistic appearance.

This is as far as i have gotten with the upper body. it's comfortable to wear and gives a good range of motion. To give an idea of bulk, If i try to walk straight through a standard door the shoulders catch a little. However none of the costume is so far from my body that it becomes clumsy and unwieldy.

tomorrow i'll do the write-up of the feet and legs so far.

Again if anyone can help with the questions in the first post i'd appreciate it.

Thanks for reading,
Cormac
 

Attachments

  • chest 1.JPG
    chest 1.JPG
    869.5 KB · Views: 131
  • chest 1.JPG
    chest 1.JPG
    872.1 KB · Views: 127
  • chest 1.JPG
    chest 1.JPG
    1.3 MB · Views: 2,100
  • Upper body 3.JPG
    Upper body 3.JPG
    1.4 MB · Views: 2,078
  • Upper body 4.JPG
    Upper body 4.JPG
    1.6 MB · Views: 2,111
  • finished arm 2.JPG
    finished arm 2.JPG
    159.9 KB · Views: 2,031
  • Finished arm 1.JPG
    Finished arm 1.JPG
    168 KB · Views: 2,057
  • finished upper 1.JPG
    finished upper 1.JPG
    135.3 KB · Views: 2,020
  • finished first.JPG
    finished first.JPG
    1.4 MB · Views: 2,566
  • finihsed upper side.JPG
    finihsed upper side.JPG
    521 KB · Views: 2,042
Re: Hulk Build + skin questions

Hello again,
Hopefully this post will get me up to date and this can be a WIP thread from now on.

I'll cover the legs and the feet to date in this post.
The legs were done in much the same way as the arms. By this point i was able to remove the upper section from the wetsuit mannequin and could stuff the legs. I put the running pants on the dummy and made a pair of trusses to give the outline of the legs. Like with the arms i wanted to add width as well as giving the impression that the hulks legs were bent slightly while mine are straight. For this reason i added quite a lot of foam behind the ankles and lower thigh and the front of the knee. My leg now goes through what looks like the calf muscle. In order to make walking easier most of the material was kept to the outside of the legs. Again there was a lot of sticking and carving with stanley blades and my swiss army knife.

leg 3.JPGlegs side.JPGlegs1.JPG

You'll notice that i'm currently stopping a little above the knee. At the moment I have a different plan for the upper legs. I have a pair of field hockey goalie shorts that should add enough bulk to the thighs. I figure since these will be covered by the torn pants anyway it should look fine. I also know that i can comfortably walk and sit down in them without any problems. I was worried that if i sat on something i had made the glue foam could come away.
400_OBO_robo_goalie_hot_pants_M.jpg


These shorts can also be opened up from the front using the velcro flaps and take off without having to pull your legs through them. This should make suiting up on the day a little easier.


I figure i need to add at least 8 inches to my height if i want to look properly imposing. To make my booster shoes I bought three of the foam mats that are used to kneel on while gardening. they were about an inch thick each. I took an old pair of shoes that i had lying around and cut the sole off of them. I cut a series of section from the foam mats and began building up the platforms. the first sections fit nicely inside the soles of the shoes. After that i expanded them by an inch or so to make the platform more stable.

It may not be entirely clear from the photos that i have but i added more height to the heel of the shoe than the front. This means that i'll be standing slightly on my toes. As well as giving me an extra inch of height without compromising balance this also makes my foot fit better inside the shape of the Hulk's.
booster shoe skirt.JPGbooster shoes.JPGIMG_3305.JPGIMG_3306.JPG

I secured these together using an awful lot of hot glue as well as the black straps you can see in the photos. After this i screwed and glued an old pair of trainers to the up of the platform.

From here i began cutting out foam profiles of the foot and building the shape. I left a gap in the foam to allow access to the laces of the shoes. I'll have to be careful while covering this with latex to allow access later.

booster shoes side view.JPGbooster shoes feet 1.JPG
I decided to arch the foot to give the impression that the Hulk was standing on the balls of his feet. I think this will suit the kind of dynamic crouch that i'm trying to pose the costume in. It also means that the foot can be less bulky and fits my scale better.


So that's as far as i've gotten so far. I'll post my progress as i go now. Hopefully I should have a decent update every week or so.
 

Attachments

  • IMG_3302.JPG
    IMG_3302.JPG
    1.2 MB · Views: 150
Re: Hulk Build + skin questions

Good work on the suit, i know how hard it can be making it look like muscles. A few advices for you : Drink loads of fluid before wearing this suit, You are not going to need to pee, It is going to be hot as hell, and your body is going to freak out. See to it that you have a friend that can keep an eye on you if you pass out. I nearly did in my musclesuit that i built for my Thorin Oakenshield cosplay.
 
Re: Hulk Build + skin questions

Jaw drop!
This is amazing!

Thanks a lot! but seriously look at the one built by biopredator. There's a link to it in the first post. It's a shame he doesn't seem too active on here anymore. I'd like to ask him a few questions.


Good work on the suit, i know how hard it can be making it look like muscles. A few advices for you : Drink loads of fluid before wearing this suit, You are not going to need to pee, It is going to be hot as hell, and your body is going to freak out. See to it that you have a friend that can keep an eye on you if you pass out. I nearly did in my musclesuit that i built for my Thorin Oakenshield cosplay.

Yeah that's something that i've been giving a bit of thought. I'm considering a few options to try to cool it. I'm definitely going to try to use some very light green fabric in areas like under the arms. I'll won't latex/paint these areas. I'll see how much of the under-shirt i can cut away from the inside too without compromising it. If i get ambitious i might try something fancy like possibly piping air though a length of garden hose of something.
 
Re: Hulk Build + skin questions

So i've been experimenting with different types of fabric to skin the costume with.
I tried using spandex/tights but found that it let too many of the rough edges of the foam show through. rahter than spend the next eight months of my life trying to smooth all of these out i began by trapping the legs in regular cotton. this was held on with spray glue and did a reasonable job of smoothing out the surface.

photo 1.JPG

once i was happy with this coat I took my knife and cut through the fabric above and below the knee-cap. This allowed the leg to bend freely.i also made a cut up the inside of the leg to allow the running pants to stretch as i put them on.

After this I took a pair of tights and stretched them over the legs. i made sure to keep some slack near the joints to keep the flexibility. once i as happy with the positioning I cut the tights above and below the area i needed to cover. I rolled back each end and used spray glue to secure them where they needed to be. I was a little worried that they would start to tear/unravel so i used some hot glue along the edges.
photo 3.JPG

The legs turned out pretty well I think. I also did the arms in the same way but forgot to get any good pictures.
I'm stating to feel how warm the finished product is going to be. This could get interesting. At lest I'll have an Irish October working in my favor.
 
Re: Hulk Build + skin questions

Great build so far Cormac! I would suggest trying a thin upholstery foam layer to help with the muscles. When I skinned the Juggernaut with the foam it created a VERY lifelike sillouette. I have seen a few builds that went with the "super bubbley ripped muscles" and the proportions don't translate well to costumes. Using the foam layer will smoothout the muscles and still give you the definition that you want. I say all this out of respect for your build cause I love it!
 
Re: Hulk Build + skin questions

I tried looking for that but 1 inch is the best i can get around here. I'm working on using a thicker fabric and softening the edges with that before giving it a final skin. fingers crossed
 
Re: Hulk Build + skin questions

Thanks Pinkratgirl. Me neither.

I did some more work this evening and it seemed to work out well enough.

I used the blue cloth which is from an old blanket to cover each of the muscles and round off the edges. I had already covered this up on the chest when i remembered that i was meant to be taking photos. I worked my way down using a combination of spray adhesive and hot glue. the glue gun was mostly used around the edges and in the groves to stop the cloth from lifting.
photo 2 - Copy (2).JPGphoto 3 - Copy (2).JPG

The thicker fabric did a decent job of evening out some of the rough edges of the foam as well as reducing the depth of the muscles. By hope here would be that by now putting some thinner fabric on top of this i can get a similar effect to if i had used a layer of thinner upholstery foam.

I got a little impatient and didn;t bother going out to buy a second tshirt of the same colour. I found some more light material lying around and ploughed ahead.
I did my best to hide the transition between the two panels of cloth in the folds of the muscle. it turned out better than in the picture below. I am hoping that the latex is as forgiving as i need it to be.
photo 1 - Copy.JPGphoto 2 - Copy.JPG

I'm at a stage now where i cans see this coming together. I think it's the green cloth that'a making the difference.
photo 4 - Copy.JPG

It does seem to be shrinking a little as i go though.I'm hoping this is just an illusion because of the different colours. we'll see.
 

Attachments

  • photo 3 - Copy.JPG
    photo 3 - Copy.JPG
    2.2 MB · Views: 132
Re: Hulk Build + skin questions

So today i did a bit more work on the Hulk. I had found that it was getting harder to get into the upper part of the costume. I adjusted the way that the under-arms were coated. Now i think i can afford to cut away some of the under-shirt once the latex is applied. there's not much of a visual change there so i won't bore you with photos.

I did manage to get both hands skinned. I ended up using a lot of socks to do this. they were just what was on hand. I'm not totally thrilled with how they turned out. I may still end up re-doing these. I'll see how they look after the latex starts to go on.

IMG_3360.JPGIMG_3361.JPGIMG_3362.JPGIMG_3363.JPGIMG_3364.JPG

After this i just have to finish the second foot before i can start the final coatings.

As always contributions are welcome.
Thanks for reading.
 
Re: Hulk Build + skin questions

I started with the latex today. This is a totally alien material to me so I had a few surprises. Firstly it was much thinner than i was expecting. in my mind it was more like PVA glue. I found that it would soak into the fabric much more than i was expecting. My hope is that that's just the first coat and future layers will build up more. I need it to really. There's a few seams that could do with being hidden.

I only had one litre to play with for the time being. I managed to give the upper body one good coat and most of the front a second. I''m going to start mixing the acrylic paint into the latex for future layers. It's setting over night now so hopefully the results in the morning are encouraging.
 
Re: Hulk Build + skin questions

Just to be honest, I am glad you got to this stage before me! Not alot of tutorials about coating foam suits in latex. I know that some puppeting sites have said to seal the foam with spray glue like 3M 74 spray http://www.amazon.com/3M-74-Spray-A...35698367&sr=8-1&keywords=3M+spray+adhesive+74

Would you mind uploading some pictures of the suit curing? I am very curious to see how the layers build up and how much strength/ flexability the latex retains. great work man!
 
Re: Hulk Build + skin questions

Yeah sure. I don't know how much use these are but you're more than welcome to them.

latex1.jpglatex2.jpglatex3.jpglatex4.jpg

That's after one good coat I'll let you know tomorrow evening how it cures.

I did a little test piece of foam to see how it wwould behave on different fabrics with glue etc. it seemed to work fine. It goes very yellow as it cures.

I also thought it would be a good idea to stuff the arms as much as possible as i've read a bit about latex shrinking as it sets.
 
Re: Hulk Build + skin questions

So painting is i little difficult. you can see the paint I bought here. I was going for a the kind of dull green from the movies. I thought the paint i had picked looked like a good match.

IMG_3375.JPG


It seems to spread very differently though. It comes out very yellow. I'm not sure what I can do about this. Tomorrow i'm going to go buy some "emerald green", Hopefully i can mix that with this and get a better result.

I tried adding a little black to see how it would react. you can see the results on the right arm.

IMG_3377.JPGIMG_3378.JPG

I'll see how it turns out when dry.
 

Attachments

  • IMG_3374.JPG
    IMG_3374.JPG
    889 KB · Views: 116
  • IMG_3376.JPG
    IMG_3376.JPG
    2.1 MB · Views: 154
Re: Hulk Build + skin questions

I like the color so far! Be careful about adding shading when painting the suit. Small layers and a light touch will make it more realistic
 
This thread is more than 8 years old.

Your message may be considered spam for the following reasons:

  1. This thread hasn't been active in some time. A new post in this thread might not contribute constructively to this discussion after so long.
If you wish to reply despite these issues, check the box below before replying.
Be aware that malicious compliance may result in more severe penalties.
Back
Top