Craftynathan
Member
Hey there,
This is my first big build project and i thought it would be fun to share it.
I have played the fallout games relentlessly and loved every moment of them and always wanted to make a top notch build. Originally i was looking at the Brotherhood of Steel and the orange jumpsuits the scouts wear. I thought this would be a winning combination when matched with combat armour.
I mulled over the different ideas and eventually decided that i should do something a little different in honor of the must nuclear drink on whats left of planet Earth, the sweet sweet taste NUKA COLA !
This made me think POWER ARMOUR ! But alas, that has been done before and by the developers too boot. So whats left ?
After playing around Fallout's NukaWorld a bit more i realized what the place was missing security guards (sure it has robot Protectrons and security turrets but what it truly missed was someone to talk to and ask questions too) and if there were security guards they would need to be slick and heavily branded as well as heavily armed.
So the PreWar NukaWorld Security Guard was born ! Clad in a jumpsuit, swish armour and plenty of Nuka Cola bottles and the best high powered laser weaponry that money can buy !
The outfit will consist of the following parts;
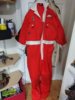
1. Custom made Nuka Cola Jumpsuit.
The jumpsuit itself will consist of a red jumpsuit and will have the white trim added later. One embroidered Nuke Cola patch on each arm and a large embroidered NukaWorld logo on the back.
The name tag was purchased from a Kentucky factory and will be added to the jumpsuit.
All parts have been secured just need to assemble this for you guys next week !


.jpg")

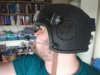
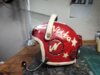
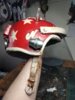
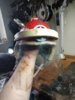
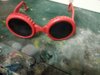
2. Combat Armour
The armour will be a mix of light and heavy Fallout 4 combat armour. Light legs, chest and back, heavy arms and a custom security helmet.
The armour will be reasonably pristine and painted in Nuke cola red and white with automotive paints to leave it with a clean shine and nice lines.
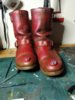
Below is the start of the combat armour legs, these were formed from a very light foam and then covered in thermoplastics.
The whole armour will be done like this. With Nuke Cola bottle caps on key areas of the armour and chromed Nuka Cola Bottle openers sitting on the chest piece for added embellishment.
The belt will consist of Micro fusion Cells (Chromed Holsters), as assortment of Nuka Cola bottles (also chromed holsters) and room for my Baton.

.jpg")
3. Weapons
The set up will consist of a 3D printed laser rifle, cleaned and painted in Nuka Cola Quantum colors with a high chrome finish,
Then a 3D printed (working ?) Thirst Zapper on the right leg armour in a chromed holster.
Then a custom baton (As seen below).

Conclusion
Overall this will be a super clean build, plenty of chrome sleek paint and overall a nice finish.
I will update this post as i work on the project, i am envisaging the whole project to take up-to three months to complete from start to finish.
Hope you follow along on this zany adventure into Nuka Cola's refreshing taste !
This is my first big build project and i thought it would be fun to share it.
I have played the fallout games relentlessly and loved every moment of them and always wanted to make a top notch build. Originally i was looking at the Brotherhood of Steel and the orange jumpsuits the scouts wear. I thought this would be a winning combination when matched with combat armour.
I mulled over the different ideas and eventually decided that i should do something a little different in honor of the must nuclear drink on whats left of planet Earth, the sweet sweet taste NUKA COLA !
This made me think POWER ARMOUR ! But alas, that has been done before and by the developers too boot. So whats left ?
After playing around Fallout's NukaWorld a bit more i realized what the place was missing security guards (sure it has robot Protectrons and security turrets but what it truly missed was someone to talk to and ask questions too) and if there were security guards they would need to be slick and heavily branded as well as heavily armed.
So the PreWar NukaWorld Security Guard was born ! Clad in a jumpsuit, swish armour and plenty of Nuka Cola bottles and the best high powered laser weaponry that money can buy !
The outfit will consist of the following parts;
1. Custom made Nuka Cola Jumpsuit.
The jumpsuit itself will consist of a red jumpsuit and will have the white trim added later. One embroidered Nuke Cola patch on each arm and a large embroidered NukaWorld logo on the back.
The name tag was purchased from a Kentucky factory and will be added to the jumpsuit.
All parts have been secured just need to assemble this for you guys next week !
2. Combat Armour
The armour will be a mix of light and heavy Fallout 4 combat armour. Light legs, chest and back, heavy arms and a custom security helmet.
The armour will be reasonably pristine and painted in Nuke cola red and white with automotive paints to leave it with a clean shine and nice lines.
Below is the start of the combat armour legs, these were formed from a very light foam and then covered in thermoplastics.
The whole armour will be done like this. With Nuke Cola bottle caps on key areas of the armour and chromed Nuka Cola Bottle openers sitting on the chest piece for added embellishment.
The belt will consist of Micro fusion Cells (Chromed Holsters), as assortment of Nuka Cola bottles (also chromed holsters) and room for my Baton.
3. Weapons
The set up will consist of a 3D printed laser rifle, cleaned and painted in Nuka Cola Quantum colors with a high chrome finish,
Then a 3D printed (working ?) Thirst Zapper on the right leg armour in a chromed holster.
Then a custom baton (As seen below).
Conclusion
Overall this will be a super clean build, plenty of chrome sleek paint and overall a nice finish.
I will update this post as i work on the project, i am envisaging the whole project to take up-to three months to complete from start to finish.
Hope you follow along on this zany adventure into Nuka Cola's refreshing taste !
Last edited:
")