(COMPLETE) Life-size Watcher, Horizon Zero Dawn — Image Heavy

amuelb

Active Member
Hello everyone,

It's been about a year since I last posted on here back when I was building my CHAPPiE cosplay! Thanks to all the help and support I received the costume was a great success — so I thought it would be worth while to post about my latest build the Watcher from Horizon Zero Dawn.

What is a watcher? Basically it's like a giant robot raptor with a large eye. It's job is to watch over and guard other robots in Horizon Zero Dawn. Here is an image:
Horizon Zero Dawn™_20181126181551.jpg


Of course, like my last build it all started with planning. I used my PS4 to take reference photos of the Watcher from all angles, and then brought them into Adobe Illustrator to create my reference patterns. These were scaled accordingly to my body size (5'7" and 115lbs) then printed and taped together. From here I could begin!

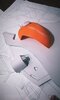
Starting with the head, I made a template from the Side and the Top.
Screen Shot 2019-02-28 at 2.36.44 PM.png

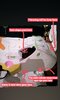
Once I had my templates printed out to size, I started to put it together... Here is a photo montage of the head progress so far! This project was started in late December so I have most of the head complete already... it weighs 4lbs currently and thats without any of my LEDs, electronics, sound, batteries, the eye, etc.

(Cosplay Foam by TrueNorthCosplay)
51861009_10155787987450458_6186852797355393024_o.jpg
51985920_10155787988095458_7757280466419318784_o.jpg
51912012_10155787987305458_3947497385122332672_o.jpg
52105045_10155787987030458_1041001640489910272_o.jpg
51720749_10155787986945458_3386719156144439296_o.jpg
51892027_10155787986880458_4587732839788707840_o.jpg
52344278_10155787986580458_1936237584216752128_o.jpg
52038630_10155787986270458_1573565967307374592_o.jpg
52181504_10155787984940458_851407318594617344_o.jpg
52141351_10155787985325458_7289743005320216576_o.jpg
51857104_10155787985060458_3220993505111310336_o.jpg
51769727_10155787984545458_2699029063091093504_o.jpg
51910858_10155787983840458_6211815473697259520_o.jpg
51760196_10155787983725458_996967273539305472_o.jpg


52269956_10155787984195458_4945028175550742528_o.jpg
51620103_10155787983360458_1847761017400983552_o.jpg


So thats the head constructed, and ready to be painted. I purchased a 11.5" Hamster Ball for the eye and some LEDs to make it light up, this will be added after the head got a base coat of primer and after details have been added to the eye.
Now that I was as far as I could get with the head, it was time to move onto the body... which is MUCH bigger!
51786728_10155787990795458_759189070759854080_o (1).jpg


More Updates soon!
 
Last edited:
Building the body of the watcher is very similar to the head. First I started off by drawing up my patterns in Adobe Illustrator from the top and the side. I then printed these at full scale and began building out the pattern on my foam:
Screen Shot 2019-02-28 at 2.33.22 PM.png

My body was made entirely out of EVA foam from True North Cosplay in Montreal, Canada. I apologize for any writing on the photos, most of my progress was tracked on my instagram amuelb.
IMG_20190206_221319_732.jpg
IMG_20190206_221526_524.jpg


Building foam domes for the first time:
IMG_20190207_211134_385.jpg
IMG_20190207_211205_077.jpg
IMG_20190207_211229_141.jpg
IMG_20190207_211258_416.jpg
IMG_20190211_225226_512.jpg


IMG_20190226_235046.jpg


Building the spine of the watcher first helps give me a better idea of how things will fit together once they're built.
This way it's more like an oversized puzzle.
IMG_20190218_181337_375.jpg
IMG_20190218_214810_056.jpg
IMG_20190220_232909_778.jpg
IMG_20190224_144622_565.jpg
IMG_20190226_131213_824.jpg
IMG_20190226_131213_823.jpg
IMG_20190226_131213_826.jpg
IMG_20190226_131213_829.jpg
IMG_20190228_203134_224.jpg
IMG_20190228_213206_969.jpg


After attaching the trim to the butt this is the result! It's not complete by any means, but day by day it gets a little closer. For the body I still need to build out the frame to support the shape, the front, the side vent and the area where my legs will attach to the body. I decided to move onto the legs before proceeding with the rest of the body that way I would know where I need to make room to accommodate the legs and what areas will need less detail since they'll be covered.
IMG_20190303_215827_968.jpg
 

Attachments

  • IMG_20190211_225309_640.jpg
    IMG_20190211_225309_640.jpg
    379.8 KB · Views: 303
  • IMG_20190212_233456_783.jpg
    IMG_20190212_233456_783.jpg
    268.6 KB · Views: 265
  • IMG_20190227_002402_505.jpg
    IMG_20190227_002402_505.jpg
    348 KB · Views: 268
  • IMG_20190227_002537_787.jpg
    IMG_20190227_002537_787.jpg
    311.9 KB · Views: 256
  • IMG_20190220_233740.jpg
    IMG_20190220_233740.jpg
    236.2 KB · Views: 276
Last edited:
Sorry it's been a while since I posted updates, but the costume is actually finished now! Let's see if I can get everyone up to speed... So, I built the body and the head... next was the legs, tail and neck!

The legs were drawn in the same way as the body and head, I gathered images from multiple angles and began to build the leg from pieces of Styrofoam, 2mm, 5mm and 10mm EVA and some foam insulation tubing. The muscles were made out of sandwiched Styrofoam (do not glue them with contact cement, it dissolves the foam!) which were carved into a rounded muscular shape. over 80ft of insulation foam tubing was then weaved and glued onto the styrofoam base to give the look of cables. These were then mounted with hot glue and popsicle sticks to the rest of the leg.
The legs have to move with my own legs and be removable for transit, so I mounted them on PVC pipe to feed into the body and held them in place with PVC pipe caps.

IMG_20190305_224123.jpg
IMG_20190309_195636.jpg
Screenshot_20190718-123057.jpg
Screenshot_20190718-123105.jpg
Screenshot_20190718-123110.jpg
Screenshot_20190718-123128.jpg
IMG_20190416_085526.jpg


There are more detailed step by steps of these on my Instagram story (amuelb)
 
in some of your pictures like the last big one i see you put like a white paste in some of the seams to cover them up. what is that?
Hey! Sorry for the late reply, the white paste is KwikSeal, a white caulking that is flexible! It's great for filling gaps and smoothing seams and it's only about $4 CAN. It cannot be sanded back, but you can smooth it with a wet finger and it will dry really smooth! If ever I have something that does not bend (like a helmet) I sometimes use drywall putty as filler instead.
 
I'm slow at this, I know... so moving on from the legs I started work on the tail.

The completed tail was to be approximately 6'8" (203cm) long but because of how far it had to come out of the body the tail had to be extremely light weight and come in pieces for transport. Based on the patterns I drew for the tail, I was able to easily break the tail into 4 parts. Each piece was made entirely out of hollow styrofoam that was then wrapped in 2mm kids craft foam sheets. The seams are filled and smoothed with KwikSeal. (excuse the type on my photos... they're from my instagram story)

Screenshot_20190718-123132.jpg
Screenshot_20190718-123137.jpg
Screenshot_20190718-123153.jpg
IMG_20190401_084510.jpg
IMG_20190401_084515.jpg

Screenshot_20190718-123258.jpg
Screenshot_20190718-123210.jpg
Screenshot_20190718-123356.jpg


Each "gear tred" on the top of the tail was made by layering, gluing, and dremeling different weights of foam, each one contains 10mm, 5mm, and 2mm eva foam. In total there are 13 gear treds on the tail and 10 on the neck, they each take about 5-10 mins to make! The "electrical hookups" look complicated but are actually quite easy... first I cut a 5mm strip of foam for my base and drew on the wiggly line where I wanted to add the internal wire. I then glued in a thinly cut 2mm strip of foam along my wiggly line. In order to make the strip look round, I then traced over the top of the glued down strip with hot glue letting it cool raised on the foam. Once everything was cooled, I covered the entire strip with contact cement, and a sheet of 2mm foam with contact cement and then I sandwiched them together smoothing the foam into all the crevices. Once the 2mm was trimmed to size, it appeared as though the wire was inside the electrical strip, woohoo!

Screenshot_20190718-123243.jpg

Screenshot_20190718-123338.jpg
IMG_20190412_085747.jpg
Screenshot_20190718-123401.jpg


The final tail measured up to approximately 6'2" - 6'4" (188-195cm) and weighed about 4lbs total. Thats one way to save weight!
 
Once the head and body were built, I pulled them into a parking garage to give them a quick coat of primer and paint.

IMG_20190322_215715.jpg
IMG_20190322_215731.jpg
IMG_20190322_215746.jpg
IMG_20190322_085519.jpg
IMG_20190322_085529.jpg
IMG_20190325_085327.jpg


The head took the paint well and was ready for some of the darker metal pieces to be painted, the body on the other hand still needed some work so I waited to do any further paint work on it. The inside of the watchers eye hole was masked off and given a black base coat of paint then a gunmetal silver was airbrushed overtop. The eye ball (a 30" hamster ball) was sanded smooth, detailed, painted black, and then airbrushed with a gun metal silver as well. Extra details and scratches were added with a regular silver paint with a brush. The watchers face fins (built from 10mm eva) were also painted in the same way.

IMG_20190420_194408.jpg
IMG_20190420_194422.jpg
IMG_20190421_100340.jpg
IMG_20190424_084907.jpg
IMG_20190424_085010.jpg
IMG_20190424_084956.jpg
 
Once I had most things built, I took advantage of a road trip out of the city to do some painting... We loaded all the costume pieces into our Prius and ventured out in the snow covered country side to paint in Canada's great outdoors!

IMG_20190421_113105.jpg
IMG_20190421_143730.jpg
IMG_20190421_143830.jpg

IMG_20190421_143836.jpg
IMG_20190421_150802.jpg
IMG_20190421_170156.jpg

IMG_20190421_170208.jpg
IMG_20190421_173332.jpg


As some of you might know... painting in Canada isn't ideal in the winter. For one, it's freezing and everything is wet so it can be hard to find somewhere safe to paint, a gust of wind can also drop a ton of unexpected snow on your paint job from a nearby tree or rooftop. Paint also does not cure properly in the cold or come out of the can properly in the cold. In order to get an even spray I had to first warm all my cans in warm water before bringing them outside... as for the curing, after waiting for most of the paint to dry I brought them into the garage where they sat near a hot wood fire, they were left overnight and STILL didn't fully dry by morning!

IMG_20190421_222815.jpg
 
I don't know what this is or who you are.

What I DO you is you're incredibly talented.

And ambitious!
 
I don't know what this is or who you are.

What I DO you is you're incredibly talented.

And ambitious!
THANK YOU SO MUCH! It's a watcher from the Sony video game Horizon Zero Dawn! It's a common enemy in the game, uses it's large eye to watch over and guard other robots. And it fires lasers, who doesnt like lasers?
The costume is complete now and was a huge success in Montreal, Canada. I will be bringing it to Toronto next weekend (Aug 25th). The full size of the watcher is appoximately the length of a car and it weighs about 30-35lbs, so I cant attend too many cons due to its size (I have to rent a minivan everytime!) If you find yourself at Torontos Fan Expo let me know!
 
So once the base coat was down, I brought all the pieces back to the city for the detailing/airbrushing and weathering.
(CALF MUSCLE- left black and gun metal - right black, gun metal, black wash, and silver edging)
(LOWER LEG - left black, gun metal, black wash, and silver edging - right black, gun metal, and silver)
IMG_20190422_232730.jpg
IMG_20190422_232835.jpg
IMG_20190424_225458.jpg


Here I am adding the same off green to the thigh that was sprayed on the head of the watcher while out in the country side.
IMG_20190425_000338.jpg
IMG_20190425_000602.jpg


Here is the progression of the leg! So after weathering the lower leg, i added the green to the thigh, then painted the remainder of the muscles black, added the gunmetal and silver to the rest of the metal on the thigh, and the accent yellow (which I later made more orange which you'll see later).
IMG_20190416_085526.jpg
IMG_20190425_085333.jpg
IMG_20190426_085624.jpg
IMG_20190428_104935.jpg
 
Last edited:
Once the legs were fully painted and the orange accents updated and I hand cut some vinyl decals to add to the thigh.
IMG_20190508_085509.jpg


When I was happy with the legs, I moved onto the head. The head was given some warm grey paint to the side of the head and all the accent orange was added. I then fully wired the eye with 50+ leds (half red and half blue) and wired them to a double throw switch so I could alternate between the colours while in the suit.
IMG_20190430_085305.jpg
IMG_20190430_085352.jpg
IMG_20190430_085408.jpg

20190528163913_IMG_8826.jpg
20190528164002_IMG_8831.jpg
20190528164051_IMG_8838.jpg
 
Last edited:
Okay, at this point its going to feel like I'm skipping steps. I was into con crunch time and didn't take the time to get any good photos of the neck build... but basically it was constructed in the exact same way as the tail only on an aluminum parallelogram so enable it to move up and down. For more detailed progress shots/video check my instagram highlight "HZD: Limbs" here.

Screenshot_20190718-123556.jpg
Screenshot_20190718-123609.jpg
Screenshot_20190718-123624.jpg
IMG_20190506_084623.jpg


Once the neck was mounted on the frame, I could work on the final touches of the body. By this point I only had a few days before my local con.... which did not go as planned, but we will get to that later. Onto the body... starting with the masking, green accent painting, hand cut vinyl decals, and the mounting of the body on the frame.
IMG_20190430_183135.jpg
IMG_20190430_183621.jpg

IMG_20190430_223107.jpg
IMG_20190506_084527.jpg


IMG_20190507_084546_734.jpg
IMG_20190508_090046.jpg
IMG_20190508_090054.jpg
IMG_20190508_090320.jpg
 
The tail was the next big part to paint.

IMG_20190424_084603.jpg
IMG_20190508_085922.jpg


IMG_20190508_085934.jpg
IMG_20190508_085944.jpg
IMG_20190430_085033.jpg

IMG_20190509_210051.jpg


Once the body, neck, tail, head and legs were all painted, I was finally able to put it all together. Now, by this point it was the DAY OF THE CON, and I had yet to do a test fitting...

20190528164108_IMG_8840.jpg
20190528164501_IMG_8850.jpg

20190528163935_IMG_8828.jpg


Last edited:
So, I went to the convention... and the ENTIRE COSTUME FELL APART within two hours of walking into the convention... But don't worry, it was a good learning experience and I was able to see what I needed to fix before heading to a much larger convention in Montreal.

Back to the drawing board, I made a ton of adjustments to the body, the mounts and the frame to help balance the weight better... I then decided to finish the paint job... We all know a watcher would never be this clean in the wild, and I always planned to weather it but just never had the time.
I used a mix of black, orange, and brown acrylics to add dirt, mud and rust to the nooks and crannies in the suit and then added highlights of silver paint to mimic scratches and chipped paint.

IMG_20190606_122641_163.jpg
IMG_20190606_122641_165.jpg

IMG_20190620_192836_910.jpg

IMG_20190702_200647_480.jpg
IMG_20190703_234650_398.jpg


My cat loved sleeping inside the watcher body while I worked.
IMG_20190704_173835_743.jpg
IMG_20190627_130544.jpg
 
Last edited:
This thread is more than 4 years old.

Your message may be considered spam for the following reasons:

  1. This thread hasn't been active in some time. A new post in this thread might not contribute constructively to this discussion after so long.
If you wish to reply despite these issues, check the box below before replying.
Be aware that malicious compliance may result in more severe penalties.
Back
Top