Captain America: TFA - Rescue Cap and Bucky

keepcalmcostume

Active Member
Yes, another one of these. Mousemeat and I are going for it. She's the Bucky to my Cap in all things, and this is no exception. This has been a long time coming, and our goal is to have it more or less finished for SDCC next year. Our biggest hope is that her costume is simple enough and I already have enough pieces of mine that we can do it justice and be fairly screen accurate (in general appearance if not in fact) without breaking the bank (too much).
still-of-kenneth-choi2C-chris-evans2C-neal-mcdonough2C-bruno-ricci2C-sebastian-stan-and-gabe-jon.jpg 00e6138500990a80d2026cdea1799702.jpg a085ccf398cae58892ddc2c302c245c4.jpg

I already have Cap's leggings. The replicas I was looking at before that were around $40, but I got my originals at a local antique store a few years ago for $9 I think. Both the lacing cords were included, but one was broken and I didn't want to strain them any more, so I replaced them with shoelaces from a pair of old tan jazz shoes I had laying around. The boots aren't brown like they should be, but again I already had them and they have the right look other than that. Plus they're really nice paddock boots (from Ariat) so they're really comfy, which is a bonus for walking around at cons all day. I already wore the leggings with the boots for a March Hare costume at SDCC this year, so they're field-tested and ready to go.
10474895_642361672508644_2025082393852280553_n.jpg

I started the heater shield a few months ago as a side project to fall back on when I got stumped on SDCC prep. Once con stuff took top priority regardless, this went on the back burner and stayed there until we decided to take these costumes on. I made a pattern/template with some scrap roll paper based on the dimensions given in an auction catalog. I don't know which auction it was, but Profiles in History would be a good guess. The screen-used costume photos up top are from the same auction. (If either of these images came from someone on here, thank you!)
Captain-America-uso.jpg captain-america-rescue-build-complete-pg-3-steve15.jpg

The dimensions are listed as 25" x 19.5". I scaled it down to be proportional to my torso and so I could cut it out of the 23" foam floor mat I used. Mine is 23" X 18" and it fits me perfect. I also eyeballed the curves. I'm sure there are much better ways to do it with computer programs and math, but that's not my style. :p The only change I still want to make to the shape is to maybe take a bit off the very top so the curve there is a little more subtle and not so pronounced.
WP_20140607_008.jpg

Since I was eyeballing the details, I drew out the placement of the stars and stripes directly onto the foam on the textured side to give me an idea where things needed to be (I'll be laying a sheet of thin craft foam over it for an even surface so it'll all get covered up, but this way I can have the measurements for when I tape it off). The stripes ended up 2" wide, and the top panel is 5" at the sides and 7" at the center top. The stars are very much improvised - they were done with a stencil quick and dirty just to get them on there so it looked kind of complete. The line around the whole edge is the tracing from my pattern, but since I ended up with a little extra room I cut it a little bigger.
WP_20140608_001.jpg
That's as far as I got before I set it aside. Next step will be lightly sanding the cut edge to get some of the scraggly bits off, then after that laying the sheet of craft foam, heat forming it to give it the slight curve, and Plasti-Dip to seal it and smooth before I paint.
 
Last edited:
Re: The First Avenger POW Rescue Cap and Bucky

Keep building! Keep going!

Nice find with the USMC leggings. They look a bit different from the US Army ones, but are still a perfect legging for the job.
 
Re: The First Avenger POW Rescue Cap and Bucky

Keep building! Keep going!

Nice find with the USMC leggings. They look a bit different from the US Army ones, but are still a perfect legging for the job.

They definitely get the job done, and I was lucky to already have them. Mine are Navy leggings specifically - they have the NXSX stamped inside. Aside from the different number of hooks and eyelets, they don't look all too different from the Army issue. Especially not at a casual glance and for a more budget version of the costume like I'm trying to do. Someday if I get more into the reenactment community or make this costume more fully accurate, I'll get some Army replicas. But for now I'm really happy with these.

Looking great so far!

Thanks!
 
Re: The First Avenger POW Rescue Cap and Bucky

After much hemming and hawing, I finally ordered the goggles last weekend and just got them today.
WP_20140916_018.jpg
The lenses are a little more square than the movie ones, but I'm hoping the size is good. Some of the other options had a slightly closer lens shape but they were smaller, so between them I kind of thought matching the size was more important so it looked right over the helmet. The bulk of the modification will be replacing the elastic with white or gray, gluing the gray foam with leather backing around the lenses, and maybe removing the black padding behind the lenses. I don't think I'll be doing anything to the nose bridge; it's not perfect but it's close enough for me for now.

I also started on the jacket last week. I found it at the thrift store for $2, and even though the style wasn't right, since it was real leather and a good color and so cheap, I couldn't pass it up. Most of the photos are washed out, but in person the jacket is a really nice medium reddish-brown that's very close to the movie jacket.
TFA Rescue Cap 1.jpg
It was also large enough that I could give it the offset zipper by taking it in, and the pieces I'd be cutting off while altering it would give me scraps to make the straps at the wrists and collar - plus maybe enough leftovers for making my own holster and knife sheath.

I removed the lining, the three outer pockets (which I'll be repurposing for the lower right flap pocket), all the buttons, and ripped out the buttonholes first to prep it. Then I arranged the collar and overlapped the front panels. I marked the center front on the outer panel and marked the zipper line to the side of that on both the outer and inner panels. Even with how much of an experiment this whole undertaking was and despite comparatively low risk, the first cut was nerve-wracking. I cut a little over an inch away from the zipper line to give me plenty of allowance to work with. The jacket has a facing (which is basically the underside of the collar) along the whole front edge, and I figured that would be a nice large scrap piece, so I cut the outer panel of the jacket first and then cut out the facing separately to keep it intact. I only removed the facing up to the bottom edge of the collar. Once all the alteration is done and I'm ready to put in the zipper, I'll separate the facing from the collar, reattach a new facing for the bottom half, and layer the zipper tape between the outer panel and the facing so it lays right in that seam.
WP_20140905_008.jpg WP_20140905_009.jpg

I removed the sleeves so I could take in the sides and adjust the armhole, which was too large to begin with and now uneven and pulled out of place from overlapping the front panels. I also ripped out the side seams at this point to make the rest of the alterations easier and so I could pull the jacket off the dress form (to try it on, flip it inside out, work on a different project, whatever) without having to unpin the front. For the horizontal seam on the upper back, I flipped the jacket inside out, marked a line and pulled the whole back panel up (basically taking up the length from below the line while keeping the shoulder area flat). I wanted the horizontal band on the lower back of the jacket to sit at my waist, so I used that as my basis for how much to pull the jacket up.
WP_20140905_011.jpg WP_20140908_009.jpg
The next step has to wait until I dig up my leather needles. In the meantime I'll be figuring out what I want to do with the zipper pocket on the front.
 
Last edited:
Re: The First Avenger POW Rescue Cap and Bucky

September kind of snuck up on me, so now that the month's almost over, I have to put this project on hold for a while to finish stuff for Halloween. But as soon November comes along, I'll definitely be back on this.

We're also trying to recruit some of our friends into a costume group as other characters from the movie. We're doing Cap and Bucky together regardless, but we're hoping to come up with a POW Howling Commando group (or really any characters we can talk anyone into doing) to go with us. It'll be kind of improvised and probably very budget since we're not asking anyone to put in the same time or money we are, but if anything comes of it we'll include that here too.
 
Re: The First Avenger POW Rescue Cap and Bucky

A few little updates.

I don't know why I didn't test this when I first got the pants months ago, but oh well.
Screen Shot 2014-11-13 at 3.56.06 PM.png WP_20140911_002.jpg WP_20140911_003.jpg
The pants aren't *technically* done - the cargo pockets need to be moved and enlarged, the knees need to be reinforced/patched, and in areas where I removed unneeded pockets the fabric underneath is darker than the rest so it need weathering. But it's close enough that it's starting to look like what it's supposed to be, and in theory they could be worn like this if it comes down to it.

I also cut the foam for the goggles (and I apologize for the poor photo quality; *really* need to start using a different camera).
TFA Rescue Cap 3.jpg
I basically just traced the very outer edge of the frames, measured and sketched in the line that goes directly around the lenses and the gaps for cut marks, extended the lower edge, and cut everything out. I haven't attached it yet since I'm still debating about what glue to use, and I also figure I should test the size/fit of the goggles over the helmet first to be sure I can even use them at all.
 
Last edited:
Updates on my end of things.
Cap's helmet is officially done:
10171902_10154836179085058_9108899441425362195_n.jpg
This was before I put the liner back in, but this started life as an M1 Paratrooper helmet from At The Front.
I sanded the loose cork bits in the original green paint down. They had a tendency to simply knock off at even the slightest scratch, so I didn't want them ending up leaving nicks in my paint job. Even after being smoothed, the texture in the metal is awesome. From some guidance in color choice from the USO Dancing Girls construction group, we settled on Krylon's Oxford Blue. Most girls use a custom Behr paint, but I honestly didn't have the spare cash to buy the stuff to make my own sprayer to avoid brush strokes. I also ended up really liking the slightly darker blue, anyways, as I think it actually matches better.

Anyways. I bought Rustoleum primer in white, which is thicker than Krylon, so it only took two coats over the whole helmet, plus a little extra layer over the front for the A. I masked the letter off with masking tape and followed it with three coats of the Krylon. All I have to do now is fix the slight feathering on the right leg of the A thanks to the tape wrinkling just a little.

Also, Bucky's outfit is complete:
10849971_718522561559221_3941556322301073178_n.jpg
This isn't the greatest lighting for correct color comparison, but we do what we can with bathroom lighting.
The sweater is unissued, from 1950 (according to the tag), 5-button pullover. It is actually green, not brown, I promise. I got it from What Price Glory. It needs a wash, seeing as it is the itchiest thing I have ever worn, but other than than it's perfect.
The pants are second pattern HBTs from At The Front. They're a size too big and they were out of the first pattern (which has no cargo pockets, and is the pair I needed), but restock on correct sizing or patterns weren't listed until Summer of 2015, so we'll make due. A belt should handle the waist, and we'll probably hem the pants a couple inches. I'm in the process of over-washing and softening them, now, before I do any slight weathering.

Both items need some wear, small holes, and fraying edges, but this costume is otherwise complete. The only thing I still need is a clip-on bang to hide my blonde ones.
Also, dog tags are these:
10473183_691603417584469_4762528502556507582_n.jpg
Custom printed order from WWII Dog Tags.
 
So stoked to see this :) my buddy and I are doing modern day bucky (post tws) and steve (post tws and pre aou) for the AoU premiere in Albuquerque. We're also doing a snow day photoshoot in Colorado in a few months. Next outfit I wanna do is a ww2 cap. Keep up the good work!!
 
So stoked to see this :) my buddy and I are doing modern day bucky (post tws) and steve (post tws and pre aou) for the AoU premiere in Albuquerque. We're also doing a snow day photoshoot in Colorado in a few months. Next outfit I wanna do is a ww2 cap. Keep up the good work!!

Thanks! I just happened to see your casual Steve. It looks good! We have a bunch of other Cap costumes on our list too, including some modern ones. We're planning on doing a Winter Soldier and one of Steve's casual "civilian" costumes for SDCC next year along with these (plus we want to do their Howling Commando uniforms from TFA someday too, and I'd love to do the stealth suit. The list goes on and on. :p ). But there can never be too much Cap! A snow photoshoot sounds like a lot of fun. I'll be keeping my eye out for photos. :)
 
While I'm waiting for the nerve and inspiration to start modifying my pants and jacket again, I've started working on the M1916 holster and M3 fighting knife/sheath. As nice as the replicas are, I can't justify spending $40-70+ on each right now. And arguably, both pieces are simple enough and placed obscurely enough on the costume that I think I can get away with a substitute, at least for now. So I'm doing *very* budget versions of both with craft foam.

It was surprisingly difficult to find measurements or a template/pattern, but I did finally find some here: http://leatherworker.net/forum/index.php?showtopic=41199&hl=ghostsoldier&page=3 and here: http://leatherworker.net/forum/index.php?showtopic=58690. The pattern from the first link is (I think) a scan of original blueprints of some kind, and I ended up using that. The second link has a pattern someone drew up themselves, which seemed good, but my printer doesn't like to do multiple pages full size for cutting/taping patterns together. So since the original scans had a scaled down pattern on a grid, I sketched it out on graphing paper to scale it back up. I only had the individual 9x12 craft foam sheets that weren't quite big enough, so I cut the top as a separate piece with a little extra on the edge, and once it's glued together the seam will be hidden on the underside and and back of the flap.

TFA Rescue Cap 6.jpg

I estimated the size of the knife and sheath from the one measurement I did have (6.75" blade) and historical/re-enactment photos of the knife being worn, and then cut it from the same craft foam as the holster. After tweaking it a bit, fabric was glued to the back for added stiffness without thickness.

TFA Rescue Cap 7.jpg
 
Really coming along nicely.
If you need any measurements let me but it looks like you have everything figured out.
 
Really coming along nicely.
If you need any measurements let me but it looks like you have everything figured out.

Thanks! I wouldn't mind having the knife/sheath measurements actually. I found a scrap of leather in my stash so I've been thinking about making a more accurate version of that, if not for this costume then just for its own sake.
 
I've taken a break from the holster and sheath and been working on the star for the stage costume shirt the past few nights. Based on auction photos and screencaps, and having been lucky enough to see the Rescue costume on display at Disneyland a few months ago, I'm pretty sure the original is a machine embroidered patch/applique.
10440699_10154729763945058_3760301760750997821_n.jpg
This is one of the better photos of the star Mousemeat and I got at Disneyland. If anyone wants to see the rest of the photos of the Rescue costume (and a bunch of shields), we'd be happy to post them.

TFA Rescue Cap 9.jpg
Using the auction catalog pdf, I zoomed in as close as I could to life-size on the stage costume and traced the star off my computer screen, then added the panel lines. I transferred that to a scrap of white cotton over a piece of grey felt. (This is the same way I make bows for replica Ruby Slippers, and I find the felt base works really well to stabilize everything and add some thickness without stiffness.)

TFA Rescue Cap 10.jpg
To make the star look machine embroidered, I used normal sewing thread instead of embroidery thread, but doubled the thread to cover more fabric and make the stitching go faster. I wouldn't recommend using a normal pencil to draw the shape on the fabric if you want it to stay clean - between handling and the needle running through it does smudge. But I wanted the smudge to act as some light weathering/distressing (I'm aiming for a sort of medium dirty version of the costume) so I used pencil intentionally with that in mind. I *think* the two halves of each point on the star were stitched separately, but I just stitched straight across it as one panel and I'll go over it with a seam line right down the middle to split the panels.


I also got a nice surprise yesterday: I ended up with not one but TWO pairs of gloves to use. Instead of replica paratrooper gloves, I was already looking at leather work gloves as a budget alternative, and I think both of these are equally good as (if not better than) work gloves while being even more under-budget (read: free).
TFA Rescue Cap 11.jpg

While clearing out some stuff in my closet, I rediscovered the pair on the left in a jacket pocket. They're just ordinary leather driving-style gloves I've had forever. The pair on the right are much cooler. I was visiting my dad and noticed a pair of tan leather Marmot gloves (very similar in style to paratrooper gloves) that were sitting out. I explained a bit about the costume and mentioned needing something similar and that I was looking at work gloves, but having trouble finding something that fit (I had to pass on a pair of ideal and discounted gloves at Kmart a few days ago because they were too large despite being a size small). Lo and behold, he rummaged around in a drawer and pulled these out. They're my grandfather's late 40s/early 50s gloves custom made from the hide of a deer he hunted. He never used them because they were "too nice," and when they got passed down to my dad he never used them because they didn't fit quite right. So now they're mine and I'm really thrilled with them.

Both pairs have pros and cons that mostly cancel each other out. The driving gloves are a bit too dark and have vent holes along the back, but they have the correct exposed seams and fit really well. The deerskin gloves are a bit too light in color and are a little too large, but I can wear them as-is if needed (or fix the fit with a liner if it comes to it) and they're still a better fit than anything I've found in a store. They're also more similar to paratrooper gloves in shape and at a glance, and being era-authentic is a bonus (as is the personal history). So for now I'm planning on bringing both with me to SDCC and letting it be a last-minute decision which I use.
 
Last edited:
Wow, that star looks great. It really shows that you saw the actual costume.

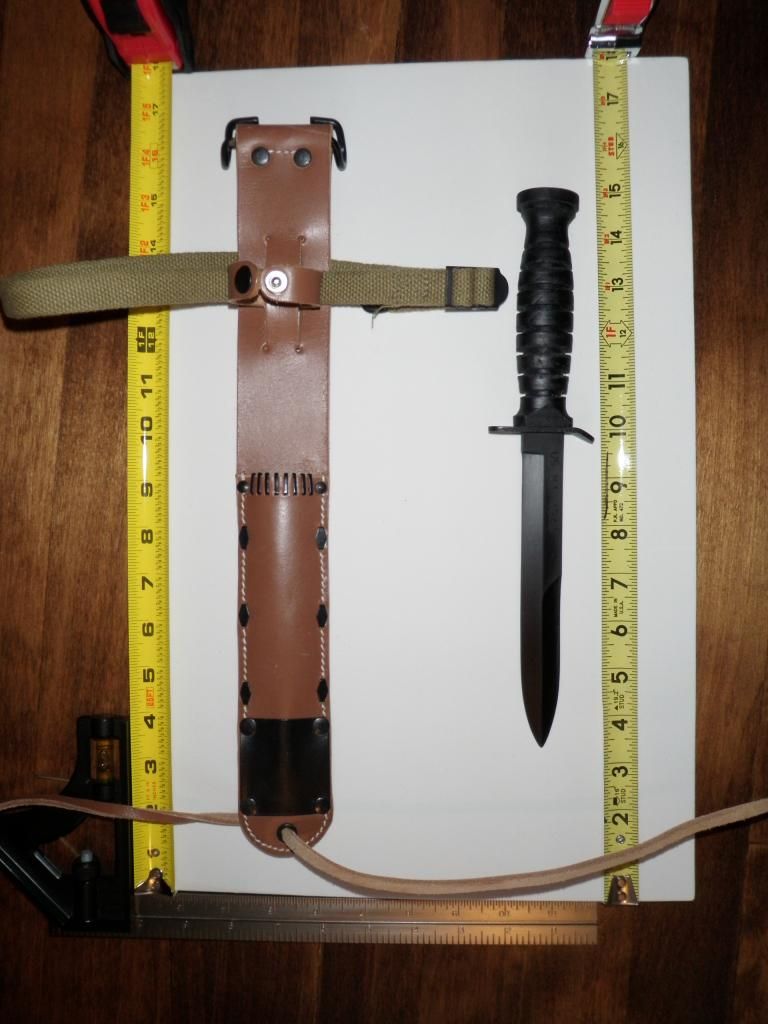
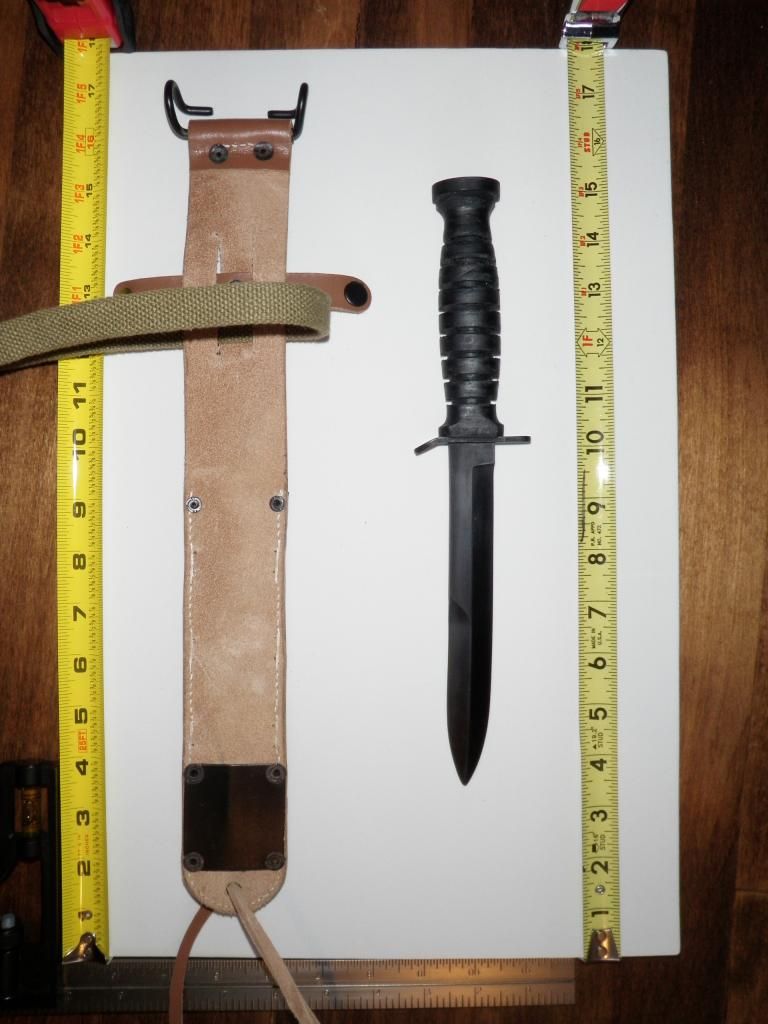
Here are the photos of a reproduction sheath and rubber fighting knife. The background is a 12 x 18 piece of craft foam.

The knife is an overall length of 11 7/16 and the blade is 6 5/8 and 7/8 inches wide.

The sheath is 15 1/16 long and 1 15/16 inches wide. The black metal plate is 2 inches tall and 1 7/8 wide.

Hopefully with these measurements and the tape rulers will help the photos to be used as a template.


For anyone interested in the photos we got from Disneyland, here you go :)
It was hard to get some of them clear because of the glass and lighting. Also, they tend to herd people through a little, though they were very nice about letting me get some decent shots ones I started.
541535_10154729762730058_5227252253031207467_n.jpg10687119_10154729763755058_3932146025973848998_n.jpg10610892_10154729763975058_3127243149816539252_n.jpg10505455_10154729763855058_2867776960592800844_n.jpg1911865_10154729763815058_982058887626119605_n.jpg1609555_10154729763885058_4224727679324370022_n.jpg1454623_10154729764030058_7590015859716920154_n.jpg1450066_10154729763705058_7680782203526889070_n.jpg1233978_10154729764095058_806755884180371700_n.jpg10731033_10154729764320058_8407407371210479474_n.jpg
 
This thread is more than 5 years old.

Your message may be considered spam for the following reasons:

  1. This thread hasn't been active in some time. A new post in this thread might not contribute constructively to this discussion after so long.
If you wish to reply despite these issues, check the box below before replying.
Be aware that malicious compliance may result in more severe penalties.
Back
Top