Captain America movie shield. The most difficult DIY shield I´ve never made before.

Mordor Brass

Active Member
Hi guys. Recently I´ve been working in my own Cap´s shield movie version. This time I would like to make a very decent replica for me and why not, I would like to sell some pieces becouse in my country the Cap´s shield are hard to find. Here the full process from to make the model to molds, casts and paint.
Sorry the quality pics from my phone.

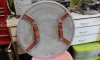
I started with an old fiberglass cast ( and last piece) from my old mold of Cap´s shield comic version from a satellite dish.

http://www.therpf.com/showthread.php?t=120774

2015-03-05 14.24.36.jpg20150315_213451.jpg


The circles was milled with a Dremel. Front side and backside. Also I gained the edge with bondo. I used foam tape to make a clean edge. Once bondo was cured, I peel the tape and Tadá, clean edge.

20150327_154430.jpg20150417_202659.jpg20150406_210319.jpg20150406_210806.jpg

The star was engraving with a metal marker and hand made chisel.

20150417_200122.jpg

To make the brackets I used foamed pvc and to simulate de ribets, I made a special drill with aluminum rod with teeths.

20150419_000330.jpg20150419_003716.jpg20150419_004909.jpg

With primer all looks better. 2K automotive primer used.

20150424_172653.jpg20150425_191103.jpg


Next part, the mould. The big mould. Hehehe.

You can find us and our works at Facebook:https://www.facebook.com/pages/Mordor-Props-Workshop/259930630823592?ref=tn_tnmn
 
Last edited:
Re: Captain America movie shield. The most difficult DIY shield I´ve never made befor

Ok. We continues. The shield´s mold was my first big mould. I used the two parts molde with fiberglass jacket and silicon core.
First, I covered the shield with plastic food to protect it from dirt. Once I covered with water base clay and I sculpted the keys. Once sculpted, I sprayed acrylic clear coat to help the demold from fiberglass jacket. Once clearcoat was dry, I brushed mold release wax. Petrolleum jelly can work too. I covered the clay with polyster resin with fiberglass. The pipe in the center is for pouring silicon late.

20150713_190003.jpg20150714_134056.jpg20150718_171421.jpg

Once the polyster cured, I removed the jacket and remove the clay.

20150718_200213.jpg

It´s time to pouring silicon. I drilled some holes in the keys of the jacket mold to let scape the air when you pour the silicone. I relocated the jacket over the shield and I screwed it to the table. I put some hotglue around the jacket to prevent the silicon scape. Once the silicon was poured, I cover the miniholes with screws.

20150719_183621.jpg20150719_185058.jpg

Once the silicon was cured, repeat the same process with the backside.

20150722_171440.jpg20150723_173457.jpg20150727_180220.jpg20150727_194607.jpg

20150727_202242.jpg

To attach the two fiberglass jackets I made holes when the parts was together ans used hex screws. Sorry, I forget take pics.

Here the master and the mold ready for cast some pieces. The bit purple in the center of the front side was becouse I used other B silicon part in the last pour becouse I consumed early the original B compound. Luckly it worked.

20150801_183907.jpg


Newt post. The wonderful world of cast and paint. :)


You can find us and our works at Facebook:https://www.facebook.com/pages/Mordo...92?ref=tn_tnmn
 
Last edited:
Re: Captain America movie shield. The most difficult DIY shield I´ve never made befor

Really when I arrived to this part, I didn´t know what kind material cast I would use. My first try was my first time with epoxy resin. I used epoxamite from Smooth-On. It´s a awesome resin. I´m in love. The final piece is lightweight and very very strong.

I laminate the front and back side separately. First coat with thixotropic aditive (Aerosil) and black pigment. Second coat resin+fiberglass.

Once semicured the two sides, I put a resin cord with thixo around the edge with a pastry bag. And yes, a pastry bag is perfect if you put thixoresin inside and you want total control where you put resin. Sorry I haven´t pics of this process.

20150802_125230.jpg20150802_132956.jpg

Here the final cast. Some little bubbles but it´s not a problem. Mr putty tu the rescue. No pics of the front side. Sorry again.

20150811_133519.jpg

Now the funniest part.(sarcasm) Painting. Transparents colour is soo dificult to apply.
I used 2K automotive primer and once cured, I sanded the surface of the frontside in one direction with 60 grit sand paper to get the brushed metal effect.
Silver colour base coat aplied with spray gun.

20150812_183834.jpg20150812_185509.jpg

Masking tape the star and the circles and first coat of Metalcast Blue from Duplicolor spray. I need say I didn´t use the spray can. I emptied the gas inverting the can and once without gas, I made a hole in the can and I extracted the paint for use it with a spraygun. It´s not very recomended but it works better than can´s diffusor.

20150813_164337.jpg20150812_193558.jpg20150812_200525.jpg

Some process with the red colour. Metalcast Red from Duplicolor.

20150813_182629.jpg

Once applied the colours, and some light weathering, I clear coated with satin 2K automotive barnish.

20150816_140231.jpg20150813_202203.jpg


Next post, the straps and the display.


You can find us and our works at Facebook:https://www.facebook.com/pages/Mordor-Props-Workshop/259930630823592?ref=tn_tnmn
 

Attachments

  • 20150816_140554.jpg
    20150816_140554.jpg
    1.3 MB · Views: 224
Last edited:
Re: Captain America movie shield. The most difficult DIY shield I´ve never made befor

Your pictures in the last post aren't working. Also, what is the diameter of the shield?
 
Re: Captain America movie shield. The most difficult DIY shield I´ve never made befor

As my sewing machine can´t sew leather, I used upholstery faux leather with eva foam core.

20150520_122225.jpg20150519_140330.jpg20150520_134139.jpg

The aluminum buckle was from 3mm aluminum sheet.

20150515_132528.jpg20150515_181614.jpg

Straps attached with Chicago screws

20150519_140738.jpg

And the final assembly.

20150816_140554.jpg20150816_141236.jpg


Your pictures in the last post aren't working. Also, what is the diameter of the shield?

Ops, sorry. The posts don´t let me upload 24 pics. I´m trying fix it. It´s my first time posting a lot of pics.

The diameter is 68 cm.
 
Last edited:
Re: Captain America movie shield. The most difficult DIY shield I´ve never made befor

For the display I thought in a wall display andI designed a piece where the shield could rest. I made the master piece withfoamed pvc, mold it and cast in polyurethane resin with aluminum powder.Coldcast. I mounted the pieces in Y structure.

20150508_205052.jpg20150508_222703.jpg20150519_115638.jpg

Left, silver paint. Center, polyurethane withblack tint + aluminum powder. Right, Polyurethane Smooth On 326 + aluminumpowder Finally I´ll use normal resin and I´ll finish it with silver paint with weathering effect.

20150729_173844.jpg

The Y structure. I know. It´s very simply. But it works hehehe.
The upper piece can unscrew to dissassmbly the shield from display.

20150816_141339.jpg20150816_140958.jpg20150816_141013.jpg

And the final mounting. This is the 00 piece. The first prototipe I´ve finished. Soon I could calculate costs for a little wave.

20150816_140121.jpg20150816_140059.jpg


I hope you enjoy with the process. Next week an profesional photographer will take better pics. I promise I´ll share.

Thanks for looking.


You can find us and our works at Facebook:https://www.facebook.com/pages/Mordor-Props-Workshop/259930630823592

20150508_205052.jpg


20150508_222703.jpg


20150519_115638.jpg


20150729_173844.jpg


20150816_141339.jpg


20150816_140958.jpg


20150816_141013.jpg


20150816_140121.jpg


20150816_140059.jpg
 
Last edited by a moderator:
Re: Captain America movie shield. The most difficult DIY shield I´ve never made befor

That is downright sensual. Fantastic work!
 
Re: Captain America movie shield. The most difficult DIY shield I´ve never made befor

Te ha quedado de lujo, paisano.
 
Re: Captain America movie shield. The most difficult DIY shield I´ve never made befor

Amazing work!
 
Back
Top