Step 3
Take the parts that is going to be silver/Metall and check them if they needs any filling, then prime them lightly.
When dried paint with silver if your choosing.
Small tip!
If there is a micro “hole” that is visible when priming, spray a little primer on a lid or something, then take a toothpick or something else and dip it in the primer paint, then apply it to the hole and it will suck itself in there and fill out the micro hole.
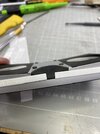
When this is done glue these pieces together as in the picture.
Now it’s time for the lenses, please check everything that it all fits together. And the lenses should have its highest point at the lowest edge of the black part in the picture.
Glue the lenses with loctite fast glue (or any other fast glue) and please be careful not to get too much glue that spills out on the lens. Use a toothpick or something to apply the glue as this gives you more control, and it’s very tight between the lenses and the base part.
Now glue the black parts that fits over the lense (as in the picture).
And now is a good time to use a black marker to paint this section black.
When fitting the “black nose piece” to the base frame, just scratch the surface on the base piece with an exacto knife until you can get the nosepiece i side.
Then use the aluminum plate as a guide to carve away the rest of the material, until the nosepiece fits.
")