Bruce Hansing Queen face repair and modification

You've raised several points during your analysis of the crown (not canon) the head and the lack of flexible material on each side of said head to comply with a closer screen look. If I were you; I would add flexible material at the side to fill the gap and design it into the same shape that's presently on each side of the head. So, in effect, it would mimic those left and right sides. Painting it the same as the crown but with a color gradation turning more to a bluish black when closing the distance toward the head.
 
You've raised several points during your analysis of the crown (not canon) the head and the lack of flexible material on each side of said head to comply with a closer screen look. If I were you; I would add flexible material at the side to fill the gap and design it into the same shape that's presently on each side of the head. So, in effect, it would mimic those left and right sides. Painting it the same as the crown but with a color gradation turning more to a bluish black when closing the distance toward the head.
- It might make sense to make a separate shroud that would fit between them and unite them optically, similar to what you suggest. It's not possible to extend the crown to narrow the gap because the whole cheek parts would have to rotate, hinged on the long slot between the cheeks and the done. So if only the gap side were extended the angle would still be off and it would look wrong. But I like your idea of perhaps creating a bridging piece. That might be a future project. When I get time I'll PShop to see what the crown and head would look like without the while of the pegboard showing through the gaps. My guess it that it will have a profound effect of their appearance.

For what it is worth: I say display it with the crown. Your pics with the test fitting look great and it makes for an impressive piece! One thought - if I were to walk in and see them displayed separately, I think my first question would be, why not display them together? Thanks again for sharing your progress and work, it is a lot fun to follow along!
- That's a very good point! Sort of parallels my issue of not having an obvious place to hang it separately. Over by the Big Chap and queen tail, sure, but then it's in a corner and not really presentable like it would be below the crown where it would be a centerpiece and you could walk around and see it from different angles.

I have a full size AvP warrior face (front of the head) and Predator mask that were gifts to the director, they are hung together on a wall next to a door because that's how they were designed, and they fit there. In theory the queen head could mount above them, but that would put it 7-8' up and there isn't much space there to back up to see it from different angles. It's worth considering I suppose, I'll try to remember to take a pic of that area...
 
Btw, I posted a new thread last night. I'm linking it here as a foreshadowing of how I intend to paint the tendons on this Hansing head. Bruce's tendons are very prominent and optically heavy, because they needed to fill gaps between the castings and also hold them together. I want to make them seem a lot lighter and thinner, so as to contrast with the heavier carapace and thicker gums.
 
Another round of red spot putty, just a few places left:
23,01-06 (3)more red putty.jpg


Here is the alternate location if the head doesn't work under the crown. The warrior head and predator mask are part of an AvP gift to the director, got them through PropStore. Wasn't planning on this being their permanent location, but I like them near the door at head height to scare my occasional visitors. The queen would have to go over them. Even angled down I think that much of her won't be easily visible. In part because you can't get any distance to the right or straight back to see more.
23,01-06 (4)alternate hanging spot.jpg

23,01-06 (5)alternate hanging spot.jpg


I primed the head again, with a low-build primer, then sanded it for the last time.
23,01-09 (1)sanded.jpg


Sprayed it with the same base as the crown: Tamiya X-11.
23,01-09 (4)base silver.jpg


Removed the mouth masking, as I didn't think it will be necessary when I airbrush the rest of the paint job.
23,01-09 (14)unmasked.jpg

23,01-09 (16)unmasked.jpg

23,01-09 (17)unmasked.jpg

23,01-09 (13)unmasked.jpg

23,01-09 (18)unmasked.jpg


I also took this pic, because it was cute:
23,01-09 (20)unmasked.jpg


Then I took another look at the teeth. They have a very rough surface texture, not sure why. And because I need to re-set so many of them and plan to sculpt my own gums I thought I should test sanding off the black paint to create a better bond. You can see some removed here.
23,01-09 (21)sanding black off tooth.jpg


That created a smooth spot, and I liked it. So one thing led to another and, like Newt's face, I had to do the whole thing. Untouched tooth in the background for comparison.
23,01-09 (23)tooth sanded.jpg


This is the same tooth, after being dipped in water to simulate clearcoat. I only sanded it to 600 grit, so certainly could be improved. But also, as I keep trying to tell myself, I'm not after "perfect", I'm after "looks right". So I think I may end at 800 and then clearcoat one to see how it looks.
23,01-09 (25)water dip.jpg
 
Yesterday was Teeth Day (1). First, a humorous pairing of full size and pencil sharpener:
23,01-11 (1)with pencil sharpener.jpg

23,01-11 (2)with pencil sharpener.jpg


As far as working on the teeth, the most important thing was figuring out how to index and label them, so I could re-place them later. I decided to go with an alpha-numeric system, T1-T10, TA-TD, B1-B10, BA-BD, as these are small enough to write on the base of each tooth - as I can't use my usual blue tape flag method of marking.

An example of the labeling on these front teeth:
23,01-11 (9)labelling.jpg


Then it was a chore to carefully remove the teeth, and then remove the hot glue from each tooth and from the mouth. Pics with the teeth pulled.
23,01-11 (15)all teeth pulled.jpg

23,01-11 (13)all teeth pulled.jpg

23,01-11 (11)all teeth pulled.jpg


And all the hot glue pieces:
23,01-11 (10)hot glue pieces.jpg


For sanding I discovered that 240-400-600 was the right mix of rough enough to quickly get rid of the bumps and bubbles and previous gum paint, and 600 being smooth enough with this resin that it took clear really well. Pic of 3 teeth sanded, going R to L sanded with 240, 400, 600.
23,01-11 (16)sanding 240 400 600.jpg


I find that these Godhand (edited, incorrectly said they were Tamiya) sanding sponges are really great for most projects, more durable than E2046 or MicroMark's sanding sponges which are otherwise quite good. They also work really well with wet sanding, which sped up the process on the teeth a lot.
23,01-11 (17)sanding 240 400 600.jpg


The exciting time...first tooth clearcoated with Upol, what I used to finish the queen's crown. Turned out really good. Comparison to an original tooth from the head.
23,01-11 (18)cleared vs OG.jpg


While that was drying I experimented sanding one of the incisors. They are trickier because of the texture on the front. I'll be finishing these with diamond files to preserve the detail.
23,01-11 (20)sanded front tooth.jpg


Comparison of (R->L) OG tooth, sanded smooth, cleared.
23,01-11 (22)OG vs sanded vs cleared.jpg


And in case you thought the Big Chap had big teeth, check out this canine!
23,01-11 (24)with Big Chap.jpg


I was still concerned about the yellowing of the teeth resin. Here is a picture next to my queen crown, to see if the teeth might look more at home with the crown's palette.
23,01-11 (27)color compare to crown.jpg


I got 1/2 the stabby teeth sanded and painted, sanding the other half before running out of time. Next goal will be clearing the other stabby teeth, sanding the incisors while those dry, then clearing the incisors while I prep the jaw for reattachment. Then gum sculpting, priming, then I can start painting the head.
23,01-11 (29)most sanded.jpg
 
Last edited:
Thanks guys! And, to be clear, I'm only taking these teeth as far as needed - still a long way from perfectly clear. In part this is because at a large scale, and an organic creature, things aren't perfect. But also, there are tiny casting defects in the teeth, and some minor tip damage. If I spent time grinding the points and then working up through the grits (800,1000, etc. up to 15,000) and then finish with polishing compound (Novus or Tamiya, depending on what the resin likes more) I could get them glass smooth, but that would take many more days only highlight defects and look out of place in the context of the rest of the head. Using clearcoat instead to fill in micro gaps and provide the final finish (very slight orange peel) will unify the surface texture to the rest of the piece after the paint is finished.
 
Been delayed by a sudden bad allergy, so only a small update. Cleared the other stabby teeth:
23,01-13 (1)cleared other teeth.jpg


While those were drying I sanded and filed the incisors.
23,01-13 (2)incisors sanded.jpg


All the pointy ones finished.
23,01-13 (3)pointy teeth done.jpg


Clearing the incisors. Of note: I switched from nano tape to 3M mounting tape. Nano tape worked pretty well, but the 3M has more grip and tolerates re-use a little better.
23,01-13 (5)incisors cleared.jpg


Today I went back and inspected the incisors, a few had tiny bubbles in the clear. I don't know why, must not have cleaned them well enough. Or it could have been a reaction to the white vinegar residue, if I hadn't waited long enough for it to evaporate after cleaning.
23,01-16, sanding and re-clearing incisors (1).jpg


Sanded the offenders:
23,01-16, sanding and re-clearing incisors (2).jpg


Re-cleared:
23,01-16, sanding and re-clearing incisors (3).jpg
 
Good work cleaning the teeth (y) Since it's an animal; I wouldn't want it to show a "Hollywood Smile";) The wear and tear are a natural process and to be too good looking would kill the overall look.:)
 
Good work cleaning the teeth (y) Since it's an animal; I wouldn't want it to show a "Hollywood Smile";) The wear and tear are a natural process and to be too good looking would kill the overall look.:)
- I totally agree. That's why I left the chipped ends on the ones that were chipped, instead of grinding those tips sharp. The teeth as I got them didn't look natural (well, Alien natural), they looked like they had epoxy residue on them.

I figure starting with smooth teeth gives me the option to build up detail as needed, relative to the paint job. So I can tune them to each other...since I still don't know exactly how the tendons will be painted. I suspect I may paint some fine details or glazes on the teeth that echo a color from the tendons, and use the color of the teeth's translucence within the tendons so that the eye will be tricked into perceiving translucence where there is none. And now that I type that I realize I might be glad that my teeth have yellowed.
 
Yesterday was teeth installation day!

Here is a picture of the inside of the upper jaw. The holes seem to be thinner parts of the casting that had been sanded through when flattening the jaw for teeth, although I could be wrong. I had considered filling them but realized it was irrelevant, structurally or cosmetically, once the teeth were reinstalled because my new gums would significantly reinforce the whole area.
23,01-17 (1)underneath top jaw.jpg


Very important: REMOVE THE RED marker before installing. Otherwise you will see the color through the now-clear teeth!
23,01-17 (2)removing marker.jpg


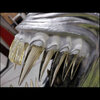
This also meant that I had to be very deliberate in laying out the teeth to ensure the correct one went to the correct indexing mark. If you look very closely the indexing marks are in gray pencil and I drew them on following the curve of the each tooth's centerline onto the lips.
23,01-17 (3)setting teeth.jpg


I used hot glue to set the teeth. Turns out Bruce knows his craft! Hot glue is almost essential, as the back side of the teeth castings vary a lot and the bulk of the glue gives you a lot of freedom with positioning.
23,01-17 (5)refining teeth spread.jpg


I liked that. But then I later I thought it looked too Miyasaki. And if you didn't immediately get the Nausicaa reference, here's where my mind went.
Nv0PIH.gif


So I popped some teeth off and reset them.
23,01-17 (7)refining teeth spread.jpg


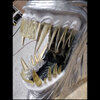
Then I set the lower teeth.
23,01-17 (8)lower teeth set.jpg

23,01-17 (9)lower teeth set.jpg


Then I looked at more Aliens reference and still didn't like the spread of the teeth. So I popped them off again, one at a time, and reset them...again. Uppers and lowers.
23,01-17 (11)changing spread.jpg


Then I had to deal with this other issue. At some point, this lower incisor (personal code BD) had been broken and reinstalled at this much shorter height. Lame.
23,01-17 (12)broken tooth.jpg

23,01-17 (13)broken tooth.jpg


So in the interest of speed I used UV resin over a silicone mat to quickly make the tooth bigger. All of the repair will be covered by gums and/or paint.
23,01-17 (16)broken tooth.jpg


*DISCLAIMER* UV lights are a SERIOUS hazard to your eyes! Even the reflected light is strong enough to damage your retinas, especially if you work with them a lot. There is a reason dentists use orange paddles to shield their eyes when curing fittings.

Usually I close my eyes once I position the flashlight. For this thin part I simply rested it over the tooth, 30 seconds on each side. Probably a little overkill. Also, note that this also minimized UV exposure to the original (Hansing) resin.

Oh, and also notice how you can see the light? That means it is NOT UV, or at least not 100% UV. We can revisit this tangent in a different thread, but I suspect that HEV light is actually what is curing the resin (and killing our eyes).
23,01-17 (17)broken tooth.jpg


Broken tooth now set, and she has a nice smile!
23,01-17 (18)broken tooth.jpg

23,01-17 (23)teeth set.jpg

23,01-17 (24)teeth set.jpg

23,01-17 (25)teeth set.jpg


Fun fact, all this powder is resin that came off during wet sanding of the teeth.
23,01-17 (29)tooth enamel.jpg


The next step, for me, was to use ProPoxy20 to anchor the teeth so that their bond is strong enough that they can't pop off during the pressure that will be applied when I sculpt the gums. Hot glue cannot be trusted (in this application). As PP20 is a lot harder than Apoxie I tried to keep this application small, and to areas I knew I would be covering later.
23,01-17 (30)ProPoxy.jpg

23,01-17 (31)ProPoxy.jpg


Then I broke out the Apoxie and defined the upper jaw gumline.
23,01-17 (35)establishing gum line.jpg


Then more putty to form up the gums.
23,01-17 (38)forming gums.jpg


And then blending into the jaw/lips. There were a lot of undercuts and small voids that needed filling.
23,01-17 (41)blending to jaw.jpg


Same procedure to do the lower jaw, but with the addition of having to do some filling and forming on the inside of the jaw too.
23,01-17 (44)lower done.jpg

23,01-17 (45)lower done.jpg

23,01-17 (46)lower done.jpg


At that point I thought it looked pretty good. But I looked at more photos, and with BobFett's advice realized the error of my ways. So tearing out hours of work is all his fault. And I thank him! Because it dramatically improved the mouth.
23,01-17 (50)changing gum curves.jpg

23,01-17 (51)changing gum curves.jpg

23,01-17 (52)changing gum curves.jpg

23,01-17 (53)changing gum curves.jpg


So ends Tuesday.
 
Last edited:
Today, gum refinement day. Using a rotary nail polisher, and various files and sandpapers, I spent the bulk of today refining the gums.

Upper jaw:
23,01-18 (2)refining upper gums.jpg

23,01-18 (6)refining upper gums.jpg


Then I primered it with two coats of Mr. Color gray primer, by brush. This, I recently inferred, needs about 24 hours to fully cure, even though it is mostly dry in just a few minutes. Since I know I'll be adding a little more putty to places, and that needs a good bond, I needed to make myself leave it alone.

First coat:
23,01-18 (9)primered.jpg


Second coat:
23,01-18 (12)second coat.jpg


I am primering bluntly over the gum/tooth areas because I need to be able to properly evaluate their relationships before moving on to paint, which will be a fade on the teeth.

The lower jaw, refined and primed.
23,01-18 (13)lower primered.jpg

23,01-18 (14)lower primered.jpg

23,01-18 (15)lower primered.jpg


And some closeups. I wish I could say I was happy and ready to move on to paint, but more work needs to be done with the gums. Some filling, some additional shaping, and I think I'll also be adding some basic creases where appropriate. Hopefully tomorrow.
23,01-18 (19)lower primered.jpg


The inside of the lower gums is still pretty rough, but it's nearly impossible to get a tool in there. Also, It's all going to be black, to blend in with Bruce's original paint that you can see. So I might smooth it a little with thin putty where my finger can reach, but otherwise it will have to be acceptably unacceptable.
23,01-18 (16)lower primered.jpg

23,01-18 (18)lower primered.jpg
 

Attachments

  • 23,01-18 (16)lower primered.jpg
    23,01-18 (16)lower primered.jpg
    181.4 KB · Views: 49
Last edited:
It's looking very good(y)(y) I know it's difficult to imagine where the teeth land on a closed jaw. Can it close its jaw?
Those type of design decisions are made because it looks good, not necessarily looking like real life...I mean, it's Sci-Fi right;)
 
Managed to get in some time today, refined the sculpt and added some details.

Overall pics, to compare to yesterday's.
23,01-19 (5)additions.jpg

23,01-19 (6)additions.jpg

23,01-19 (7)additions.jpg


I filled some gaps between the lower gums and the lip, and smoothed out the inner gums.
23,01-19 (8)additions.jpg


I also thought the lower teeth looked a little "stuck on", so I added a tiny amount of putty and sculpted it similarly to the indentations on the teeth. I hope this will serve as a subtle transition element.
23,01-19 (9)additions.jpg


In addition to refining the gum/tooth curves, I added a lot of material above the larger teeth to bulk up the gums. This makes the tooth size and positioning more believable. I also added a few little areas of "random" creasing. Gums are naturally pretty smooth, but I thought the contrast between the gums and the lips' textures was too great. I also plan on filing in some additional gum texture once the putty dries.
23,01-19 (11)additions.jpg

23,01-19 (12)additions.jpg
 

Attachments

  • 23,01-19 (13)additions.jpg
    23,01-19 (13)additions.jpg
    169.1 KB · Views: 49
Friday, more gum revisions. Getting closer to done. I started by eased the edges of the gum bulges nearest the teeth. And general clean-up of distracting shapes.

Before:
23,01-20, refining gums (1)easing edges.jpg


After, a little more integrated look. In hindsight there was a much easier way to have sculpted the gums. But I've never sculpted like this before, so, trial and error learning.
23,01-20, refining gums (2)easing edges.jpg


Primed again.
23,01-20, refining gums (6)primered.jpg
23,01-20, refining gums (9)primered.jpg

23,01-20, refining gums (10)primered.jpg


Close up. On tooth #4 (left to right) you can see a little shadow where there is a recess in the tooth casting. It stands out a little too much...
23,01-20, refining gums (7)primered.jpg


...so after the primer dried (different than cured) I added a little more putty to smooth out that tooth.
23,01-20, refining gums (11)late modification.jpg
 

Attachments

  • 23,01-20, refining gums (8)primered.jpg
    23,01-20, refining gums (8)primered.jpg
    145.6 KB · Views: 66
The toilet ring failed in my hallway bathroom. Had to pull it, and all the flooring, this morning. I'm currently waiting for it to dry out with the fan before I can start fixing things. At which point I'm going to lose queen time :( So today I was able to finish the queen's teeth.

Sanded (400 to remove minor imperfections and feather primer thickness by the roots) and cleaned. A note: Cleaning, like before, with white vinegar. Alcohol will give them a slightly better clean, but may chemically react with paints (like the clear on the teeth) and certain polymers (like plexiglass). So far I have not experienced any negative reaction using white vinegar on any paint or polymer.
23,01-23 (1)sanded.jpg


It's not a flaw, it's a feature! Since the teeth had yellowed, and I wanted to keep this head at least physically original to Bruce's creation, I thought that if I gave them a slight brown gradient toward the root that would make them seem less yellowed. Airbrushed with Freak Flex clear brown.
23,01-23 (4)brown tint.jpg


Then a black tint, also Freak Flex, clear black. This is presuming that black will look good with whatever the gum paint job will end up being. Which I won't know until I paint the rest of the head. I expect black(ish) will make sense because most of the inside of the mouth (OG paint still there) is black.
23,01-23 (7)black tint.jpg


Then I base coated the gums with X-11, same as the rest of the head except by brush instead of airbrush.
23,01-23 (11)gums based.jpg


A slightly washed-out closeup. Gives a better idea of how clear the teeth are. From oblique angles (above) they look darker than others. Since they are clear and the mouth interior is black. Root beer candy corns anyone?
23,01-23 (14)gums based.jpg


Then I cleared the teeth with Upol, just like before.
23,01-23 (15)cleared.jpg

23,01-23 (16)cleared.jpg

23,01-23 (17)cleared.jpg

23,01-23 (18)cleared.jpg

23,01-23 (19)cleared.jpg
 
Last edited:
Teeth are looking mighty good for sure :cool: :cool: :notworthy: :notworthy: as for the toilet wax seal; I replaced mine twice in 13 years:unsure: I use a foam seal now and it works well...so far.
 

Your message may be considered spam for the following reasons:

If you wish to reply despite these issues, check the box below before replying.
Be aware that malicious compliance may result in more severe penalties.
Back
Top