Custard Gannet
New Member
So for my first scratch build I decided on the "Lobster" aerodyne from Blade Runner (although it could just as easily be called the "cobra car" from the stencils you can see on its "claw" wheel wells in some shots of the studio model. Its kind of mysterious, and relatively obscure (no toys or kits were ever produced that I know of), but its the first vehicle you see in the film, and its a gorgeous design : its basically a VHS tape.

When compiling reference material, I like to compile it into a collage I can easily negotiate on my tablet screen. Moving on from this stage can be
difficult - what if you find a cache of perfect reference when you're halfway done?

drawing blueprints from reference material is excruciating because it seems impossible to eliminate all the problems you will encounter with construction. Realising a geometric object with planes of styrene is far more difficult than I would have thought. And to think that a modeller back in the day might have a week for a build like this...
All in all I think my approach is kind of messy, and I'm sure folks will agree. But I'm not really a methodological purist - as long as the finished model meets my projected standards I don't care about the methods applied (Of course, I won't reject a shortcut).


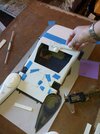
For an armature I decided on a framework of mdf. It turns out that this was far too robust, in that I could have used some gaps to thread wiring through and even for access later on. It was a difficult balance to strike, as I knew I would need some sort of housing inside for the deeply embedded lights (5050 smds) needed for the ventral arodyne thrusters.


I knew I was going to embed a female 0.7mm jack in the armature, both for ease of mounting and for power. In the end I was pleased that this turned out to be a viable idea. I'm absolutely terrified of electrics/leds, as any problems down the line potentially require undoing a lot of painstaking work (far more work in a scratch build than a kit).


Building little light arrays for the claws. I only modelled one side of one of these and moulded/cast it three times in Polyurethane.


I can't relax until this puppy's done, but can hopefully tear myself away to post as I go.
Its slooow going.
When compiling reference material, I like to compile it into a collage I can easily negotiate on my tablet screen. Moving on from this stage can be
difficult - what if you find a cache of perfect reference when you're halfway done?
drawing blueprints from reference material is excruciating because it seems impossible to eliminate all the problems you will encounter with construction. Realising a geometric object with planes of styrene is far more difficult than I would have thought. And to think that a modeller back in the day might have a week for a build like this...
All in all I think my approach is kind of messy, and I'm sure folks will agree. But I'm not really a methodological purist - as long as the finished model meets my projected standards I don't care about the methods applied (Of course, I won't reject a shortcut).
For an armature I decided on a framework of mdf. It turns out that this was far too robust, in that I could have used some gaps to thread wiring through and even for access later on. It was a difficult balance to strike, as I knew I would need some sort of housing inside for the deeply embedded lights (5050 smds) needed for the ventral arodyne thrusters.
I knew I was going to embed a female 0.7mm jack in the armature, both for ease of mounting and for power. In the end I was pleased that this turned out to be a viable idea. I'm absolutely terrified of electrics/leds, as any problems down the line potentially require undoing a lot of painstaking work (far more work in a scratch build than a kit).
Building little light arrays for the claws. I only modelled one side of one of these and moulded/cast it three times in Polyurethane.
I can't relax until this puppy's done, but can hopefully tear myself away to post as I go.
Its slooow going.
")