Blade Runner Blaster Build (Anders / DaveChaos / Tip Top Worksop)

genZOD

Sr Member
IMG_0478.jpeg


I finally finished this mostly metal kit. It feels very good in your hand. I found pictures of the original prop that I followed pretty closely: LINK

You can find the kit on this site. It's offed by DaveChaos.

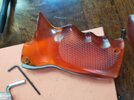
The kit is well made, but all of the parts needed lots of cleanup. With no ability to putty, the quality of the metal parts was very important. A few of the pieces were warped. Who knows why. The metal is pretty soft, so this wasn't a huge deal. A few small parts had this level of distortion:
IMG_0387.jpeg

The Cylinder is cast resin, not metal. This is apparently a limitation that can't be avoided. I burnished aluminum foil onto mine and then aged it with aluminum black.
IMG_0378.jpegIMG_0381.jpeg

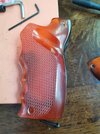
The gun goes together fairly easily. The grips required quite a bit of sanding. After The overall thickness & shape was correct I used guid coats to get the insides as flat as possible. Mostly I was concerned with getting rid of the "rolled edge" look.
IMG_0422.jpeg

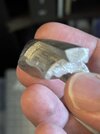
The kit can't come with fake bullets because of some real rule. Anyway, AMERICA, I bought real empty 44 magnum cartridges from an online auction site and printed the slug part. I used Rub-n-Buff to get a reasonably believable lead color. In the second photo you can also see where I added bit of detail along the spine of the handle.
IMG_0413.jpegIMG_0443.jpeg

The lighting on this kit is really cool. My exposed wire is a bit thinner than the one that comes with the kit, to make it look a bit more like the real prop. I did add a bit of heat shrink tubing to protect the top, so it's still not it's not 100% accurate, but it looks OK after everything is weathered.
IMG_0429.jpegIMG_0434 2.jpeg

Anyway, this is a really cool kit that is worth the money and the wait. In hindsight, I would have done more rounds of test fitting. I plan to build some kind of "in-world" stand for the gun. I also have extra casings so I'll make some bullets for the stand. It'll need to be sturdy though, this thing is heavy!

Most of the finished was achieved by coating the metal parts with lots of pewter black. The handles were sanded and then polished. Some grunge was added (mostly to the white wires and switch) with black and brown washes. The black plastic parts were "scuffed up" with Ebony Rub-n-Buff. That part looks good in person but is nearly invisible in pictures. I made the switch more accurate by painting it white. I also just barely managed to paint the on-off text white as well. After everything was done, I polished the whole thing with a gun lubricant/protectant. That wiped off most of the Rub-n-Buff... so after the finish dried I reapplied it. Anyway, the final result is fairly convincing & I'm happy with it.
IMG_0431.jpegIMG_0430.jpeg
 
Last edited:
Did you manage to sort this warping out? Mine is the same and I'm already nervous about how to tackle it without breaking it off :/
 

Attachments

  • IMG_0387.jpeg
    IMG_0387.jpeg
    1.4 MB · Views: 99
Did you manage to sort this warping out? Mine is the same and I'm already nervous about how to tackle it without breaking it off :/
Yeah, I was able to bend everything back into place. I bent it cold & nothing cracked. I just used slow steady pressure. IIRC, heating pewter can make it more brittle.

Definitely do lots of test fitting & assembly. The parts fit together, but for me anyway, it was a process.

I’ve read that tiny scraps of pewter can be used to “weld” broken parts. I also found some speciality solders. That’s all worst case, super fiddly, and I didn’t need it.
 
Did you manage to sort this warping out? Mine is the same and I'm already nervous about how to tackle it without breaking it off :/
Same - starting to see if I can unkink it; there is also a layer of flashing over the opening that I'm taking off first.
Having worked with a bunch of pewter minis though in the 90s it's a lot more forgiving that 3D resin :)
 
Yeah, I was able to bend everything back into place. I bent it cold & nothing cracked. I just used slow steady pressure. IIRC, heating pewter can make it more brittle.

Definitely do lots of test fitting & assembly. The parts fit together, but for me anyway, it was a process.

I’ve read that tiny scraps of pewter can be used to “weld” broken parts. I also found some speciality solders. That’s all worst case, super fiddly, and I didn’t need it.
I've managed to straighten out mine with zero issues...as you say...gentle, slow pressure is best.
I did however try the same on the screwdriver sight rod and managed to break it so please do go easy!
 
I've managed to straighten out mine with zero issues...as you say...gentle, slow pressure is best.
I did however try the same on the screwdriver sight rod and managed to break it so please do go easy!
Ugh that sucks! I didn't have too much trouble with the sight rod thing. I did drill it out a bit to get the passthrough hole more centered and used my own wires. I don't have the temperament for the thin ones that came with the kit...
 
Anyone have any tips for how to resolve this without breaking it? For some reason the grip frame doesn't fit to the grips....seems to be bent back on the rear edge somehow

I thought about maybe rough handing it and screwing the grips on in the hope that maybe it retains that shape but I'm worried that maybe the metal is stronger than the resin and it cracks the grips...THAT would be a super no.

any tips to bend the pewter without damaging it pewtermeister DaveChaos ? I'm not sure heating it will help as it's probably gonna get too soft if it's too hot and very difficult to handle or not get hot enough to make any difference?
 

Attachments

  • IMG_20240825_101703.jpg
    IMG_20240825_101703.jpg
    2.4 MB · Views: 111
  • IMG_20240825_101630.jpg
    IMG_20240825_101630.jpg
    3.3 MB · Views: 112
Last edited:
Well, to do so with cold grips is going to be a disaster. Two solutions: one with your grips dipped in hot water for a minute or more and then screwing them on the metal part.
Or shaving/sanding the metal part to be flushed with the grips...good luck(y)
 
I sort of did all of the above. I reshaped the metal & resin as much as possible. I heated the grips & then got all the threads started. Then I applied heat & pressure until it locked in place. That was followed by more reshaping until it looked unified. Even after all that, when I pulled it apart to add the finish I had to use heat to get it to go back together. For me anyway, everything did eventually line up really nicely. My parts had extra material that threw everything off. Also, one grip had a warp that I couldn’t just grind out.
 
Anyone have any tips for how to resolve this without breaking it? For some reason the grip frame doesn't fit to the grips....seems to be bent back on the rear edge somehow

I thought about maybe rough handing it and screwing the grips on in the hope that maybe it retains that shape but I'm worried that maybe the metal is stronger than the resin and it cracks the grips...THAT would be a super no.

any tips to bend the pewter without damaging it pewtermeister DaveChaos ? I'm not sure heating it will help as it's probably gonna get too soft if it's too hot and very difficult to handle or not get hot enough to make any difference?
Looks like a little squeeze will get that lined up. Dont be scared, the Pewter is quite forgiving. You can also drop the grips into hot water too soften and them too
 
IMG_0679.jpeg

I spent a bit more time getting some of the details correct (per the pictures of the prop I found, your milage may vary). I still need to redo the white wires. I used a white shrink tubing to protect the top. I works, but stands out too much. Also, I plan to grind down some of the bolt heads at some point.

IMG_0685.jpegIMG_0688.jpeg
 
Last edited:
Did you manage to sort this warping out? Mine is the same and I'm already nervous about how to tackle it without breaking it off :/
I've got a few interesting angles/spots where there is some debris or flashing from the pewter process - any tips for getting into tight corners like this one? 90 deg between two surfaces is sandable, but finding it much harder to clear stuff where it's 3 internal angles coming together. For similar areas done in resin, it's not too bad to cut into the corner with a craft knife, but that's much harder in pewter.
 

Attachments

  • IMG_2102.jpeg
    IMG_2102.jpeg
    1.1 MB · Views: 87
I've got a few interesting angles/spots where there is some debris or flashing from the pewter process - any tips for getting into tight corners like this one? 90 deg between two surfaces is sandable, but finding it much harder to clear stuff where it's 3 internal angles coming together. For similar areas done in resin, it's not too bad to cut into the corner with a craft knife, but that's much harder in pewter.
I didn't do anything special. I have the typical collection of new, old and nearly useless files and Dremel bits that I use to get into corners. One super thin off-brand sanding drum bit was very helpful. I did end up using the cheap-o dental tools I bought from Amazon a few times. Pewter is so easy to scratch that I'm not sure if they caused more problems than they solved.

Actually, I'd be interested in learning how other people do this sort of work.
 
Back
Top