I know DJb1138 has a disassembly video, but now that Entertainment Earth has restocked and I have my Luke helmets, I tackled this and wanted to update this thread with handy tips and observations for taking these apart. As with the suspension attachment points in their Boba helmet, several points that have given people problems fall under the category of "if brute force doesn't solve your problems, you're not using enough".
After removing all the screws and the rubber trim, I poked around to see where things were cooperative and where they were stubborn. The next step for a full disassembly is popping out the visor. It's pretty tough plastic. I was going at it with a flat-blade screwdriver and it's barely scuffed. I hadn't been planning to keep it, so I wasn't bothering being careful. As was mentioned upthread, the root of the visor needs to be forced inward to pop off the retaining clips. I pried the inner retaining wall away from the visor with the screwdriver to give myself more working room, then, though experimentation, got the middle to pop out first, followed by the ends. Your mileage may vary. Here it is, freed. I haven't done anything to clean it up, not even wiping away finger smudges from yanking on it:
View attachment 1441798
After that, there was enough play inside to seriously apply myself to the lining. the seams aren't decorative. Don't be afraid to really force it to get it to pop free. Start with the side pieces and push them into the middle. POP! POP! The the rear piece, POP!, which exposes most of the electronics. Then pulling in at each temple popped one side, then the other free at the mohawk front detail piece's retaining clips, and that whole thing came out. The wires are taped to the backside of that crown piece, and the tape comes off pretty easily.
View attachment 1441799
View attachment 1441800
View attachment 1441801
The mowhawk strip is mostly held on with the four screws through the crown lining and the greeblie at the front snapped on. Near the back the strip has two retaining clips of its own, which are easy enough to pop free. The last bit was tough on this first helmet I tackled. I welcome others' experience with this -- and potential solutions. Toward the very rear end of the mohawk strip it has a lateral tab that is friction fit and glued into a slot on the battery unit. I just forced mine until the plastic gave, in hopes I could defeat the glue bond, but no:
View attachment 1441802
View attachment 1441803
(Sorry for the blurry.)
View attachment 1441804
You can see how the strip fatigued and bent at that tab. I need to find a better way to deal with that, for at least one helmet.
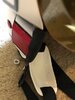
That strip was mostly what locks the helmet halves together. That and these two glued tabs at the back:
View attachment 1441805
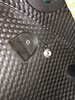
Those, at least, are fairly easy to pop apart. I think one of my favorite things about this helmet is that, even though it's engineered so that everything on the final helmet is lined up right, it's still one half overlapping the other, just like the originals:
View attachment 1441806
In the end, apart from that one troublesome tab, the electronics all come out easily as a unit:
View attachment 1441807
...and the helmet interior looks like this:
View attachment 1441808
A lot to play with in there, depending on what one wants to do with it. I'm likely to keep the side pieces of the lining, at least, with mods. The snaps are handy, they help retain the rubber edge strip, the mic mount is convenient, and some form of better earcups can be mounted to them while removed, the whole subassembly being able to just be screwed securely in place. I might see if I can extensively rework the crown lining piece to interact with a less-static visor... A lot depends on how much room is needed for a head and good padding.
")