Luke Skywalker pilot helmet - Black Series facelift

jhfagan

Active Member
Gone but not forgotten.
As was done with my Darth Vader Black Series and Rubies restorations, Black Series Stormtrooper, and Boba Fett facelifts/conversions, I now tackle Luke's pilot helmet.
Those helmets results in the links below.


I've been waiting for this one for a while, and in my recent research, I was SO disappointed in how eFX dropped the ball on the paint job/weathering of their pilot series, that for $130, and my own hand, I could turn out a much better looking product for FAR less $$$.
On it's own though, for what it is, I must admit, this Black Series version is awesome!
Now, the only decision...to make it ANH, ESB or ROTJ. Decisions...decisions.... lol
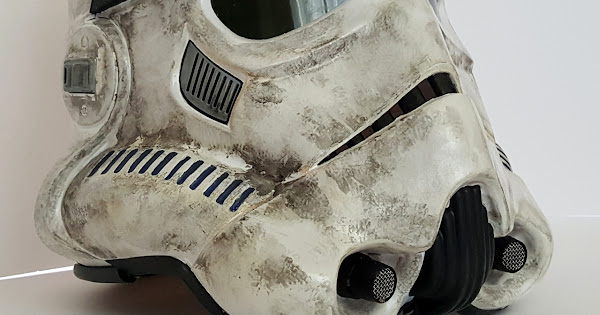
Some "before" shots. : )

20210520_173556.jpg20210520_173624.jpg20210520_173638.jpg20210520_173704.jpg
 
Last edited:
Looking forward to this...
I just picked up the disney parks version and it's nearly identical, as far as I can tell.

And you wouldn't consider a TROS version?

I kid, I kid...
 
I'm going forward with ANH.
It's the iconic piece, and it's already painted to ANH specs.
Although I'm usually all things ESB, the ESB helmet is SO dirty and weathered in the film, the thing almost looks completely dirt gray. Ugly.
AND, it's paint job is different enough from ANH that I'd have to go to completely longer lengths than I want or need to, frankly. lol
And ROTJ, well, nothing interesting...just a few seconds of front shot in the cockpit.
What's interesting as I prepare studying the prop in the film, is this little difference in the helmet, shortly before the battle , as he approaches Han, you can see different markings on the side of the mohawk, which seconds later after that scene, he's holding the normal one in the rest of the film, with the sides that are red with a yellow pin stripe.
It's always something with these films....lol
1621649949336.png


1621650595475.png
 
Last edited:
And so it begins.
Of course, taping off the visor first.
First issue to tackle, is the sizing and corrected lines painted on the block at the front of the mohawk.
Removed the block using a small flat head screw driver to pry the tabs out.
Easy.
Now, the block is noticeably higher than the prop, so, using a utility knife, I cut down the 1/16th of an inch lip from the the top, and sanded it down smooth.
Gave the entire block a little sanding, and hitting it with it's first layer of Tamiya Camel Yellow.
When layer dries, will add another, give a light sanding, then will start painting the lines by hand to correctly match the prop.

20210522_121854.jpg20210522_120110.jpg5a.png20210522_122102.jpg20210522_121038.jpg20210522_123737.jpg20210522_124034.jpg
 
Following this! I look forward to seeing what you do with it. I have one myself and am thinking of doing an ESB version.
From what I see, it's pretty much the same helmet actually.
There's just FAR more dirt on the ESB version....
It's not just lighting...the s**t is dirty! lol
1621737383150.png
1621737497976.png
 
UPDATE**
While waiting for the yellow paint to thoroughly dry overnight before sanding, I multi task ( at 11PM on a Saturday night , of course ).
The rebel symbols are a bit too "thin", small, and angled too sharply inward, and need replaced.
I considered painting over them, then painting new ones, or applying a decal.
But my OCD won out, and I decided to take the hard road, and sand them off, and repaint them back on by hand.
I have a rebel symbol printed out to the correct size ( 3in dia) and some carbon paper.
When the old symbols have been sanded smooth away, I will trace down the symbols in their correct geometry, then begin hand painting them back in.
This is just starting for now.
Complete look later.
20210522_230157.jpg20210522_230029 - Copy.jpg20210522_230031 - Copy.jpg20210522_230049 - Copy.jpg
 
Interested to see this. I’ve got this helmet and I know it’s not exactly right/accurate. My only real issue with it is the lame weathering. I’d like to give it more, it’s not dirty enough.
 
Sanding both Rebel symbols done....(400g to take paint off into surface. 1000g to smooth surface )
New Rebel Symbol cut out, and carbon paper layer cut out, and taped in place, to correct angle and placement.
Now, to trace lines.
20210523_102446.jpg20210523_103434.jpg20210523_104238.jpg20210523_105158.jpg
 
Tracing done.
20210523_113634.jpg
Now, the yellow on the block is still just a wee bit sticky, so I will let it cure the rest of the day, and will begin working on it later.
 
Black outlines painted, and first layer of Testors Dark Red is on.
Letting this dry thoroughly next day before messing with it.
Red is , along with blue, THE worst colors to fool with and layer.
But, will buildup the red layers until nice and dark red, then touch up the black lines to sharpen them and even them a bit.
Don't worry...we know how proper weathering will bring all that red into check later.
20210523_224300.jpg20210523_224403.jpg
 
Had to enlarge the symbols a bit, and got the front block repainted, keeping it a bit "by hand" looking, as the prop.
Will have to thicken the black outline on the symbols when the red dries thoroughly.
20210524_151642.jpg20210524_151609.jpg
Then on to the weathing, pretty much
 
I just picked up this helmet and I’ve been considering doing this as well! Will watch your progress with great anticipation!
 
Ok.
Rebel symbols are where I want them, and waiting to dry before I do some last minute fine detailing to them.
Yeah...they're a bit splotchy, but again, the black wash and weathering on them will fill that.
Block is painted and "worn".
Again, will dull down during weathering.
Finally, block back on the helmet and secured.
Before overall helmet weathering, I will need to putty in the slots on either side of the block and paint over gray/white to match helm and hide the slots. That's later.
Now, on to paint-detailing the helmet (scratches, dings, paint scuffs, etc ).

20210525_114215.jpg20210525_114151.jpg20210525_114620.jpg
 
Proper weathering has begun.
So far ( as of these pictures ) the basic layers of light and dark gray (dirt) areas are laid down.
Waiting for them to dry, then some light sanding to blend some of the layers and overlaps a bit.
Then there are still some little thing yet to do, like some various white scratches about the helmet, and some black line details.
Then, the eventual black wash should seal everything up nicely.
Not too much more to go.

20210526_225741.jpg20210526_225751.jpg20210526_225825.jpg20210526_225837.jpg
 
Ok...home stretch.
All painting is done as far as I'm concerned, and I'm now just waiting for the putty to thoroughly dry over the gaps where the block snaps into the mohawk.
Will then sand them down, correct the paint on them, then give the whole helmet a once over sanding with probaby 800g, perform the black wash, then hit it with a seal of satin clear finish.
20210527_123129.jpg20210527_123207.jpg20210527_123231.jpg20210527_123306.jpg20210527_123355.jpg20210527_123444.jpg
 
Putty sanded, repainted, chin cup weathered and helmet blackwash completed.
Just waiting for blackwash to thoroughly dry, covering the visor, then hitting the helm with satin clear, and this thing is done.
The blackwashing completely made all this work beyond belief!
Will setup proper white drop boards and lighting for those final pics for the gallery.
Note : I left the battery cover intact, although repainted it correctly to screen.
I may want to use the electronic effects at some point in the future. : )
20210529_111623.jpg20210529_111637.jpg20210529_111647.jpg20210529_111657.jpg20210529_111724.jpg20210529_111911.jpg
 

Your message may be considered spam for the following reasons:

If you wish to reply despite these issues, check the box below before replying.
Be aware that malicious compliance may result in more severe penalties.
Back
Top