ATAT w.i.p

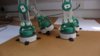
starting to see the beginning of the end now....its only taken me 4 years or so to get this far rather than the 15 plus that my other effort took (and still not finished !!!)
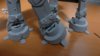
the spray booth has warmed up so i thought id put some primer on.
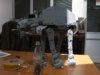
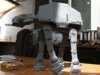
putting this together really makes me appreciate how hard it must have been to animate with all those legs to worry about .. ....they must have had a lot of patience
 
im hoping to finish the changes to the feet drawings in the next few weeks then hopefully have them cnc turned....
trying to get the model to stand niclely is quite tricky because of all the
adjustable joints , its like a table with 4 wobbly legs...
 
Jeebus....that's purty! :eek

Love it!:thumbsup

But I'd be petrified that it will topple over in that last pic!
 
At last... Finally got the feet pretty much finished..
Hopefully next week I can take it all to bits to spray it in primer, then I have to go back and do all the parts I didn't get round
To ( if I can remember where they are )......
 

Attachments

  • image.jpg
    image.jpg
    1.4 MB · Views: 579
  • image.jpg
    image.jpg
    728.8 KB · Views: 453
  • image.jpg
    image.jpg
    739.1 KB · Views: 455
  • image.jpg
    image.jpg
    1.8 MB · Views: 526
  • image.jpg
    image.jpg
    1.4 MB · Views: 606
Jon, can you share with us how you approached the area of the pistons? are they fully functional and rigged to the motions of the other leg elements (like the real studio model), is each piston ONLY rigged to its "twin" (i.e. push one up, and the other goes down), are they friction and you move each individually as you wish, or are the fully static and "glued in"?
 
Thats really lovely Jon. A work of art. Im also interested to hear which way you went with the pistons.
 
Thirded on the pistons lol. This is one of the most amazing builds I've seen on here in quite some time, now and then, a build comes along that blows you away, this is it. Been meaning to ask Jon, what is the green media you have machined on the legs? Between some really amazing artists here on the RPF, we really have built Empire!!!

lee
 
The pistons will be joined , so as you move one the other will move in the opposite direction. But at the moment
They move independently (you can see in earlier pics the area where the mechanism will go)
I was going to gear it to the movement of the leg but the more I watched the film the less sure I was that ,that
Was what they did

The green material is a really high density modelling board that is really strong but quicker and easier to machine than Ali plus you can superglue it really well (unlike Ali)

Have you ever noticed this famous painting shows the top of the leg with the covers off ?
 

Attachments

  • image.jpg
    image.jpg
    427.6 KB · Views: 342
Jon thanks for the heads up. That painting is quite weird, its almost, a WIP, of what may have happened in the model shop, like, "don't paint that mech yet Ralph, were not even sure it'll work yet" lol......pretty cool. Its always nice just to appreciate a thread like this, and the work and effort put in.

lee
 
Im leaning to the pistons being hand animated as well and not connected to the motion of the legs. It seems in some shots that's how it was done? Makes the internal gear a snap to do that way as well. More than likely the way I will go.
 
I only want to know how all of this bull butter equates to a finished resin kit that we can all buy!!!!!!!!
Otherwise why all the pomp and circumstance?????????????

We love the various kit build ups and variations,,,,,,,,, but keep us small time builders in mind.

Lost me on this one too mate, who said the thread was about a resin kit you could buy??

Saying to keep small builders in mind to someone that has taken 4 years to get this far comes across as a bit blunt and unneccessary and anyhow Revell cater for that
 
Ouch.
I vaguely remember posting that tripe. I remember being wowed by the build. I'm afraid I was very very drunk.
I meant no disrespect.
I shouldn't drink and post.

Sorry.

I am extremely awed by your work.
 
It's taken 2 weeks but I finally managed to get a coat of primer on... It all had to be dismantled and mounted on spray sticks .Because there is a lot of metal it all had to be etch primed first then any gaps had to be filled then it was ready for primer.

I've taken a photo of it next to a coke bottle so you get an idea of the size....
 

Attachments

  • image.jpg
    image.jpg
    1.8 MB · Views: 434
  • image.jpg
    image.jpg
    2.1 MB · Views: 446
  • image.jpg
    image.jpg
    1.6 MB · Views: 512
  • image.jpg
    image.jpg
    1.4 MB · Views: 400
  • image.jpg
    image.jpg
    1.5 MB · Views: 431
Back
Top