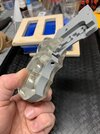
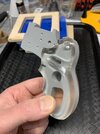
Another Snub-nosed Blade Runner blaster thread because... can you ever really have too many?

Not be that person (Ok I will be that person haha!), but whenever you complete and are satisfied with your build, are you planning on releasing the files or selling casts? I'd love to get my hands on a snub nose. I also discovered recently that Dave's kits are no longer available. Thanks!

Lol... right now all I'm focused on is seeing if what I spent all this time designing can actually even be built!

One of the pitfalls of programs like Fusion 360 seems to be how easy it is to design something incredibly complex that works in the computer, but that you can't actually produce with the tools at your disposal. Oh, to have a 1/4 million dollar six axis CNC mill of my own some day...

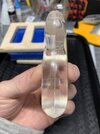
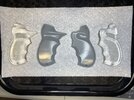
Lately I've mostly been continuing to fail at casting grips while also familiarizing myself with materials and processes I have little to no actual hands-on time with.
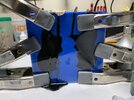
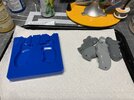
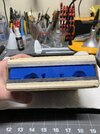
IMG_4897.JPG IMG_4899.JPG

My problems seem to be 3-fold:

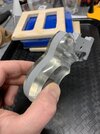
1.) The specific angle the grips are at in the mold I've made traps bubbles in a few locations no matter what I do:
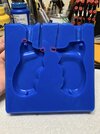
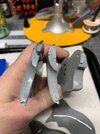
IMG_4900.JPG IMG_4898.JPG

2.) The Smooth-cast 300 sets up too quickly for me to get the whole mess into the pressure chamber to get rid of the bubbles that way. I mean 3 minutes? Really?

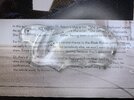
3.) The plexiglass "back plate" I'm using to get an ultra flat surface on the side of the grips that face the blaster (you can see it in the pic higher up in this post with the resin curing in it) is only 1/8" thick and distorts under the pressure of my clamps leading to this:
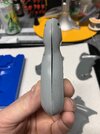
IMG_4902.JPG

So I've ordered some Smooth-cast 310 which has an extra 18 minutes of pot life which should give me ample time to get the mold in the chamber and up to pressure before the resin begins to set. Unfortunately the trial size is backordered on Amazon for some reason so I won't be getting that until March 9th or so unless I want to pay Smooth-on $25 shipping on a $30 item.

I've also bought some 1/4" polycarbonate that I'm going to use as the backing for the next round of castings. Hopefully it's rigid enough to eliminate the distortion issue.

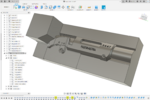
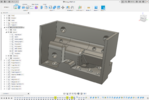
Finally I've also been exploring another idea Dave used in his original Snub build: 3D printing "metamolds". He did it on a much smaller scale there (with the binding post) but basically you design a multi-part mold in the computer, printing "negative" molds (I know, molds are negatives themselves... I don't know how better to explain it) then casting silicone into those. The end result is you can have really cleanly produced multi-part, interlocking molds that have never contained the actual piece being cast in them.

I'm hoping it'll help with some of the super complex shapes in this build like the receiver and the magazine well:
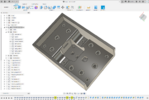
Screenshot 2021-02-18 113053.png Screenshot 2021-02-18 113510.png Screenshot 2021-02-18 113729.png
 
Those molds are great, albeit difficult to achieve...prepare yourself for a few fails;):( I don`t use plexi to put on top of my mold while the resin cures; I use a piece of glass (3mm thick) :) clamp it carefully is a useless statement at this point:p
 
Finally, a success! Sort of... certainly a sign I'm getting slightly better at this, anyway.

So while I wait for the slower curing resin I ordered I figured I'd use some Smooth-cast 327 I have to try pressure casting another set of grip blanks. 327 has almost identical cure times to the 310 I'm waiting for, it's just the "clear" version.

I actually did an initial test with the 327 a few days ago using the old mold setup but it was a messy disaster because it's "arctic tundra" season here in the northeast US/my garage and it I didn't factor that into my cure times.

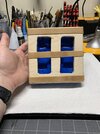
I mentioned in my last post the thin plexi warped under the pressure of the clamps I was using so I rebuilt the "mold sandwich" using thicker 5mm plexi and 3/8" plywood that I rounded off with my router so now not only is the whole setup more rigid, I can also use rubber bands instead of clamps and they won't keep snapping on me because of the sharp plexi edges.

IMG_4937.jpg IMG_4936.jpg

I also cut windows into the front plywood piece so I could still see the resin filling the mold cavity.

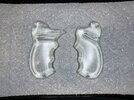
And the results:

IMG_4942.jpg IMG_4944.jpg IMG_4948.jpg IMG_4943.jpg

IMG_4945.jpg IMG_4946.jpg IMG_4947.jpg

I'm SUPER psyched about this! These aren't practical as texturing blanks because they're clear, but now at least I've got some experience getting good, bubble-free casts out of the pressure pot.

Now I've just gotta see if my plan to use my Shaper Origin and some kind of jig is actually going to work for the checkering.

Speaking of... hey, veektohr as the one person one here I KNOW owns a set of stock checkering files, care to help a brother out with some measurements? I'm specifically looking for the angle of the file teeth themselves as well as the distance from point to point on the "double row" tool. Bonus points if you can provide that last measurement in metric.

I swear I tried to find this information on the internet before asking here...
 
Wow, has it been a YEAR?! I guess a pandemic will do that. Anyway not dead, just been re-evaluating some things and regrouping.

I printed the metamolds for the magazine well and cast... molds out of them (I don't think that's how that sentence is supposed to go) since that and the Steyr receiver are the two most complex parts to mold and cast. I was 80% successful. The idea is sound, DaveG has already proven that, I mostly have mold design and 3D printing tweaking to do.

I printed all the molds in such a way that none of the surfaces responsible for casting the mold pieces would have supports on them, so there was literally no cleanup. All the support pimples are on the backside of everything you can see.

A wise man once told me: take a lot of pictures. So without further ado...

Bottom metamold. This creates the part of the mold that protrudes up into the well and creates the cavity the magazine fits in:

IMG_5083.JPG


Left side metamold:

IMG_5084.JPG


Left side metamold closeup on Steyr logo and caliber size numbers that I totally just made up. This lettering/logo is SO SMALL. I'm super impressed with how it came out even though (*spoiler*) this metamold was bad. Anyway, yes, there's still visible lines but they are so fine that I believe a single coat of paint would cover them without sanding. 50 microns layer height, Elegoo Mars 2 Pro, basic grey Sirayatech Fast resin:

IMG_5085.JPG


Right side metamold:

IMG_5086.JPG


All 3 metamolds with a 1/8th plexi "3rd wall" glued on. The molds were designed, and the plexi cut, such that when glued together the two parts form a stable, level unit. The red markings were so I didn't accidentally cut and glue plexi over the opening I was supposed to be pouring the silicone into. These things require some real 4 dimensional thinking.

IMG_5096.JPG


Measuring my silicone batch. At least the rice didn't get stuck in these.

IMG_5101.JPG


I also built a 3-point adjustable plexiglass base to serve as a level pouring surface (my workbenches are all wonky as hell) since I wanted to get the "raw" tops of the mold parts as flat as possible as they'll need to be held together by sheets of something rigid when I pour the final part into them and if they're not level surfaces that rigid support material will just push distortions into the casting.

IMG_5105.JPG


Degassed and all poured up. Also mistake #1, I definitely should have put these in the pressure pot.

IMG_5110.JPG


Left metamold result:

IMG_5114.JPG


If you zoom in close on the Steyr logo you can see that (understandably) an air bubble got in there, as well as another just below it. You can also see the major flaw with this metamold. These parts were all printed suspended from the build plate by their backs and at a 45 degree angle on both axes. At some point the part that made up that right side of the Steyr logo/caliber number "face" was insufficiently supported by the rest of the mold and became distorted:

IMG_5112.jpg


Right metamold result:

IMG_5115.JPG


Bottom metamold result:

IMG_5117.JPG


Left and right mold sides together and air bubble #3:

IMG_5118.jpg


Left and bottom metamold together. Another look at the distorted length of the left mold part.

IMG_5119.jpg


Overall though, the molds fit together exceptionally well. That's not the silicone sagging, the bottom mold piece has a concave surface:

IMG_5120.JPG


All 3 pieces together:

IMG_5121.JPG


The version of the magwell printed by Shapeways inserted into the mold just to demonstrated the concept a little better. It doesn't fit absolutely perfectly because air gets caught in it when you're trying to fit it onto/into the mold pieces, but it's definitely close enough that I believe the concept will work once I fix the molds:

IMG_5122.JPG


IMG_5123.JPG


I'm also working on simplifying the design overall. I really wanted to do one that was entirely held together by screws, but that's a tall order on a full-sized blaster, and with a snub sized blaster it just complicates the hell out of the design. This project has given me a huge amount of respect for what Bill Doran's "all screws" blaster kit represents. He's even got the trigger mechanism in there and he printed his on filament printers! Truly a herculean feat.

I'll still have a moving bolt and triggers and it will have as little "glue together" components as possible, but also while not becoming an unmanageable beast that breaks its own back under the weight of its own complexity.

Next up:

-Reprint simplified versions of all metamolds
-Mount my pressure pot horizontally and level the shelf within it
-Recast 3 mold parts
-(Hopefully) cast a finished piece out of that second round of mold parts

That's all for now!
 
Wow...no words mano_Oo_O:cool::cool:(y)(y)Those molds are truly impressive; Pro-Job on that part of the project. I wish my mold making stuff was at your level;) Glad to hear that the project is still on and eager to see your next update!
 
Wow...no words mano_Oo_O:cool::cool:(y)(y)Those molds are truly impressive; Pro-Job on that part of the project. I wish my mold making stuff was at your level;) Glad to hear that the project is still on and eager to see your next update!

Thanks joberg ! I've actually never done anything like this before. My prior mold making experience is close to nil, but I'm also one of those "research for too long, then research some more, then do it and fail by 15% because there was still some research you somehow missed" kinda guys so I guess that sort of pays off sometimes?

This is absolutely incredible. Can't wait for more progress

Thanks! But I'm literally just copying everything from Dave Goldberg's blaster project. He was using DLP resin printed molds and CNC cut grips back in 2011!!! If you haven't seen his snub-nosed build thread stop reading this and go there now. It's one of those projects I find infinitely inspiring (obviously):


So I decided to try to cast something out of the mag well mold anyway just to see if the concept/setup/process worked for me and... it was mostly a disaster. But not in the ways I was expecting, so that's kinda cool! Something seems to be wrong with the resin I was using or how I was using it, don't know which yet. Pics:

InkedIMG_6658_LI.jpg


First pull out of the (imperfect) mold. This was done in the pressure pot at room temp and 60psi. Not sure why this air bubble didn't shrink tho...

IMG_6659.JPG


So all this flashing was so small that it could be scraped off with a fingernail which was awesome. I also placed all the seams on hard (90 degree plus) edges where possible so once it was removed there was almost no trace of it. This puts to rest my fear that mold parts that are meant to fit together but created separately would have gap tolerances too sloppy for a usable casting.

IMG_6660.JPG


The extra thick flashing line along the left side is the result of the defect with the one mold part that I knew was there going into this casting. The weird part here, though, is that the resin literally started breaking down after I removed it from the mold. Like the pressure was keeping it mixed or something.

The "wetness" you can see around the "38" and along the bottom was literally one part of the resin separating from the other. It was bubbling and leaking before my very eyes. So weird. Even still I am absolutely thrilled those numbers and the Steyr logo came out as well as they did. I thought for sure that part would fail.

IMG_6662.JPG
IMG_6661.JPG


So I was also casting up some grip blanks that I could use to build a jig for carving different textures into. These were not cast in the pressure pot because my setup started leaking and was instantly the kind of mess you just put somewhere to harden and then come back and deal with later. Parts of this mess were still uncured after almost 4x the required cure time.

These castings were all done with Smooth Cast 310 which has a working life of 15-20 minutes and a cure time of 3-4 hours. All these pictures are of a de-mold 15 hours after pouring. Everything was at room temp before I started and while the resin was bought a year ago I only opened it right before I started casting. I had a "control" sample in the mixing cup (so no pressure variable, no mold-release variable, no mold material variable) that was just the resin and the dye and that is also uncured after 15 hours. Everything was room temp the whole time.

Anyway, this still feels like a success because the resin didn't all blow out the gaps in the multi-part mold and the fine details came out so good, but it was also equal parts messy failure. Anybody have any idea what happened with the resin here?
 
Yeah...that's weird that resin...too humid in the shop? Do you put baby powder into your mold to remove the bubbles?
I know that with your pressure pot you shouldn't have a problem with those...and since it's not your first tango with those products...I can understand the questioning as to why that resin is behaving :unsure:like this
 
Thanks joberg ! I've actually never done anything like this before. My prior mold making experience is close to nil, but I'm also one of those "research for too long, then research some more, then do it and fail by 15% because there was still some research you somehow missed" kinda guys so I guess that sort of pays off sometimes?


Thanks! But I'm literally just copying everything from Dave Goldberg's blaster project. He was using DLP resin printed molds and CNC cut grips back in 2011!!! If you haven't seen his snub-nosed build thread stop reading this and go there now. It's one of those projects I find infinitely inspiring (obviously):


So I decided to try to cast something out of the mag well mold anyway just to see if the concept/setup/process worked for me and... it was mostly a disaster. But not in the ways I was expecting, so that's kinda cool! Something seems to be wrong with the resin I was using or how I was using it, don't know which yet. Pics:

View attachment 1552879

First pull out of the (imperfect) mold. This was done in the pressure pot at room temp and 60psi. Not sure why this air bubble didn't shrink tho...

View attachment 1552875

So all this flashing was so small that it could be scraped off with a fingernail which was awesome. I also placed all the seams on hard (90 degree plus) edges where possible so once it was removed there was almost no trace of it. This puts to rest my fear that mold parts that are meant to fit together but created separately would have gap tolerances too sloppy for a usable casting.

View attachment 1552876

The extra thick flashing line along the left side is the result of the defect with the one mold part that I knew was there going into this casting. The weird part here, though, is that the resin literally started breaking down after I removed it from the mold. Like the pressure was keeping it mixed or something.

The "wetness" you can see around the "38" and along the bottom was literally one part of the resin separating from the other. It was bubbling and leaking before my very eyes. So weird. Even still I am absolutely thrilled those numbers and the Steyr logo came out as well as they did. I thought for sure that part would fail.

View attachment 1552878 View attachment 1552877

So I was also casting up some grip blanks that I could use to build a jig for carving different textures into. These were not cast in the pressure pot because my setup started leaking and was instantly the kind of mess you just put somewhere to harden and then come back and deal with later. Parts of this mess were still uncured after almost 4x the required cure time.

These castings were all done with Smooth Cast 310 which has a working life of 15-20 minutes and a cure time of 3-4 hours. All these pictures are of a de-mold 15 hours after pouring. Everything was at room temp before I started and while the resin was bought a year ago I only opened it right before I started casting. I had a "control" sample in the mixing cup (so no pressure variable, no mold-release variable, no mold material variable) that was just the resin and the dye and that is also uncured after 15 hours. Everything was room temp the whole time.

Anyway, this still feels like a success because the resin didn't all blow out the gaps in the multi-part mold and the fine details came out so good, but it was also equal parts messy failure. Anybody have any idea what happened with the resin here?
It could just be a bad batch of resin. Either that or there is a contaminant in there somewhere.
 
This is phenomenal project. Cant wait to see the final kit. Have you given any thought to pricing?

I haven't given any thought to making a kit... I'm not necessarily opposed to it, I'm just focused on producing one finished project first.

It could just be a bad batch of resin. Either that or there is a contaminant in there somewhere.

Turned out it was just an embarrassingly rookie move. I didn't shake the parts A and B of the resin before mixing them. It's a thing I know I have to do but when I thought back on it I realized I was just focused on getting the two parts mixed thoroughly and didn't do it before measuring them out and mixing them together.

Anyway, properly shook some of what was left of the two parts and cast up a little puck in the bottom of a Dixie cup to see if it was the resin or what and everything turned out fine. Won't make that mistake again.
 

Your message may be considered spam for the following reasons:

If you wish to reply despite these issues, check the box below before replying.
Be aware that malicious compliance may result in more severe penalties.
Back
Top