You are using an out of date browser. It may not display this or other websites correctly.
You should upgrade or use an alternative browser.
You should upgrade or use an alternative browser.
Nice, that’s not bad at all, man :thumbsup
Love this project! I have a Nostromo uniform to assemble for myself and this is great inspiration to get back to it.
Mike J.
Master Member
2019 will be the 40th anniversary of Alien, and I'm renewing work on my costume. Here's an update:
The first pair of shoes having been too small to wear, I've acquired a new pair of similarly styled white canvas sneakers, made by Polo / Ralph Lauren. Despite their brand, they were still about $20, used, on eBay. For those curious, they are the "Clarke" model.
They fit well, but have very smooth soles and little traction. They might benefit from some sole replacements, but I have not committed to such a mod yet. As far as construction and accuracy go, these are less accurate than the PF FLyers, regrettably. They have a smooth toe 'bumper' and no 'air holes' at all. Additionally, they have some Polo patches which must be removed, and "Polo" text on the tongues and heels.
I ran them through the wash a day ago, removed the ankle patches, and am debating my next step. I purchased a can of white fabric spray paint. I am inclined to paint my D-rings with a heavy duty enamel before assembly, though I haven't yet purchased such. It also occurred to me that my vinyl for the straps seems thin compared to what we see on screen, so I am considering gluing it back-to-back to increase the thickness.
Mike J.
Master Member
Mike J.
Master Member
Minor progress report:
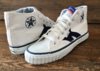
The weather was slightly warmer this afternoon than I expected, and a quick look at tomorrow's looked slightly less favorable than it had before, so I quickly slapped a coat of the fabric spray paint on my shoes. Photo attached below.
I'm not super happy with the results. Coverage seems thin to me, but there's not much paint left in that can. I will hit them again with whatever remains at the next available opportunity, with a slower pass at closer range, but I don't know when that will be. The paint leaves a sort of dotted fuzz on the canvas sections of the shoes, as any spray paint might on slightly rough fabric. Perhaps a brushed application of white acrylic paint will be in their future. On the plus side, this spray paint claims to be both permanent and washable.
Attachments

Mike J.
Master Member
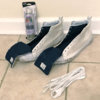
D-Ring Update:
One of my problems was going to be how to paint the D-rings. I figured out that I could use two zip ties to tie one D-ring to a stick, in an orientation that would let me line them up for spray painting. I would have preferred some twisty-ties, but didn't have enough and didn't see any at the stores, so about an hour later, I had zip tied about 38 or 39 of my D-rings to a handy stick, and was ready to begin painting. Stopped by the auto parts store and grabbed some self-etching primer and a glossy white enamel in spray cans, and then stopped at the hardware store to get a can of mineral spirits. After wiping the D-rings down with mineral spirits to remove any residual oil or sweat from my hands, I applied about 2 or three coats of the primer, waited 30-odd minutes, and then applied 2 coats of the gloss white. This should take about 48 hours or more to cure fully, but it's unlikely I'll do anything to them before next weekend.
One of my problems was going to be how to paint the D-rings. I figured out that I could use two zip ties to tie one D-ring to a stick, in an orientation that would let me line them up for spray painting. I would have preferred some twisty-ties, but didn't have enough and didn't see any at the stores, so about an hour later, I had zip tied about 38 or 39 of my D-rings to a handy stick, and was ready to begin painting. Stopped by the auto parts store and grabbed some self-etching primer and a glossy white enamel in spray cans, and then stopped at the hardware store to get a can of mineral spirits. After wiping the D-rings down with mineral spirits to remove any residual oil or sweat from my hands, I applied about 2 or three coats of the primer, waited 30-odd minutes, and then applied 2 coats of the gloss white. This should take about 48 hours or more to cure fully, but it's unlikely I'll do anything to them before next weekend.
Attachments
Last edited:
Arsenal Best
New Member
Since I'm currently on the same road (doing Dallas and Ripley; guess we were not the only one realizing its the 40th anniversary, judging from the activity on the RPF... ") ):
):
Which size are the D-Rings?
I'm currently thinking of 12x10x2,1mm ones, estimating the loops to be 12mm wide with the rivet around 10mm.
):Which size are the D-Rings?
I'm currently thinking of 12x10x2,1mm ones, estimating the loops to be 12mm wide with the rivet around 10mm.
Arsenal Best
New Member
By the way great assumption with the hi-tec logo.
I noticed those "cover-ups" while I was looking for the ventholes. Thought that they maybe covered up to ventholes to differentiate the shoes, but your explaination makes much more sense.
Thinking of adding that to the shoes for fun, since that would be more "screen-accurate"...
I noticed those "cover-ups" while I was looking for the ventholes. Thought that they maybe covered up to ventholes to differentiate the shoes, but your explaination makes much more sense.
Thinking of adding that to the shoes for fun, since that would be more "screen-accurate"...
Mike J.
Master Member
I bought my D-rings off eBay; they were advertised as 1/2 inch. That's the width of the interior of the D-ring. About 13mm wide. The wire itself is about 1/16th of an inch thick - about 1.5mm thick.
I settled on my size based on guesswork and estimations from looking at screen captures and comparing them to a different pair of shoes than what I'm going to use, so be mindful.
I settled on my size based on guesswork and estimations from looking at screen captures and comparing them to a different pair of shoes than what I'm going to use, so be mindful.
Wayne R.
Well-Known Member
Look what I finally found...
These were what I owned back then. The name changed from Inter to Hi Tec in '82, if you check the link below you can see than Inter made a Silver Shadow a lot like the Hi Tec one, so maybe my pair were made later in the transition and bore the Hi Tec name:
Vintage Hi Tec / Inter - The Webs Largest Archive of Vintage Sneaker Adverts 1965 - 2005
Attachments
Arsenal Best
New Member
Look what I finally found...
These were what I owned back then. The name changed from Inter to Hi Tec in '82, if you check the link below you can see than Inter made a Silver Shadow a lot like the Hi Tec one, so maybe my pair were made later in the transition and bore the Hi Tec name:
Vintage Hi Tec / Inter - The Webs Largest Archive of Vintage Sneaker Adverts 1965 - 2005
Great find!
Though it just blew a theory I just developed about Dallas' shoes... :/
From the incoherent look of those ridges of the only clear close-up I guessed that they might have simply cut them into the rubber or the patches were single pieces glued onto the shoe. But from the look of the Inter boots, it seems they really looked that way from the factory.
Since trying to keep the budget as low as possible, based on that idea I did a quick test for the look of our Dallas and Ripley (since the ridges on the PF Flyers are basically the positive version, which looks similar if not looked at in closeup) boots, simply using a sander to get rid of the original profil and a minidrill to cut the ridges (those must become yet a bit wider I think).
Mike J.
Master Member
Minor update:
Bit the bullet and ordered a pair of PF Flyers from Amazon. Which marks my third pair of shoes for this project. Also bought a length of 1/2 inch white leather strip for the D-rings, from eBay. Hopefully, the shoes will get here before Saturday (and hopefully they fit well, too) so I can take them for a test drive to a nearby outdoor con / event.
Bit the bullet and ordered a pair of PF Flyers from Amazon. Which marks my third pair of shoes for this project. Also bought a length of 1/2 inch white leather strip for the D-rings, from eBay. Hopefully, the shoes will get here before Saturday (and hopefully they fit well, too) so I can take them for a test drive to a nearby outdoor con / event.
Similar threads
- Replies
- 7
- Views
- 3,811
- Replies
- 17
- Views
- 5,354
- Replies
- 12
- Views
- 3,690
- Replies
- 16
- Views
- 5,902