hello there,
I thought I might update the WIP thread a bit
")
exciting update but a bit long and quite technical. But I know some people were asking technical stuff ;-)
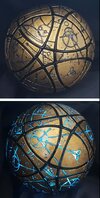
after a long time (more than a month) placing each engraving line based on 30 references! several back and forth with Julie, validating everything. The engravings were finaly validated yesterday.
After this came a bit of cleaning of the 3D file. Then a little python script to mathematically put even divisions on each curve based on its length
before/after:
View attachment 1749115 View attachment 1749116
The way I modeled the curves was pretty ok. Each "straight line" was modeled with a portion of a circle of the actual sphere diameter, so they were following the curvature nicelly, I was just rotating them from the center of the sphere to place them around. However, each circle visible was an actual flat circle and the curved lines (like those on the right above) were also circle portions that I positioned as best as I could each time. Then there was a bit of moving around of everything during all the process and the result is that all curves were not always perfectly following the surface. I first scripted another python script to project each curve on a nurbs sphere and duplicate it into a new, clean and rebuilt mathematically curve. However, thank you Maya! the projecting function is slightly bugged and most of the curves came out deformed slightly, sometimes badly...
So, I finaly came up with the idea of using a deformer that will basically suck a curve or mesh that you give him onto the closest position on another mesh, in this case, a sphere of the proper diameter with a LOT of subdivisions. This worked perfectly and all curves are now perfectly circular, all of the same diameter
As I mentioned before, I used to work in animation movies and was a rigger/blendshape artist/developer for 10 years. I am going full rigger mode on this project. modeling everything with nurbs curves, scripting the cleanup... and the following step...
I mentioned before I was simply going to use booleans to do the actual engravings next. But this is dirty and is a crazy amount of work! After spending more than a month getting to this point, the idea of spending at least 3 days cleaning all the lines converted to polygons, merging them together cleanly and hoping the software didn't crash while calculating the boolean on so many polys didn't enchant me.
I finaly came up with the idea of using another deformer, the wire deformer. This is a deformer that uses a nurbs curve to deform a mesh object, something I used a lot before.
To do this, the mesh needs to be extremely subdivided. Maya is not intended for several millions polygons, so I have to be clever about my subdivising, in this case, i went one subdivision at a time, removed a few useless lines, divided again, removed as much as possible under the tile and so on. The triangle tile is already 400k polys, which is quite a bit for Maya already.
but then, it's just a matter of selected the tile, selecting all the curves on this tile and applying the deformer. Then I just scale all the tiles to 0.99 and it will pull the polygons around each curve slightly. This is all parametric, each line can be more or less thick. The final file/files will be heavy, but I get a great result and it saved me a few full days of work!
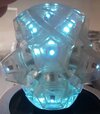
first test on 5 main tiles :
View attachment 1749119
View attachment 1749120
someone was asking for the wireframe. In this case, it will just be subdivided and deformed, so heavy, but clean
I will probably do all the holes first with booleans though.
View attachment 1749121
cheers!