74-Z Speeder Bike Build.

I recently started a thread on the Pathfinders forum for the 501st legion.
But I thought I’d have access to a bigger community of builders here so I’ll share on both platforms.
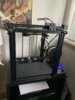
About a month ago I bought a Creality Ender 5 3D printer.
Love this printer. User friends. Real work horse for what I need. A few small upgrades here and there.
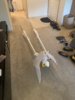
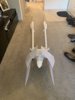
But in no time I started to print the front forks of the bike itself.
After WEEKS of printing and multiple trips to the hardware aisle at ACEs I have the front portion ~90% completed.
 

Attachments

  • 0A44438F-B50C-4194-840C-6837B98DCB8A.jpeg
    0A44438F-B50C-4194-840C-6837B98DCB8A.jpeg
    1.2 MB · Views: 422
  • AF5E8F67-AF0C-43EF-BD38-73E5CCD50B06.jpeg
    AF5E8F67-AF0C-43EF-BD38-73E5CCD50B06.jpeg
    1.7 MB · Views: 431
  • 51C227FB-3A14-43A2-A87D-F8B12D969543.jpeg
    51C227FB-3A14-43A2-A87D-F8B12D969543.jpeg
    1.8 MB · Views: 384
Last edited:
For most of the assembly I used stock K&S hollow aluminum tubing for mounting the front plates and 3D gloop for PLA. after fully curing for 6 hours that stuff is STRONG. Highly recommend it.

It came in handy for assembling the smaller pieces on the dash that had to broken due to their thin profile and thick supports
IMG_0619.JPG


Bending the tubing and forming the metal I used a cheap harbor freight tube bender and cutting tool. Cost me less that $20 for them both.
IMG_0622.JPG
 
Currently I am designing the last few steering linkage brackets in freeCAD. I ran into some printing issues. Structurally it was crap. I could squeeze these parts and crush them easily and they delaminated very quickly.
I’ll adjust my print setting soon and get them printed.
IMG_0629.JPG
 
I am trying to recreate a buck similar to this one I found from a group in Australia. I reached out and they are not in a position to give out patterns.

Does anyone know how to design something similar to this?
I have this form made from paper for templates but I want something with more structure from MDF board.

Can you print 2d from a 3D model if I sliced it up?
IMG_0491.JPG
IMG_0490.JPG
45F70622-A79F-44D9-86BF-A359725A780A-6199-000003FC6829A0DF.JPG
 
I am trying to recreate a buck similar to this one I found from a group in Australia. I reached out and they are not in a position to give out patterns.

Does anyone know how to design something similar to this?
I have this form made from paper for templates but I want something with more structure from MDF board.

Can you print 2d from a 3D model if I sliced it up?


You can use Pepakura designer if you've already worked up a 3d model. Slice the model everywhere you want a bulkhead, import into Pepakura, and then unfold it to the correct scale. It is a little bit of leg work, but allows you to print 1:1 paper templates that can be transferred over to MDF/etc. Looks great so far!
 
there are companies that can laser cut mdf from a dxf file. It's super convenient. You just upload your file and you receive your cut mdf a few days later. I use one in France but I'm sure you can find that locally too.
 
You can use Pepakura designer if you've already worked up a 3d model. Slice the model everywhere you want a bulkhead, import into Pepakura, and then unfold it to the correct scale. It is a little bit of leg work, but allows you to print 1:1 paper templates that can be transferred over to MDF/etc. Looks great so far!

Really? That is a good idea. I always have thought of pepakura as a designer for the “skin” of an object. I didn’t know I could use it to make the skeleton like the picture I found above. I guess I could do some research later.
 
there are companies that can laser cut mdf from a dxf file. It's super convenient. You just upload your file and you receive your cut mdf a few days later. I use one in France but I'm sure you can find that locally too.

Isn’t laser cutting msg pretty expensive? I was thinking about using a jigsaw and going at it myself to save some cash. Even though laser cutting is pretty clean.
 
the company I'm using is not extremely expensive actually, it's just a bit more than the price of the wood itself usually, It's really worth it for me to make guitar template or prop templates.
if you want to do the same kind of things than the example you posted, you're going to be cutting with your jigsaw for days and days. But this is possible of course, I like to do stuff by hand myself too.

laser cutting is not only clean, the laser also makes the cut border harder and more resistant.
good luck :)
 
Really? That is a good idea. I always have thought of pepakura as a designer for the “skin” of an object. I didn’t know I could use it to make the skeleton like the picture I found above. I guess I could do some research later.
Essentially, yes it does. So if you converted a box over to pep, when it was unfolded you'd essentially have a flattened box of 6 interconnected squares (like a cross) that could then be cut out and folded into a box.
So instead, you can take your buck model, and cut it using meshmixer for instance every 12 inches or so down the length to create several sections that would make up your bulkheads. Pepakura is going to unfold those sections like several independent 'boxes', including where you cut (so a lot of those boxes will have ends for your bulkheads. You can then just set up to print the bulkhead parts (and not the exterior), giving you templates to transfer to wood/whatever.
THEN, you could take your initial model,cut it down the center, and follow the same procedure to get a center form as ell, that kind of thing.

You know what, after explaining all that, it still takes a bit of time to learn how to use pepakura for something like this. If you do get a buck 3d model together, pm me a link and I'll cut it and convert it. It'd likely take someone unfamiliar with the steps at least a couple of hours to figure it out, I can knock it out in 10 minutes (y)

Really? Yeah that would be awesome. Wow. I think I can get a 3D model of the “cab” of the bike together and sent to you later on. That’s really cool of you. I’ll PM you sometime
 
How heavy is that badboy? That skeleton looks amazing and super detailed. On of my favs from SW are the Speeder Bikes. I would NOT want to ride one.
 
How heavy is that badboy? That skeleton looks amazing and super detailed. On of my favs from SW are the Speeder Bikes. I would NOT want to ride one.

The front forks are mine. They are right now anyways 15lbs. The wooden chassis is something I am inspired by and want to make. I also want to make an aluminum base with castered wheels for transport. Gotta keep it light weight.
 
Upon further inspection and giving into my OCD I have decide to CUT OFF part of my front forks. These ones I have highlighted below. They are approximately 6-7” off from where they should be proportional to the rest of the front forks. I’ll cut them off with a dremel. Make a mess and show it off later.
I’ll print out new greebling for the steering linkages and glue them up with some 3D Gloop.
If I haven’t said it already I’ll say it again. Buy that stuff! It’s super strong and worth the $$. Glued PLA to ABS or to more PLA better than E6000. Get it!

IMG_0631.JPG
 
  • Like
Reactions: ABE
Shoutout to Laellee!
They took a STL file and put it through Pepakura and sliced it up so I can get a solid chassis and seat for my bike.
I love this community.
IMG_0633.JPG
59053925632__FDD0D69F-BFE6-49BE-BB73-B9A0DB536F5A.JPG


I also cut off the greebling on the underside of my forks and I’ll be working on printing up new brackets and greebling. Here is the first steering linkage also.
IMG_0635.JPG
IMG_0634.JPG
 
New brackets being printed now. Took me about 2-3 hours to design this one. I hope they turn out great. Should be one of the last things I need on this part of the build.
IMG_0018.JPG
IMG_0016.JPG


I also reprinted glued on the new lower brackets.
And I filled in with Bondo filler and sanded it down flush.
IMG_0017.JPG
 
Back
Top