Bondo Fett

Well-Known Member
RPF PREMIUM MEMBER
Hello again, all, it's nice to be back and to share my latest build.

This thread will cover my version of the 5' ANH filming model's round topside quad laser turret, built at twice studio scale. The project was inspired by the many fantastic photographs that so many other fans have taken of ILM's original model. The sheer number of close-up detailed shots made me think "gee, I'd like to build just one of the recessed maintenance bays on the Falcon", or maybe a 'pie-slice' section of hull as a large, individual piece. I finally settled on the gun turret as something I thought was within a reasonable scope.

Another reason for the double studio scale is that I plan to more or less scratch build the entire piece so I won't have to spend time trying to find 1/16 or 1/8 scaled versions of model kits that probably don't exist anyway. The research of the details, scales, and proportions is enough work for me. Not that there won't be various geegaws (excuse me, greeblies) used in the build, but I intend to make a replica, not a duplicate, so please, no rivet-counting.

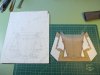
And as to research, this whole thing would be impossible without the serious scholarship and generous sharing of knowledge by members of the RPF. In particular I must acknowledge Andre vfxsup64, whose thread "SW – ANH (5 Foot) - Studio Scale Millennium Falcon Build" provided the crucial dimensions I needed to get started. I simply doubled all the figures.

So, here goes.
2x Falcon dims.jpgIMG_7098.JPGIMG_7124.JPGIMG_7106.JPGIMG_7103.JPG

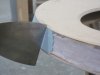
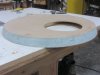
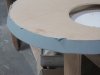
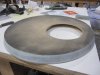
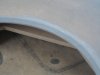
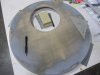
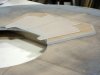
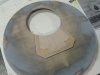
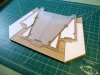
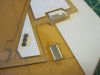
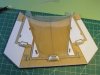
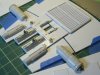
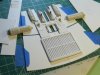
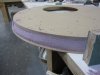
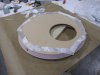
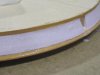
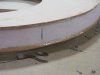
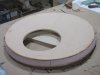
The main top and bottom surfaces are 1/4" MDF with a 1" rib inside to bring it to 1 3/4" thick (or tall). I routed a nice bevel on the bottom panel so I would have a clean taper when I built up the side walls.
 
I considered using acrylic for the body (so I could weld sections of styrene to it), but MDF is a material I have a lot close at hand and so if I don't have to buy it, I won't. MDF is rigid, dimensional, cuts, routes, and sands nicely, and accepts lots of different adhesives. Not as light as plastic, but I needed the window frame to be about 1/4” deep and beveled around the edge so that clinched it for the MDF. The biggest drawback is that the endgrain of MDF has to be consolidated with resin or primer of some kind to close it up.

I used 3/4” plywood cut to 1” thick strips to create some simple ribs and then filled out the perimeter with 1" pink insulating foam to create a rough surface of the outside edge. Glued in with wood glue and clamped in place. I drew a circle on the bottom piece and some markers on the top corresponding to the ribs so I could still find the correct registration when the excess foam was blocking the view. This gave me a light, rigid box that is mostly hollow, which is good ‘cause I’m not sure how I want to fill in the details of the interior.
IMG_7126.JPGIMG_7130.JPGIMG_7133.JPGIMG_7138.JPGIMG_7141.JPG
 
I used a rasp to get the foam worked down. I finished the shape with some 40 grit on a block. The foam itself is just a rough shape of the final surface so I deliberately sanded it a little low.
I used a single layer of 10 oz woven e-glass and laminated it with epoxy slightly thickened with with cabosil. A little filler in the epoxy resin gives it more hang on the surface without compromising its ability to soak into the foam and the MDF. I wasn’t concerned with being very tidy about the epoxy, I planned to do plenty of sanding anyway. However I made sure the glass lapped onto the two MDF panels for a good bond.
You can see how my plastic mxing cup melted when my resin cooked off, fortunately I had finished in time!
 

Attachments

  • IMG_7143.JPG
    IMG_7143.JPG
    2.7 MB · Views: 275
  • IMG_7144.JPG
    IMG_7144.JPG
    2.6 MB · Views: 278
  • IMG_7145.JPG
    IMG_7145.JPG
    2.6 MB · Views: 249
  • IMG_7147.JPG
    IMG_7147.JPG
    3.2 MB · Views: 261
  • IMG_7149.JPG
    IMG_7149.JPG
    2.6 MB · Views: 309
  • IMG_7153.JPG
    IMG_7153.JPG
    2.3 MB · Views: 333
  • IMG_7154.JPG
    IMG_7154.JPG
    2.6 MB · Views: 278
I love this project!
I think your choice of scratch building the detail as opposed to hunting down donor kits is wise- the project could stall easily that way.
Have you considered having some parts 3D printed?
 
3D printing hadn't crossed my mind actually, although I'd be open to what is possible. Part of the fun for me is hand-fabbing the details and the double scale should make that easier for me. Plus I'll get to embellish on some of them!
Frankly, I haven't seen many printed parts- at least at the home/table top level- that were made from a material that was easily sanded, glued, painted, etc. I would be happy to be proven wrong, though. I've visited a shop in town that can print large pieces at 600 dpi. Million dollar machine, I think.
 
Last edited:
Time for some filler putty, aka bondo (small B). After sanding down the cured epoxy/laminate to give it some tooth and make sure no bits of it stood proud of the edge I spread on a first coat of filler. I know some people hate the stuff, but I use it all the time for my work and I simply can’t live without it. I build it up gradually, spreading it thin, and sand it before it gets extremely hard, because I hate sanding and sanding and sanding. I got the surface I wanted with two applications, the first builds up the shape, the second creates the actual surface profile.
A quick shot of black rattle can primer, knocked back with 220 grit, to check my work. Just a few 80 grit scratch marks, no real low spots, so I can move on to the final surfacing.
 

Attachments

  • IMG_7158.JPG
    IMG_7158.JPG
    2.7 MB · Views: 257
  • IMG_7161.JPG
    IMG_7161.JPG
    2.4 MB · Views: 268
  • IMG_7163.JPG
    IMG_7163.JPG
    2.4 MB · Views: 242
  • IMG_7164.JPG
    IMG_7164.JPG
    2.9 MB · Views: 247
  • IMG_7165.JPG
    IMG_7165.JPG
    2.7 MB · Views: 244
  • IMG_7176.JPG
    IMG_7176.JPG
    3 MB · Views: 253
It's going well as I see. When finished, how are you going to display it? Wall mounted perhaps?

I do plan to wall mount it, up or down (whatever that means). I provided for that with some recessed notches at hard points in the back panel for the inclusion of picture hanging cleats. I'll put up a picture of that later.
 
Automotive primer. Basically a sprayable bondo (small b). Its the same stuff anyway- polyester. The main difference from rattle can primer is that since it is catalysed you can keep spraying and spraying until you get the coverage you need, as long as you don't rush it and it all sags off. This will obliterate any sanding marks up to and including 80 grit. It also makes for a surface material I can glue details onto with confidence. It goes on a little orange-peely, but that doesn't matter 'cause it sands really well. A few small dings showed through from the underlying surface but I figured they're appropriate for "a piece of junk" (pic 3) so I won't bother with them. I brushed some extra primer over the routered window frame edge to consolidate the wood grain (pic 4).
 

Attachments

  • IMG_7184.JPG
    IMG_7184.JPG
    2.9 MB · Views: 264
  • IMG_7178.JPG
    IMG_7178.JPG
    2.5 MB · Views: 298
  • IMG_7179.JPG
    IMG_7179.JPG
    2.2 MB · Views: 289
  • IMG_7183.JPG
    IMG_7183.JPG
    2.7 MB · Views: 276
Last edited:
Starting layout of the hull plating. I took the orthographic layout that Andre 'vfxsup64' posted in 'SW – ANH (5 Foot) - Studio Scale Millennium Falcon Build' and printed it out at scale (22" diameter). As far as I can tell, the ILM 5-footer had .040" styrene for the plates, so I'll be using .080" sheet to scale it up. My plot of the turret is starting to look like the map of holes from Time Bandits. I've included the jpg file.
 

Attachments

  • IMG_7241.JPG
    IMG_7241.JPG
    2.7 MB · Views: 394
  • IMG_7243.JPG
    IMG_7243.JPG
    2.8 MB · Views: 457
  • Falcon turret layout.jpg
    1.7 MB · Views: 297
Back from a break.

Started building the trapezoidal base for the gun mount. 1/4" mdf and 1/8" plexiglass. I routed an angle around the circular edge that intrudes into the window area, and consolidated the open endgrain of the mdf (the edges) with Mr. Surfacer. Bonded the plexi to the mdf with epoxy, and the styrene with CA. Styrene bonds to plexi great with liquid cement. The white styrene triangular sections are .040", and the outboard sections are .020".

I mentioned before that I intended to embellish some of the details. By that I mean that any pieces on the original 5'-er that consisted of just a square of styrene glued to the surface will be given some kind of detail. Of course, any identifiable, distinct details (greeblies) will be duplicated as well as I can. I won't go over the top with the embellishments, but with a model of this size I will be representing those elements as more than just squares or rectangles.
 

Attachments

  • IMG_7252.JPG
    IMG_7252.JPG
    2.9 MB · Views: 272
  • IMG_7253.JPG
    IMG_7253.JPG
    2.6 MB · Views: 272
  • IMG_7334.JPG
    IMG_7334.JPG
    3.4 MB · Views: 284
  • IMG_7335.JPG
    IMG_7335.JPG
    2.7 MB · Views: 266
  • IMG_7340.JPG
    IMG_7340.JPG
    3 MB · Views: 278
  • IMG_7341.JPG
    IMG_7341.JPG
    2.8 MB · Views: 274
  • IMG_7344.JPG
    IMG_7344.JPG
    2.5 MB · Views: 289
Well hello again. Been nearly a year. Moving house is really disruptive, you seem to lose everything and then have to find it again.

But now I'm back to it, a little.
Got the plating figured out and cut to size. I'm pretty confident in the size and location of all the little edge nibbles (kerfs?). Used .080" styrene sheet for the plating, and used pieces of scrap .080" for the spacing between plates. Bonded to the MDF hull with epoxy, with a shot of CA to hold the plates in place while the epoxy cured.
2x_1.jpg2x_2.jpg2x_3.jpg

- - - Updated - - -

Some close-ups. I routed a chamber under the square grill so I can put some geegaws under it. Not that they will be very visible, its just for laughs.2x_4.jpg2x_5.jpg
 
Great to see you back at it...and looking very good!! Eager to see the next update! Btw, what are geegaws (same as greeblies, nernies, wiggets?)
 

Your message may be considered spam for the following reasons:

If you wish to reply despite these issues, check the box below before replying.
Be aware that malicious compliance may result in more severe penalties.
Back
Top