1/38 Alain Rivard 3D Printed Y-Wing

RayHoungus

New Member
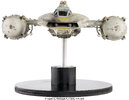
Hey all, first post here. Wanted to share my progress with 3d printing Alain Rivards incredible 1/24 3D printed Y-Wing model kits.

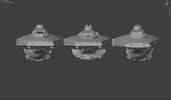
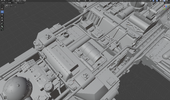
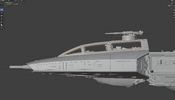
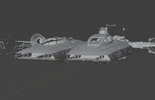
I chose his because most of the other models can't seem to get the canopy shape and proportions right. Most are too squared and boxy, the canopy is really more smooth and tapered of a shape. His model is the Red Jammer version, I'm making a gold leader, but I'm not worrying about getting 1000% of the greebles right. I made a few in blender as well as all the pipes myself, which I am happy to share if needed.

But I ended up tweaking the shape of the front canopy cause Alains was a tad too rounded, see pic. The sculpt interface in blender came in very useful.

Im printing it all in resin with Elegoo space grey 8k. I know 1/38 is an unconventional scale, but I dunno, studio scale or 1/32 is too big and 1/48 is too small, it seems just right to me. Its maybe halfway printed so far.

Just ordered my archive x paints for it too, going to go for a more screen accurate color scheme, rather than workbench accurate as some do. These models were painted colorful because they knew the colors would get washed out on camera, and they just look cooler in closer shades of grey imo.

Enjoy! I will update with progress!
 

Attachments

  • 20250509_163705.jpg
    20250509_163705.jpg
    3.3 MB · Views: 209
  • Screenshot 2025-05-09 at 4.51.30 PM.png
    Screenshot 2025-05-09 at 4.51.30 PM.png
    5.5 MB · Views: 184
  • Screenshot 2025-05-09 at 4.50.53 PM.png
    Screenshot 2025-05-09 at 4.50.53 PM.png
    7.1 MB · Views: 165
  • Screenshot 2025-05-09 at 4.48.47 PM.png
    Screenshot 2025-05-09 at 4.48.47 PM.png
    6.8 MB · Views: 177
  • IMG_20250509_171047.jpg
    IMG_20250509_171047.jpg
    154 KB · Views: 186
  • 488659712_1086860153474686_3433636117868240920_n.jpg
    488659712_1086860153474686_3433636117868240920_n.jpg
    698.9 KB · Views: 181
  • 20250509_164209.jpg
    20250509_164209.jpg
    126.5 KB · Views: 179
  • 20250509_163825.jpg
    20250509_163825.jpg
    2.3 MB · Views: 179
  • 20250509_163710.jpg
    20250509_163710.jpg
    2.2 MB · Views: 192
  • 20250509_163714.jpg
    20250509_163714.jpg
    2 MB · Views: 161
  • 20250509_163719.jpg
    20250509_163719.jpg
    2.4 MB · Views: 144
  • 20250509_163724.jpg
    20250509_163724.jpg
    2.3 MB · Views: 154
  • 20250509_163821.jpg
    20250509_163821.jpg
    1.9 MB · Views: 176
Also interesting the different takes on the mouth of the Y-wing. I could be imagining it but maybe the gold leader molding was warped inward? I feel like the other models didnt bend inward like that but could be totally wrong. Which do you guys think is the most accurate Y-Wing 3d model?
 

Attachments

  • 224908675_2878627665783644_591468331095469336_n.jpeg
    224908675_2878627665783644_591468331095469336_n.jpeg
    138.3 KB · Views: 145
  • 488366125_1085103723650329_3617834801636708906_n.jpg
    488366125_1085103723650329_3617834801636708906_n.jpg
    233 KB · Views: 152
  • lf.jpeg
    lf.jpeg
    553 KB · Views: 151
Update on the canopy, the most important part of the Y-Wing to get right imo, changed the front windscreen profile more from Alains original design. And flattened it a tad as seen in side view. Seems as accurate can can be.. for now.
 

Attachments

  • Screenshot 2025-05-10 at 10.21.14 PM.png
    Screenshot 2025-05-10 at 10.21.14 PM.png
    2.7 MB · Views: 135
  • Screenshot 2025-05-10 at 10.22.50 PM.png
    Screenshot 2025-05-10 at 10.22.50 PM.png
    2.6 MB · Views: 129
  • Screenshot 2025-05-10 at 10.27.16 PM.png
    Screenshot 2025-05-10 at 10.27.16 PM.png
    1.4 MB · Views: 135
Re profiled the whole cockpit, flattened it out a bunch, super happy with the result, can't believe I didn't see it before.
 

Attachments

  • Screenshot 2025-05-14 at 8.58.43 PM.png
    Screenshot 2025-05-14 at 8.58.43 PM.png
    4 MB · Views: 112
  • Screenshot 2025-05-14 at 8.59.48 PM.png
    Screenshot 2025-05-14 at 8.59.48 PM.png
    856.5 KB · Views: 101
  • Screenshot 2025-05-14 at 9.00.11 PM.png
    Screenshot 2025-05-14 at 9.00.11 PM.png
    4.7 MB · Views: 107
  • lf.jpeg
    lf.jpeg
    56.3 KB · Views: 122
Did some prints of the old cockpit, how can i fix these horrible banding issues? Someone said it was a suction issue, but theres also very minor banding like this on parts that avoid the suction issue so not quite sure. It was printed upright like in the first pic. Any thoughts? Thanks
 

Attachments

  • Screenshot 2025-05-14 at 9.19.14 PM.png
    Screenshot 2025-05-14 at 9.19.14 PM.png
    4.7 MB · Views: 108
  • Screenshot 2025-05-14 at 9.19.04 PM.png
    Screenshot 2025-05-14 at 9.19.04 PM.png
    4.4 MB · Views: 111
  • Screenshot 2025-05-14 at 9.18.56 PM.png
    Screenshot 2025-05-14 at 9.18.56 PM.png
    2.1 MB · Views: 117
Did some prints of the old cockpit, how can i fix these horrible banding issues? Someone said it was a suction issue, but theres also very minor banding like this on parts that avoid the suction issue so not quite sure. It was printed upright like in the first pic. Any thoughts? Thanks
It may be because your exposure time is too high.
also when printing these kinds of open, thin walled shapes, they get distorted due to the curing, and bending at corners, and gives that result.
Best is to add some construction walls inside to prevent losing shape.

Also, why are you printing at a low resolution, the top of the canopy has very visible layer ridges on it, why buy a resin printer, and print FDM like thick layers :)
printing with thinner layers makes it much more smooth, and is faster then you can sand it smooth.
Remember as you lower the layer height, it will increase printing time, but because of the low layer height your exposure times can also be lower, witch lessens the printing time again :)

Screenshot 2025-05-15 at 10.38.44.png
 
Did some prints of the old cockpit, how can i fix these horrible banding issues? Someone said it was a suction issue, but theres also very minor banding like this on parts that avoid the suction issue so not quite sure. It was printed upright like in the first pic. Any thoughts? Thanks
I bought these files and have been printing them over the past few days. Although I quite like the breakdown of these parts, I like the mods that you're doing.

I sometimes get these lines on my prints where there are internal walls, such as this cockpit part. When I asked around for some advice, it did come down to suction, and the types of supports that I was using. I now only use Medium to Heavy supports, so that they hold onto the model better while it's being pulled up from the FEP thousands of times. If you're already using Medium supports, try increasing the density to 75 or 80%.

Let us know how it goes.

SB
 
It may be because your exposure time is too high.
also when printing these kinds of open, thin walled shapes, they get distorted due to the curing, and bending at corners, and gives that result.
Best is to add some construction walls inside to prevent losing shape.

Also, why are you printing at a low resolution, the top of the canopy has very visible layer ridges on it, why buy a resin printer, and print FDM like thick layers :)
printing with thinner layers makes it much more smooth, and is faster then you can sand it smooth.
Remember as you lower the layer height, it will increase printing time, but because of the low layer height your exposure times can also be lower, witch lessens the printing time again :)

View attachment 1932895

Ah ok ill mess with that and see how it goes, and yeah haha we were still messing with print angles and layer height when I did the first canopy, heres the V2 compared to it.
 

Attachments

  • 20250515_125956.jpg
    20250515_125956.jpg
    2 MB · Views: 76
I bought these files and have been printing them over the past few days. Although I quite like the breakdown of these parts, I like the mods that you're doing.

I sometimes get these lines on my prints where there are internal walls, such as this cockpit part. When I asked around for some advice, it did come down to suction, and the types of supports that I was using. I now only use Medium to Heavy supports, so that they hold onto the model better while it's being pulled up from the FEP thousands of times. If you're already using Medium supports, try increasing the density to 75 or 80%.

Let us know how it goes.

SB
Thanks Steven, good idea, I've only been using small supports so that should help a lot. I'm happy to send you any of my edited files if you want
 
Also interesting the different takes on the mouth of the Y-wing. I could be imagining it but maybe the gold leader molding was warped inward? I feel like the other models didnt bend inward like that but could be totally wrong. Which do you guys think is the most accurate Y-Wing 3d model?
My opinion. I like Alains out of the three but I'd prefer his top of the mouth be flat like the bottom, I think that's how it was meant to be, the sag makes no sense other than a result of age. Love your edits keep it up.
 
My opinion. I like Alains out of the three but I'd prefer his top of the mouth be flat like the bottom, I think that's how it was meant to be, the sag makes no sense other than a result of age. Love your edits keep it up.
Thank you! Thats what I thought at first! But upon inspection from movie stills the sag is still there, but maybe less so? So perhaps it was partially due to age. Maybe it was a poor molding! Hard to tell, but if it was there onscreen im doing my best to replicate it.
 

Attachments

  • Screenshot 2025-05-15 at 11.32.46 PM.png
    Screenshot 2025-05-15 at 11.32.46 PM.png
    4.9 MB · Views: 111
Thank you! Thats what I thought at first! But upon inspection from movie stills the sag is still there, but maybe less so? So perhaps it was partially due to age. Maybe it was a poor molding! Hard to tell, but if it was there onscreen im doing my best to replicate it.
That's a nice screen grab and it does look unchanged from the latest auction photos.

I say it does sag, still don't like it though, I think both top and bottom should be flat.
 
It's not sag, it's just a natural effect from vacu-forming. Depending on how hot you let the plastic get and how quickly you pull that plastic off of the buck has a lot to do with the final shape.
 
Did some prints of the old cockpit, how can i fix these horrible banding issues? Someone said it was a suction issue, but theres also very minor banding like this on parts that avoid the suction issue so not quite sure. It was printed upright like in the first pic. Any thoughts? Thanks
For banding issues, change the layer height to be the smallest your printer can do, and also change the angle that you print it at. If it's upright, put it at an angle and create supports. Test with a smaller part first!
 
Thank you! Thats what I thought at first! But upon inspection from movie stills the sag is still there, but maybe less so? So perhaps it was partially due to age. Maybe it was a poor molding! Hard to tell, but if it was there onscreen im doing my best to replicate it.
Could you do an edit that makes the top and bottom flat? I'd like to see what that looks like.
 
For banding issues, change the layer height to be the smallest your printer can do, and also change the angle that you print it at. If it's upright, put it at an angle and create supports. Test with a smaller part first!
Thanks, I'm gonna put it at a 15 degree angle with heavier supports and see how that works.
 
While waiting for my updated cockpit to print, heres a quick comparison between Alain Rivards version, mine, and DaveGs, left to right
 

Attachments

  • Screenshot 2025-05-23 at 3.08.55 PM.png
    Screenshot 2025-05-23 at 3.08.55 PM.png
    1.5 MB · Views: 101
  • Screenshot 2025-05-23 at 3.09.09 PM.png
    Screenshot 2025-05-23 at 3.09.09 PM.png
    3.6 MB · Views: 106
  • Screenshot 2025-05-23 at 3.10.03 PM.png
    Screenshot 2025-05-23 at 3.10.03 PM.png
    5.4 MB · Views: 94
  • Screenshot 2025-05-23 at 3.11.31 PM.png
    Screenshot 2025-05-23 at 3.11.31 PM.png
    5.9 MB · Views: 93
  • lf (2).jpeg
    lf (2).jpeg
    553 KB · Views: 115
Back
Top