1/32 BSG Viper Mk II - Revell/Moebius build

HughB

Active Member
Hi all!

After finishing my first foray back into modelling with the JJprise which I started last summer, I've decided to keep going, and move from something that was probably a bit ambitious to something that'll hopefully be a bit simpler. I've settled on the 1/32 Viper Mk II from Revell (which I believe is a European reboxing of the Moebius kit), which should provide me with the opportunity to do a bit more small detail for things like landing gear and cockpit, but will have a simpler lighting scheme and also allow me to weather the heck out of it! The Star Trek universe, while lovely, is so very clean...

Also, it's a cool-looking fighter :)

I have the Paragrafix photo-etch set for the Moebius kit, and it fits the Revell reboxing perfectly, so I'm starting with the cockpit. First off, cutting out all the areas behind the dials so they can be backlit, and then fitting the photoetch:
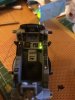
09-Photo 13-06-2015 18 39 45.jpg10-Photo 13-06-2015 21 29 07.jpg

Mmmmm, primer:

11-Photo 14-06-2015 15 16 43.jpg

I'm using Alclad grey primer for the first time, and I have to say it's lovely. Goes on really thin and smooth from the airbrush. Also, those Paragrafix dials and control panels are really nice.

I then made the catastrophic error of looking at some reference from the full size prop that was auctioned off a while ago. The seat is totally wrong. Wrong wrong wrong. And the kit part looks really uncomfortable too.

Kit part:

01-Photo 16-06-2015 20 04 18.jpg

Full size prop:

dscn0640.jpg

Since I'm planning to display the model in the hangar with no pilot and the canopy open, this is going to stick out like a sore thumb. The kit part also doesn't have any attachment points for the pilot's harness, and I really want to add seatbelts to this build. We're going to need a new seat. Fortunately, Galactiguise has excellent reference of the actual seat used.

This is my first attempt at scratchbuilding or sculpting anything, so here goes nothing...

I made some templates for the angle of the seat back from styrene, and the seat pan. These were glued together and roughly sanded to shape:

02-Photo 16-06-2015 20 19 47.jpg03-Photo 16-06-2015 20 27 31.jpg04-Photo 16-06-2015 21 01 26.jpg

I marked out where the different padding sections should be (mark 1 eyeball used for this part), as well as the holes for seatbelt attachement points:

05-Photo 16-06-2015 21 18 56.jpg

Seat padding was added using Milliput white epoxy putty in strips:

06-Photo 16-06-2015 21 46 50.jpg

Aaaand we're done!

07-Photo 16-06-2015 22 43 45.jpg08-Photo 16-06-2015 22 51 28.jpg

I don't mind that it's a bit wonky, the actual prop's fabric cover is quite slouchy after quite a lot of Starbuck sitting in it. I'll give this a sand and a coat of primer once the Milliput's fully cured. The kit seat will now need to be cut away to allow the new piece to sit in place properly - it should go below the pads used for a headrest.

Next stop, seatbelts. I have some Eduard 1/32 RAF harnesses with separate buckles that I plan to use with either Milliput or tape belts.
 
Nice job on the seat. Great attention to detail. Did you consider at all trying to use some actual fabric/covering? A but adventurous I admit but maybe cool to try....or maybe not worth it.
 
Damn your eyes man, now I have to pull apart my cockpit and see if I can replicate your efforts here. Fine work there HughB.

Er. Sorry... This all started because I really wanted to add seatbelts and I couldn't work out where to attach them to the kit part! I was also researching what colour the various buttons and indicator lights should be and spotted the photos of the seat. For an easy life, never look at references, that's the lesson here!

Nice job on the seat. Great attention to detail. Did you consider at all trying to use some actual fabric/covering? A but adventurous I admit but maybe cool to try....or maybe not worth it.

I didn't think about it to be honest. Sculpting was the first place my mind went when I was thinking about this. I think any fabric grain would be very overscale in this case though, and getting the padding structure would be pretty fiddly too!
 
HughB, I drilled out the openings for the seatbelts in the cockpit and used curling ribbon with photoetch for the belts. I am going with my original concept of having the pilot, in this case Starbuck, seated in the cockpit. I'm going to have her with her helmet off talking with ground crew as they prep her Viper. Going to use the Lily Lityvak head from the Master Box aces set. Going to cast a clear resin helmet to rest just above the instrument panel.

If I do another Viper without the pilot, I'm definitely going to use your idea for the seat.
 
I'm going to have her with her helmet off talking with ground crew as they prep her Viper. Going to use the Lily Lityvak head from the Master Box aces set. Going to cast a clear resin helmet to rest just above the instrument panel.

That sounds awesome! Looking forward to seeing it.

I dunno, the Kelvin looked a bit beat-up....

Heh, true story!

Progress update - I cut out the area where the old seat was, and filed down the edges a bit so the new seat can sit under the headrest pads. The hole was filled with milliput which also served to even up the edges:

1-Photo 20-06-2015 22 01 46.jpg2-Photo 20-06-2015 22 46 42.jpg

I primed and painted the seat semi-gloss black, and began the frustration-intensive process of fabricating seatbelts out of masking tape and photoetch:

3-Photo 21-06-2015 17 53 30.jpg8-Photo 21-06-2015 18 37 14.jpg

After fitting to the seat, they looked a bit... perky, so I wetted them down with some watered down PVA glue which, once soaked in, got them to conform to the seat better:

4-Photo 21-06-2015 18 45 50.jpg5-Photo 21-06-2015 19 06 10.jpg

A bit of flat black paint, and we're done!

7-Photo 21-06-2015 22 15 07.jpg6-Photo 21-06-2015 22 06 15.jpg

Next to do: painting the cockpit tub. Detailing the buttons is going to be.. interesting.
 
The seat looks fantastic!!! If you give it a green/silver wash I bet it would look just the prop photo. One method I use to paint the buttons is to grab several round toothpicks and cut or shave down several different sized ends. A careful dab of paint on the end and Bob's your uncle, one painted button.


I bought a set of masters and molds of figures from a chap in the States. He did up five figures as deck crew for the Viper. I also picked up a few pieces of equipment from Brad Hair to use with the figures. Even got my hands on a boarding ladder and maintenance ladder from Shapeways Both the figures and the equipment are a bit rough and I'm working on them to make them more presentable. Brad said he's working on new equipment he's hoping to release in time for the Moebius Raptor later this year. Check out the pictures.

PC181453small.JPGPC181454small.JPGPC181455small.JPGPC181456small.JPGPC181457small.JPG
 
Wow, that diorama's going to be great! I'm not going as far, but am planning to make a base that looks a bit like hangar bay decking. I picked up some scale tread-plate embossed styrene from Don Mills on ebay, and was planning on using it and some brass to scratch-build a boarding ladder, but if the shapeways one is any good I might go that route. The only thing is it maybe looks a little large/high, what do you think? Is there a tread-plate pattern on the rungs?
 
The layout in the photos is just a proof of concept thing. There is a chap form Oz who has done resin wall pieces to make the bays with. I've shot off a message to him to see how he is coming along with them. I also found some images of the actual set layout drawings complete with measurements so if the resin ones don't work, I'll beak out my sheet styrene and have ago myself.

The Shapeways product is done in Strong, White and Flexible which is a nylon composite. it is rough to the touch and I am applying a resin product over it to smooth it out. Check out the photos for an example. I have asked them if it will be available in a different material.

As for the ladder being too tall, I haven't glued the landing gear in place yet and the kit sagged a little because of that. I am sending along the e-mail address of a fellow in Florida who does a resin kit of the ladder as well as a link to a review of the kit., email him for availability and shipping cost. If you decide to scratchbuild your own you'll have a shape to work with. And yes, there is a tread pattern on the rungs. I'm attaching photos as proof.

e-mail - cl2012@yahoo.com
review site - http://www.modelermagic.com/?p=22695
Shapeways page - https://www.shapeways.com/shops/moebiusmodels

2014-05-30 17.57.57.jpg100_3095-332x500.jpgLadder 01.jpgLadder 02.jpgLadder 03.jpgLadder 04.jpg

As you can see in the last picture there are two types of ladders but only the far one is modeled.
 
Thanks for the links, that's really handy - I'll look into those for sure! My question about the tread plate was about the shapeways model specifically - does it have tread plate on it?
 
Sorry Hugh, didn't quite catch on to that. No, the Shapeways one does not have the tread plate pattern on it although to be honest I think it would be difficult to do on the 3D pattern. Can't say anything about the Larson Designs kit as I've never encountered any reviews of the kit. Keep us all posted with your progress.
 
Hi all!

Progress has been a little slow, but work on the cockpit continues. I've masked and painted the two different shades of grey for the sidewalls and front panel (a mixture of Tamiya medium sea grey 2 and ocean grey) - I tried to get close to the colours listed here. Not quite right, but I'll take it.

Then it was masking the individual dials and panels for a coat of flat black. Fiddliest masking job I think I've ever done, cutting 0.5mm strips of tape!

1-Photo 29-06-2015 21 37 32.jpg2-Photo 29-06-2015 22 06 24.jpg

Black paint on:

3-Photo 29-06-2015 22 55 36.jpg

... and then painting buttons with a toothpick. Fiddly, again! A bit of touch-up was definitely required here...

5-Photo 07-07-2015 20 01 14.jpg

Finally, a coat of clear and the decals went on. I used a mixture of the Revell-supplied ones and the Paragrafix ones where there wasn't a Revell equivalent. The printing on the Revel ones is much crisper, the PG ones seem quite pixelated:

6-Photo 10-07-2015 01 05 52.jpg7-Photo 10-07-2015 01 06 42.jpg

Next job - flat coat, drops of gloss for the dials, and then I'll fit the backlit films. I'm planning to start work on the lighting circuit this weekend!
 
I love the work you did for the harness straps, what did you use for the main buckle?

The PE was all from a Eduard 1/32 scale set of late WWII RAF harnesses - I forget which set exactly, since all I was really after was the tensioning buckles.
 
That is what I thought it might be, guess I'll be going blind scratchbuilding one for Starbuck. Thanks again mate. Remember to keep us all updated on your work.

Don
 
That is what I thought it might be, guess I'll be going blind scratchbuilding one for Starbuck. Thanks again mate. Remember to keep us all updated on your work.

Don

Will do! I've been trying to keep on top of it, but life has been getting in the way somewhat, you know how it is :)

The buckle was from the PE set too, you might be able to adjust it to make it work as a closed buckle, although I'm not sure how. I'd also add that I don't think it's accurate for the Viper, I just needed something in there!
 
Hi all,

Work continues, slowly. I've fitted the paragrafix backlit films to the cockpit. A word of warning here - the ink used to print this film is not sealed on the back side, and is extremely delicate and water-soluble. Any water-based glue (like the micro krystal klear I used) will dissolve this ink almost immediately, and render the film utterly useless. I actually destroyed both copies of the top screen when I was doing this - the final piece is actually the supplied decal attached to a piece of clear plastic film and glued in.

Anyway, a few very frustrating hours later and they're in:

08-Photo 16-07-2015 23 15 20.jpg

One LED behind just to see what it looks like:

09-Photo 16-07-2015 23 15 37.jpg10-Photo 16-07-2015 23 16 10.jpg

I plan to light each screen separately using some smd leds that I have left over from the Enterprise project, so that I can have them come on one by one as part of a start-up sequence, and also flicker and blink randomly as it the whole thing was a bit shaky! That means soldering wires a bunch of these tiny things again, which I have lost the knack of:

11-Photo 19-07-2015 16 30 34.jpg

I got a few done, and fitted behind the screens - I had to make some light-proof dividers for a few places too, so that screens that are close together could be isolated.

A green one for the top display:

01-Photo 18-07-2015 19 20 54.jpg

White for the rest:

05-Photo 19-07-2015 17 02 55.jpg06-Photo 19-07-2015 17 05 43.jpg07-Photo 19-07-2015 17 06 13.jpg

0.5mm optical fibre fitted for the indicator lights on the main panel - I'll put more 0.25mm fibre for the lights on the starboard side panel too. These are just hooked up to one green LED for testing, I'll decide what to actually do with them later. I might have some of them come on and off for different flight modes or weapons locks or something:

03-Photo 18-07-2015 21 51 41.jpg

Finally, there are lights shining down on the port and starboard control panels from the top of the cockpit. More SMD LEDs and it looks a bit like this:

02-Photo 18-07-2015 19 49 51.jpg

I'm going to use warm white SMD LEDs for the analogue dials on the main control panel, so I need to solder up 6 of those, plus one normal LED for the main display. I got rather frustrated yesterday though, losing SMD LEDs to the carpet monster, so I gave up and painted the control column instead. I'll pick the LEDs back up after work tonight, and then that'll be the cockpit nearly done! Time to start work on the LED driver electronics.

Cheers,

Hugh
 

Attachments

  • 04-Photo 18-07-2015 21 51 58.jpg
    04-Photo 18-07-2015 21 51 58.jpg
    287.6 KB · Views: 349
This thread is more than 5 years old.

Your message may be considered spam for the following reasons:

  1. This thread hasn't been active in some time. A new post in this thread might not contribute constructively to this discussion after so long.
If you wish to reply despite these issues, check the box below before replying.
Be aware that malicious compliance may result in more severe penalties.
Back
Top