1/32 BSG Viper Mk II - Revell/Moebius build

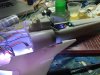
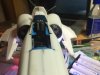
This weekend was spent finishing off the cockpit lighting. I don't have much to say that I haven't said already, just some pictures of the various dials lit up individually - I used brass strip to make dividers to block light from going where it wasn't wanted.

5-Photo 25-07-2015 21 46 55.jpg4-Photo 25-07-2015 21 46 25.jpg2-Photo 25-07-2015 21 45 16.jpg3-Photo 25-07-2015 21 45 51.jpg6-Photo 25-07-2015 21 47 33.jpg7-Photo 25-07-2015 21 48 34.jpg1-Photo 25-07-2015 21 44 09.jpg

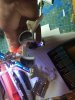
And it's spaghetti junction at the back! I quite like the brass shroud I made for the LED for the main screen, it looks like there's some big CRT monitor back there :)

9-Photo 25-07-2015 22 14 16.jpg8-Photo 25-07-2015 21 49 09.jpg

Next, I'm going to work out how many separate channels of lighting I actually want in this thing... I need to decide if I want to use 2 or 3 shift registers. If I keep each panel separate, I've got 12 channels in the cockpit alone, without taking into account the LEDs for the fibre optic buttons (12 strands, but I'll group those together). In addition to this, there will be 1 channel for the wing tip lights, and 3-9 for the RGB LEDs in the engines (3 if I have all engines act in unison, 9 if I want them to be able to flicker independently). Each shift register offers me 8 channels, so I can have either 16 or 24, so the question becomes "Can I fit them all in the fueslage"?
 
Last edited:
Hi,
Looking good. i have just bought the same kit but the Moebius one as I am in the UK. just wondering, since yours is a Revell one, are the paints listed Revell? the one i have has Testors ones and i cant find the colours need here. if you do have the Revell ones, any chance you could post a picture of the list (or similar) so i can try and find the colours i need since i am not having much luck finding direct replacements for what are in the instructions.
Thanks

--- Edit ---

just noticed, you are in the UK as well, i must have got an import model. hopefully with yours being a European version it will be easier to find the colours.
 
stecox,

Greeting from Canada. The Revell kits of Battlestar Galactica you have across the pond are the Moebius kits reboxed for Revell. The one and only difference is the decals in the Revell editions. They have extras on them that are not in the Moebius decal sheets.

Here is a link to the a PDF of the instructions for the Revell of Germany edition with all the paints listed.
http://www.revell.de/fileadmin/import/images/bau/04988_#BAU_COLONIAL_VIPER_MK_II.PDF

Hope this helps.

Best regards,
Don
 
are the paints listed Revell?

They are, and 19narvik40's helpfully posted the scan of the instructions, but I'd add that they're not entirely accurate. I'm sort of eyeballing the colours based on this reference, and using some Tamiya paints because they airbrush nicely, and Alclad IIs for the metallics (I'm using their Steel, Jet Exhaust, and Aluminium colours). The cockpit should actually be two different shades of grey, and the main fuselage is not actually white, but a very pale grey as well.
 
thank you both for your help. this is going to be my first attempt at any type of model making and those revell instructions look a lot easier to follow than what came with my kit.
 
Do your self a huge favour and Google Viper MkII builds. You should get a ton of links to study as well a bunch of Youtube videos to check out. There are plenty right here on the RPF.

Don
 
I finally got all of the cockpit LEDs hooked up together for the first time! I'm now starting to write the control code. This is just a test sketch, but it looks kinda fun:


This does show up a bit of lightblocking that's needed around some of the screens and around the centre console, so I'll try and do that this weekend.
 
Last edited by a moderator:
What a fantastic build. Glad I came across it whilst browsing other BSG stuff. I've got the Revell kit, and hadn't heard of paragrafix before. As luck would have it, I'm in the states in a week, so ordered a set from them so its waiting for me at the office when I get there! :) Saves about $25 shipping!

Can't wait to see the finished item. If mine is half as good, I'll be happy.

Cheers Darren!

Progress has been a little slow of late, but I have a little bit to share:

I got some electronics mounted in the nose, and the fuselage sealed up. This is two of the three shift registers and the LEDs that connect to the fibre optics for the dashboard lights:

11-Photo 23-08-2015 00 54 35.jpg10-Photo 23-08-2015 00 53 17.jpg

Made a little hatch using part of the engine nozzle part. This is held on with magnets and allows the panel to be removed for access to the programming header for the arduino, so I can update the code once the model's finished:


05-Photo 30-08-2015 00 20 27.jpg04-Photo 30-08-2015 00 20 10.jpg06-Photo 30-08-2015 00 20 51.jpg07-Photo 30-08-2015 00 20 55.jpg

Finally, the wings. 1mm fibre optics inserted for the wingtip lights and glued in with epoxy. Wings sealed up, and then finally fitted to the engine intakes (which I've painted on the inside - easier to mask this when painting the bodywork than mask the body). Engine intakes are now glued to the main fuselage!

12-Photo 05-09-2015 19 45 40.jpg13-Photo 05-09-2015 19 58 59.jpg14-Photo 05-09-2015 20 05 30.jpg16-Photo 05-09-2015 23 40 35.jpg

Next steps are completing the landing gear - I'm trying to run wires up them in the least obtrusive way possible for power. The parts need a lot of clean-up, with lots of sink marks, flash etc. I'll also need to scratch-build the catapult hook on the front landing gear. After that, I should be able to get the body sealed up and the painting can begin!
 

Attachments

  • 08-Photo 05-09-2015 22 53 54.jpg
    08-Photo 05-09-2015 22 53 54.jpg
    267.2 KB · Views: 198
  • 15-Photo 05-09-2015 23 40 03.jpg
    15-Photo 05-09-2015 23 40 03.jpg
    242.6 KB · Views: 200
  • 17-Photo 05-09-2015 23 40 48.jpg
    17-Photo 05-09-2015 23 40 48.jpg
    192.8 KB · Views: 226
Well, I've been a bit lax on the updates, but work has continued on the Viper, albeit slowly. I got distracted by a Bandai AT-ST, some electronic repairs on the JJPrise, and a Revell 1/144 Saturn V that I bought on impulse because I happened to be in the store and it was half price, and told everyone I would just build out of the box but have now spent more than 5 times the kit cost on aftermarket accurising parts...

The electronics are complete, with the arduino and shift registers packed into the rear engine area, and power running up inside the landing gear, terminating in some brass contacts in the feet. These will contact pins in the base. The programming header is also now in place under the cover I made before, held on with magnets. Pics of the undercarriage to come, but here's some electronics packed and epoxied into a small space...

Photo 16-10-2015, 15 46 28.jpg

I've also been working on detailing the engine bay areas, using piano wire and brass tube, again following the reference pics of the full size prop:

Photo 16-10-2015, 15 57 24.jpgPhoto 18-10-2015, 20 50 25.jpgPhoto 18-10-2015, 22 25 52.jpgPhoto 18-10-2015, 22 44 59.jpg

Mmmmmmm (too much) primer:

Photo 18-10-2015, 23 27 07.jpg

After I cleaned that mess up a bit, I re-primed and gave it all a coat of Alclad II Steel:

Photo 19-10-2015, 01 27 09.jpgPhoto 19-10-2015, 01 27 21.jpg

And that's all so far! Next job is the avionics bays on the main fuselage and then we'll be nearly ready for paint.
 
Thanks guys! I really appreciate it :)

As promised, I took some shots of the landing gear last night - she looks like whoever was piloting her had a few hard landings and the gear's been bashed back into shape by a frustrated deck chief with a sledgehammer. I'm OK with this, since it's hands on only on Galactica, of course.

Photo 19-10-2015, 22 56 15 (1).jpgPhoto 19-10-2015, 22 56 20.jpg

Thin wires run up the inside of the gear struts and terminate in these brass pads:

Photo 19-10-2015, 22 56 07.jpg

There's a bit of cleaning up to do there, of course. The brass pads will mate with pins on the base (styled to look like hangar deck).

Last night's job was fitting brass detail parts to the avionics bays. I used a micro-chisel to remove the kit detail and installed the Paragrafix part and a bit more brass tube:

Photo 19-10-2015, 20 51 04.jpg

Everything's nicer with paint. This is Alclad II Steel again, with the cross members picked out in Alclad II Aluminium:

Photo 19-10-2015, 22 54 04.jpgPhoto 19-10-2015, 22 54 37.jpg

A cheeky drybrush with Tamiya flat aluminium and the cables picked out in Tamiya copper:

Photo 19-10-2015, 23 56 33.jpg

All these exposed mechanical areas will get some washes and weathering with various things once the overall paint job is finished. Next, I need to "install" the RCS thrusters all over the ship, I don't think just putting black circles of decal on there really does the job...
 
Quick update - I did some work on the base last night, trying to get the pads on the bottom of the landing gear to contact the power pins (with mixed success...). Anyway, here's a few photos, there's obviously rather a lot of light blocking to do...

Photo 22-10-2015, 22 53 47.jpgPhoto 22-10-2015, 22 53 57.jpgPhoto 22-10-2015, 22 54 09.jpg

None of the base is glued up yet, but the plan is to paint it as hangar deck, and maybe do some piping and stuff along and behind the girder section as if someone'd taken a cross section of the ship somehow...

Also, I really like this angle...

Photo 22-10-2015, 23 50 52.jpg

Major frustration though, the wingtip lights for the port side aren't working. They're fibre optics running from the same LED as starboard, but there's just nothing coming through. I think they've broken inside the wing, there's some red light leaking through the styrene. There's really nothing to do, the whole thing's sealed with epoxy and glued up, and the surgery to repair would be massive. Starboard's going to be the display side, I guess! I may turn the wingtip lights off altogether when displaying with an all-round view, which is the joy of a re-programmable embedded micro-controller!
 
Update! I've decide to do the RCS thrusters - although the full size prop doesn't have them, I'm modeling a functional ship here, and she wouldn't be able to maneuver without them. I'm using a technique I first saw implemented by JanewayC in her build here, IC sockets for electronics.

Photo 26-10-2015, 23 46 16.jpg

Marking out the positions from the Revell drawing (the numbers are me scaling the drawings to the model - they're about 1:1.89):

Photo 26-10-2015, 22 12 22.jpgPhoto 26-10-2015, 22 00 35.jpg

Drilled out - a 1.8mm bit works perfectly:

Photo 26-10-2015, 22 58 54.jpg

And the sockets removed from their plastic support strip and inserted, fixed in with a bit of CA:

Photo 26-10-2015, 23 14 18.jpgPhoto 26-10-2015, 23 51 35.jpgPhoto 26-10-2015, 23 51 42.jpg

These will get a coat of Alclad Jet Exhaust and then masked over before I paint the main bodywork, which I will do next!
 
Oh, cool, only just over 3 years since my last update on this one. That's fine, right?

Since last we saw the Viper, I've given the whole ship several coats of primer, and filled and sanded quite a bit. There are a lot of fit issues with this kit, especially concerning around the engines where light can leak out of hundreds of tiny gaps. Some gap filling shims were made from styrene sheet, and I ended up turning the model upside down and injecting resin into the area below the tail fin, to fill the gaps around the top engine. I also got hold of the Green Strawberry photoetch kit to add canopy release, avionics bay and canopy frame details

The whole thing was then given a coat of alclad steel to provide a base layer for paint chipping:

Image from iOS (6).jpg

Followed by masking parts that were to stay steel (engines mainly) and spraying white after a couple of coats of hairspray:

Image from iOS (7).jpg Image from iOS (8).jpg

I used Orbital Drydock's paint mask set to mask for the red stripes and registry numbers, and painted these. Unfortunately the hairspray technique didn't really work for me this time, and the white lifted in quite a few places when I pulled the masks off. Weathering will hide the crimes :whistle:

Time after that for more paint chipping, and the second way the HS technique didn't really work for me. My paint wasn't stuck down enough when I wanted it to be, and wouldn't release when I did want it to! I ended up scraping with various implements and it looks OK, if a bit out of scale.

Image from iOS (9).jpg

Decals went on, which really pull this model together, there are so many nice little warning labels.

Image from iOS (10).jpg

After setting solution and a flat coat over the decals, time for weathering. I'm trying Michael Rinaldi's oil paint rendering technique for the first time here, applying tiny dots of oil colour where they're needed and then blending them into the surface with a flat brush dipped in turpentine and then almost completely dried off on tissue. It's a technique that gives you a lot of control, especially if you're as good at it as Michael, but I'm quite happy with a first attempt.

Image from iOS (11).jpg Image from iOS (12).jpg

I've only done one side so far - here's the clean side vs the dirty side for comparison:

Image from iOS (14).jpg Image from iOS (13).jpg

Tonight I'll weather the other side, the top and the bottom, and then it's time to move on to making a base to get power into the model!
 
This thread is more than 5 years old.

Your message may be considered spam for the following reasons:

  1. This thread hasn't been active in some time. A new post in this thread might not contribute constructively to this discussion after so long.
If you wish to reply despite these issues, check the box below before replying.
Be aware that malicious compliance may result in more severe penalties.
Back
Top