You are using an out of date browser. It may not display this or other websites correctly.
You should upgrade or use an alternative browser.
You should upgrade or use an alternative browser.
The ones sent from Korbanth are REALLY bad, and I just don’t think they will be useable. One, they are very poorly cast. Pinholes and structural problem everywhere.
Secondly, they weigh a ton, and even with the reinforcements cast into the resin(barely), they sag badly. The weight will put a lot of stress on the pivot joint.
I had a few minutes between confrence calls, so I started having a play with them.
The wings are nominally 1/4” thick. I am using 1/16” balsa for the top and bottom skins, and will use 1/8” thick basswood for the inner structure of the wings.
This should make them considerably lighter then the supplied parts.
I will add some carbon fiber plates at the pivot point to add strength.
The completed wings will be finished with carbon fiber veil and lightweight fiberglass cloth to make them very strong. This will also give me a finish-able surface to add panel lines and other details.
I used to have a vacuum bagging setup to laminate composites, but sold it when I quit flying RC jet airplanes. I have a few ideas for building a ‘poor mans’ vacuum bag system. For those of you unfamiliar with vacuum bagging composite structures, this method optimizes the resin to cloth ratio, and makes a smooth, light, and very strong structure.
I’m just going to do one wing for now, and see if my idea works out like I want.
Anyway, attached is a pic of the balsa skins I cut for the right wing. Boring stuff.
I’ve duplicated most of the contours of the wing on the top and bottom of the wing.
Made the ‘air ejector’ scoop on the top skin, and landing gear door, but have yet to cut the door free and make an inner box for it.
I’ve made an inner structure to the wing out of basswood and CF rod. It’s much stiffer (and a hell of a lot lighter) than the resin wing.
The skins aren’t glued together yet, as I have to cut CF sheet for the pivot and landing gear bay. I think my little experiment is starting to look like it may work.
Last edited:
That is a great (and interesting) approach to overcome some of the possible future issues. Got this kit recently, too. Will be greatly interested to see how this turns out...
That is a great (and interesting) approach to overcome some of the possible future issues. Got this kit recently, too. Will be greatly interested to see how this turns out...
Thank you. We’ll see how the wing turns out.
I have figured out how and where all the parts fit on the model, so I’m going to begin assembly on some of the fuselage while I wait for some vacuum bagging supplies to show up.
Be sure to wash ALL the parts with hot soapy water and let it dry. I scrubbed them pretty well with soap and a green scrubbie pad, to make sure any mold release is cleaned off. Additionally, before gluing anything, I wipe the part to be glued with denatured alcohol.
First part glued on was the back plate, I would assume this this is the ‘hyperdrive’ unit.
It’s a solid resin part, and kind of heavy.
I used some thin styrene stock to fill the small gaps along the sides. Some rubber bands held the sides of the fuselage to the ‘hyperdrive’ while the glue set.
In the picture, you can see some voids in the fuselage casting that I’ve also begun to fill in that area. I’ll finish cleaning up that whole area before I move on to the next part of assembly, which will be the interior.
A quick note on the wings...I spoke to Randy over the weekend, and he’s going to have a replacement set cast for me. I’m going to continue with building the balsa/composite wings just in case the replacements aren’t very good.
A couple of more small updates to the U-wing.
I figured out where a couple of ‘mystery’ pieces went.
These are installed into the lower hull as shown. They are spacers for the upper hull, and will also act as location guides for a few other pieces of the model.
The red arrows mark where I glued them to the lower hull. I left the areas marked by the blue arrows free of glue for the moment, until I’m ready to install some other parts in the future.

These 3 pieces install in the forward part of the lower hull to act as mounts for the pilot/co-pilot seats, and control stalks. The middle piece, I’m guessing, is a step up for the crew to the seats.

The supplied control stalks look a little plain, so I’m going to come up with my own.
Also going to add a couple of other minor details to the interior.
I figured out where a couple of ‘mystery’ pieces went.
These are installed into the lower hull as shown. They are spacers for the upper hull, and will also act as location guides for a few other pieces of the model.
The red arrows mark where I glued them to the lower hull. I left the areas marked by the blue arrows free of glue for the moment, until I’m ready to install some other parts in the future.
These 3 pieces install in the forward part of the lower hull to act as mounts for the pilot/co-pilot seats, and control stalks. The middle piece, I’m guessing, is a step up for the crew to the seats.
The supplied control stalks look a little plain, so I’m going to come up with my own.
Also going to add a couple of other minor details to the interior.
Look at that big ol pinhole yeeeesh dont forget that.
Lol, yeah, I see it. My eyes get crossed after awhile, and I missed that one before!


PHArchivist
Master Member
Love the project.
Was not a fan of the design (am a traditionalist, and loved the X's in R1), but your work is amazing...
Was not a fan of the design (am a traditionalist, and loved the X's in R1), but your work is amazing...
Love the project.
Was not a fan of the design (am a traditionalist, and loved the X's in R1), but your work is amazing...
Thanks, PHA. I rather like the U-wing, as it incorporates ‘historical’ design elements of ‘Incom’ ships. Kinda cool. I’ll try to make a silk purse out of a sows ear. We shall see.
Is it worth putting carbon tow on those wings like we do on dlg gliders tail surfaces? Or slot it for carbon tube?
Dave
Even after receiving the new wings from Randy, I keep going back and forth on building new wings. The new ones are MUCH improved, but they still are heavy, and still sag.
I will be using carbon tow, carbon veil, and some lightweight fiberglass cloth to make a set of stiffer wings. Great suggestion!
I’m on vacation now, but stand by for further updates to the wings. I’m getting to the point where I need to finish them before I move on with further assembly of this model. We shall see if they work out as I want. I always have the resin wings to fall back on.
Last edited:
Between work and the holidays, I’ve been slow getting motivated to get back on this.
Began playing again...
I added some internal structure to the test wing, and a piece of carbon tow to the inside. I didn’t have the balsa secured to a perfectly flat surface, so I inadvertantly introduced a 1/4” warp in the skin as the epoxy in the carbon tow dried. My bad.
No real matter, this wing is just a test to try out techniques. When I work out the bugs, I’ll build a set that incorporates the lessons learned.
Even with the warp, the balsa wing structure is MUCH stiffer than the resin wing, and doesn’t sag nearly as much.
I can’t wait to try out my poor mans vacuum bag technique, to see how it works.
The last 2 pics show the difference in stiffness between the 2 wings.
Resin wing near the tips is about 1.5” above table height.
Balsa wing at the same point is about 2.25” above table height. Still about .25” lower than level, but vastly improved.
I have started working on mine and yes the wings are fine as far as casting but there is no way they will be straight without support.
I also seem to have a problem with my main top half. The entire thing seems to warp up in the back when looking at it from the side so it looks odd sitting on top of the bottom half.
I really love this kit despite the challenges.
I am gonna add bolts to the wing pivot and magnets to keep them in place when they are out front. Gonna use magnets on top as well so I can take the top half off and show off the cockpit as well as switching between flight and landed display.
If you can figure out a wing that won't sag would you be able to offer them as a run??
Thanks
Glad you are also working on the U-wing. It seems you are finding the same issues I am.
The front of my upper hull half warps up, and sits a little high over the grille portion of the model. Initially, I was planning on using magnets to hold the hull halves together, but with the warp...I don’t think that this is a viable option. I believe the best option is to glue the upper and lower halves together.
I too will be using a screw or bolt to pivot the wings on.
My initial experiments with building out new wings appears it will work as intended. May not get ALL the sag out, but I think better than 95% is possible. I am awaiting on some composites to be delivered, a few pieces are on backorder with the manufacture. I’ll be picking this up again once they are delivered.
I seriously doubt I’ll be able to do a part run for the wings. My business travel schedule is unpredictable at best, and I don’t want to have anyone holding up one me, waiting on parts. I WILL show you how I build the wings, and give you a parts list of everything needed. Believe me, this will be a ‘Keep It Simple Stupid’ set of wings. Minimal parts, minimal tech, minimal fuss.
I would love to see how you tackle this build, please feel free to post your progress in this thread.
Cheers!
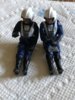
Couple of 3D printed flight crew figures for the U-wing. Will be painting them up and detailing them while I await my composites to show up.
Pilots are from Falcon3D. I didn’t realize I ordered them in a similar pose...my bad .
Pilots are from Falcon3D. I didn’t realize I ordered them in a similar pose...my bad .
Attachments
Glad you are also working on the U-wing. It seems you are finding the same issues I am.
The front of my upper hull half warps up, and sits a little high over the grille portion of the model. Initially, I was planning on using magnets to hold the hull halves together, but with the warp...I don’t think that this is a viable option. I believe the best option is to glue the upper and lower halves together.
I too will be using a screw or bolt to pivot the wings on.
My initial experiments with building out new wings appears it will work as intended. May not get ALL the sag out, but I think better than 95% is possible. I am awaiting on some composites to be delivered, a few pieces are on backorder with the manufacture. I’ll be picking this up again once they are delivered.
I seriously doubt I’ll be able to do a part run for the wings. My business travel schedule is unpredictable at best, and I don’t want to have anyone holding up one me, waiting on parts. I WILL show you how I build the wings, and give you a parts list of everything needed. Believe me, this will be a ‘Keep It Simple Stupid’ set of wings. Minimal parts, minimal tech, minimal fuss.
I would love to see how you tackle this build, please feel free to post your progress in this thread.
Cheers!
Will do. That would be great on the wings. I especially like the "simple" part. I will post up pics as soon as I finish my kids zip line.
Thanks
Tom
Similar threads
- Sale
- Replies
- 6
- Views
- 639