You are using an out of date browser. It may not display this or other websites correctly.
You should upgrade or use an alternative browser.
You should upgrade or use an alternative browser.
1/18 T-70 X-wing
- Thread starter Jkirkon
- Start date
This is the T-70 next to a partially completed studio scale T-65 x-wing. I can’t get over the size of this thing!
I’ve got to finish a couple of projects on the bench first, but I’ll be getting on this soon. Going through reference, and the instructions provided.
Should not be too hard of a build, but the fuselage joints might take a bit of filling and fiddling around to make them disappear. The fuse is cast in 8 separate pieces, not including canopy and cockpit, and screws/glued together. I can build most all the fuse and fill the joints before installing the wing mechanism. I’ll have to leave the lower rear section off until I get the wing mechanism built and installed.
Also have to figure out how to light this model, as something this size SCREAMS to be fully lit.
I won’t be getting on this for awhile, but wanted to show you guys this beast, it’s pretty detailed, and very cool!
Very cool. You going with black and orange or blue and white?
Chicagovader
Sr Member
Wow! Impressive kit! Can't wait to see your build up.
Let’s start this pig.
There are 8 main pieces to the fuselage. They are supposed to screw together, so that the fuse can be disassembled. I didn’t like the gaps this left, so I glued everything but the lower rear section, and buttplate together. This must be removable, so that the wings/mechanism can be accessed. It will also make it much easier to paint and detail the wings later down the road.
Fuselage is now built and joints are filled. I laid down a quick primer coat so I can see the little areas that need more attention. There aren’t many.
I’ll fill the little imperfections, wetsand, and see how it looks.
The nose as it came from the caster reminded me of a shovel. It’s was very squared off, and wide at the leading edge. I sanded a slight taper into it, giving it a bit of an organic curve. Looks more like I remembered it from the movies, but still considering going a little further with it.
Now that I’ve got a little primer on the cockpit pieces, the detail pops out. It’s going to look cool with the Brickstuff screen, fiber, and lights. There are several more 3D printed pieces that go into the cockpit to add more detail. Very, very cool!
Brickstuff screen video is here. Click on link and there is a video on Brickstuffs website.
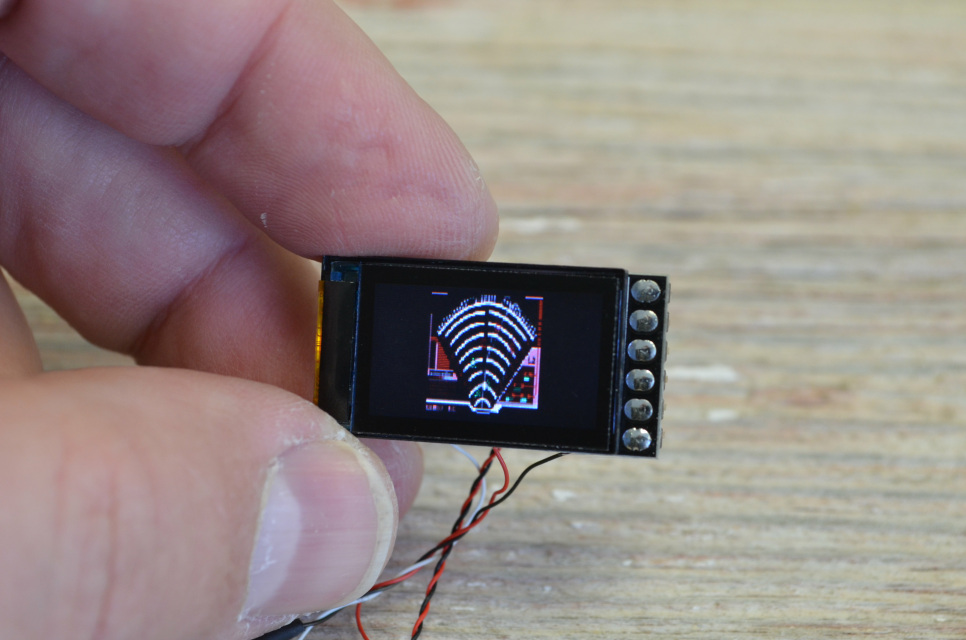
Mini LCD Video Player with DRADIS Animation | Brickstuff
Perfect for any Battlestar Galactica model, this mini LCD screen is pre-loaded with a looping custom animation based on the DRADIS radar screen. (Power supply sold separately, or you can use your own 5V power source.)
www.brickstuff.com
Small update, as some family issues are currently more pressing than model building...
I’ve decided to make the canopy one piece, and removable, because it’s more solid that way, and fits better to the fuse. It will also be easier to access the switches for lighting and LCD display.
I’ll attach it to the fuse with small magnets.
I’ll be working on the cockpit section next, painting/lighting/detail and such.
Last edited:
Finally getting back on this. I had to finish 2 studio scale x-wings before I could commit myself to working on the T-70.
I had to find a suitable power supply to power the Brickstuff screen. I wanted to use a battery pack onboard the model, so it took a little digging to find something suitable.
The Brickstuff screen requires a constant 5VDC, and draws approx 130mA.
I found a battery eliminator circuit on Amazon, that acts as a voltage regulator. I got 3 in a pack for like $8.

It’s pretty tiny. You can see a comparison next to a dime.
Input is 6-30VDC and output is either 5 or 9VDC, depending on how you set it up.
I used a 7.4VDC LiPO battery from a small R/C plane.
After wiring and soldering everything up, I verified the output was correct, then hooked it up to the Brickstuff screen....and fired it up.
The ‘magic smoke’ stayed inside the electronics...and the screen worked as designed!! Woohoo!!
Now, I’ll have to paint the cockpit interior, drill for fiber optics, and add some LEDs for additional effect.
I had to find a suitable power supply to power the Brickstuff screen. I wanted to use a battery pack onboard the model, so it took a little digging to find something suitable.
The Brickstuff screen requires a constant 5VDC, and draws approx 130mA.
I found a battery eliminator circuit on Amazon, that acts as a voltage regulator. I got 3 in a pack for like $8.
It’s pretty tiny. You can see a comparison next to a dime.
Input is 6-30VDC and output is either 5 or 9VDC, depending on how you set it up.
I used a 7.4VDC LiPO battery from a small R/C plane.
After wiring and soldering everything up, I verified the output was correct, then hooked it up to the Brickstuff screen....and fired it up.
The ‘magic smoke’ stayed inside the electronics...and the screen worked as designed!! Woohoo!!
Now, I’ll have to paint the cockpit interior, drill for fiber optics, and add some LEDs for additional effect.
I forgot to post the battery I’m using.
It is an eFlite 2S, 7.4VDV 800mA battery.

Getting a start on painting the cockpit. Don’t laugh at my crappy painting skills. I’m cleaning up as I go along, and will add more detail...yes, I know it looks like crap now. I hope to make it look better!!

It is an eFlite 2S, 7.4VDV 800mA battery.
Getting a start on painting the cockpit. Don’t laugh at my crappy painting skills. I’m cleaning up as I go along, and will add more detail...yes, I know it looks like crap now. I hope to make it look better!!
I found a little time today, and played around with the monster T-70.
First, I’ve been extremely unhappy with the nose profile. As it came in the kit, it looked like a shovel. WAY too wide at the tip, and looks nothing like the movie ship.
 Thats how it started out.
I whittled away at it for awhile with a sanding block earlier in this thread, and wound up with this.

Still not even close.
Today, I whipped out the bench sander, and profiled it even more.
Now, it looks right to me.
I also spent a little time on the wings. Really just fitting them to the resin engine pods. The pods are pretty warped, so I’ll have to fiddle with them to straighten them out. That way the wings will line up properly when closed.
I couldn’t resist taking a pic with the wings on...just to see how massive this thing really is.
View attachment 1365987
It’s 30” across!!!!!!!!!


First, I’ve been extremely unhappy with the nose profile. As it came in the kit, it looked like a shovel. WAY too wide at the tip, and looks nothing like the movie ship.
I whittled away at it for awhile with a sanding block earlier in this thread, and wound up with this.
Still not even close.
Today, I whipped out the bench sander, and profiled it even more.
Now, it looks right to me.
I also spent a little time on the wings. Really just fitting them to the resin engine pods. The pods are pretty warped, so I’ll have to fiddle with them to straighten them out. That way the wings will line up properly when closed.
I couldn’t resist taking a pic with the wings on...just to see how massive this thing really is.
View attachment 1365987
It’s 30” across!!!!!!!!!
Last edited:
Oh...I meant to mention, the 1/18 T-70 now has a friend....a 1/18 T-65. It’s 3D printed.
Here’s the fuselage next to a studio scale (1/24) x-wing.

I now have 6 built SS x-wings, the big T-70, the big T-65, and an unbuilt Salzo V4.......
My wife called me an ‘x-wing junkie’.
I may need professional help.
Here’s the fuselage next to a studio scale (1/24) x-wing.
I now have 6 built SS x-wings, the big T-70, the big T-65, and an unbuilt Salzo V4.......
My wife called me an ‘x-wing junkie’.
I may need professional help.
Last edited: