1:1 WALL-E

PrestonAltr

New Member
Hey Everybody!

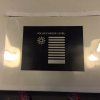
I'm beginning the long but worthwhile process of building a 1:1 scale WALL-E. I'm a member of the WALL-E Builder's Club and will post my updates on this thread over the coming months.

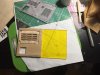
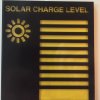
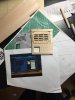
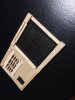
For now, I thought I'd show you a draft of my first part: the solar charge port. If any scaling seems off to you, or you have any notes, please let me know!


Solar Board.jpg

I have a sneaking suspicion that I will be "donating" most of my upcoming paychecks to the Church of Smooth-On.
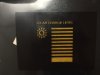
 
UPDATE: 7-17-15

Sorry for the delay, as things have been hectic with work. Long story short, I took another look at the CAD drawings and blueprints on the WALL-E Builders Club page and found my scaling was off. While planning the final scale of the project, like so many of my fellow club members, I discovered WALL-E is just too big at 1:1 scale to even fit out the front door of my apartment. As such, I have chosen to continue the project at 3/4 scale.

I ended up using balsa to get the fine detail. My plan is to coat the balsa in a light layer of spackling paste, followed by sanding and finishing resin to remove any trace of wood grain before painting. I was able to print up the solar charge graphic at my local Staples, with yellow acrylic glued beneath. In the final photo you see I removed the plexiglass to prevent spackling or finishing resin from damaging it.
 

Attachments

  • 11009887_10153703371335101_1039265741082307520_n.jpg
    11009887_10153703371335101_1039265741082307520_n.jpg
    74.8 KB · Views: 289
  • 11011777_10153703371170101_5649132250249985392_n.jpg
    11011777_10153703371170101_5649132250249985392_n.jpg
    53.7 KB · Views: 299
  • 11032529_10153703371540101_2588186006514218367_n.jpg
    11032529_10153703371540101_2588186006514218367_n.jpg
    70.4 KB · Views: 258
  • 11095230_10153703371130101_6310587959518809197_n.jpg
    11095230_10153703371130101_6310587959518809197_n.jpg
    66.4 KB · Views: 218
  • 11666100_10153703371450101_8630888470259279285_n.jpg
    11666100_10153703371450101_8630888470259279285_n.jpg
    43.1 KB · Views: 261
  • 11698476_10153703371060101_7709755392311366677_n.jpg
    11698476_10153703371060101_7709755392311366677_n.jpg
    79.4 KB · Views: 294
  • 11698489_10153703371230101_2336783750151593254_n.jpg
    11698489_10153703371230101_2336783750151593254_n.jpg
    36.6 KB · Views: 260
  • 11702661_10153703371645101_1723623868630895458_n.jpg
    11702661_10153703371645101_1723623868630895458_n.jpg
    86.6 KB · Views: 241
  • 11755884_10153727926045101_3161544515330876954_n.jpg
    11755884_10153727926045101_3161544515330876954_n.jpg
    75.4 KB · Views: 304
Last edited:
Hi there,

I was curious to see some pictures of your build ... alas those attachments are not working for me ... please have aonther try?

- update -

Okay ... I've seen them now via your link, thanks ... great start ... looking forward to your progress :)

Chaim
 
Last edited:
UPDATE: 7-27-15

I am excited to announce that the solar charge section of the WALL-E is now COMPLETE!

Since my last update, I sought out my local Hobby shop and learned the best way to rid the balsa of its deep grain would be to coat it in "Aero Gloss Sanding Sealer" and sand it down with finer and finer grit sandpaper. After about three hours of applying single layers, sanding, and repeating, I was able to come away with a fantastic, almost plastic surface (thanks to some 600 grit sandpaper). The next step (after all the various parts were attached with Zap-A-Gap) was to apply a thin coat of fiberglass resin to prevent cracking whenever WALL-E bumps into things. Once this step was done, I re-sanded the surface back down to 600 grit and prepped for paint. I began with a dark grey Automotive Primer from Rust-O-Leum (two coats), followed by a rust colored matte paint. Once that coat was completely dry, I applied sand/dirt to the areas which were going to be "rusty" and coated the whole surface with the original Automotive Primer. Finally, I applied a coat of matte "satin granite" and began to brush/sand away the dirt hidden by the paint. The result was fantastic (as seen below). Finally, for the buttons, I used a small brush and also applied a little more detail in areas which needed it. The final stage was to coat the whole thing in matte clear coat to protect from chipping (MATTE is the key word here, as gloss would ruin the whole illusion).

11221412_10153745850190101_7646949986461693606_n.jpg20495_10153761592190101_5011444456686232062_n.jpg11755639_10153764073195101_5718224105252612440_n.jpg11800537_10153764073250101_5950465263164308169_n.jpg
 
Interesting build; it's just that I wouldn't have used Balsa wood. As you know, it's too fragile and can be damaged easily. I would've used a small thickness panel of MDF and plastic (Sintra or other) for the fine details. Easy to sand, paint and seal and less work than Balsa.
I'm going to follow your build and see what you'll cook for us next;) Keep up the good work.
 
Great point! For that reason, I applied several coats of fiberglass over the whole thing to make sure it wouldn't chip before painting. Hopefully the placement of this part on the WALL-E (and the addition of the trim around the top) will protect it. The body itself will be MDF!

Thanks for the support, guys!
 
UPDATE: 8-27-15

Hey folks! Since I last posted, I began work on the arm section. One of the best experiences was meeting Michael McMaster and Mike Senna at the D23 Expo and take high-res photos of their WALL-Es. They gave me several tips for my design that I used (see below). For instance, weight is always an issue with animatronics, so the brushed metal parts are actually just cardstock bent in the correct shape and fiberglassed for stability (resin only). WALL-E's famous yellow paint is actually a Rustoleum Inverted Striping Paint used for marking those yellow lines down roadways. I should be posting further updates this weekend, after I fiberglass and age the hand section.

11224102_10153813669180101_803716942093138782_n.jpg11863482_10153816126575101_4672631654433565681_n.jpg11855654_10153821154940101_6635660711728702102_n.jpg11885202_10153821197035101_8512967293356476234_n.jpg11898615_10153823356640101_5492163610287797153_n.jpg11892144_10153844106305101_824449514784526485_n.jpg11880364_10153844106350101_7612195002272249562_n.jpg11934949_10153844494355101_7767138700231176185_n.jpg11947679_10153846792755101_3927173133121140902_n.jpg11902474_10153846840995101_5722969133164638479_n.jpg
 
Last edited:
Just wanted to post a small update of the completed hands. Before coating in fiberglass, I glued a layer of cardstock over the fingers to get rid of the wood grain.

11951851_10153858692435101_4059903249867731854_n.jpg11951814_10153858692555101_3542050938749677410_n.jpg11988381_10153858692455101_2782546737232654428_n.jpg
 
Hey All,
At this point, the head is nearly finished (with the exception of the magnifying glass lenses which are being shipped soon and the B&L decal for the inner eye). The biggest challenge was to keep the head light (for the servos) while maintaining some rigidity in case of any bumps. With that in mind, I settled on PVC, wooden dowels, and foamcore.
11220838_10153873381360101_925930892365265438_n.jpg12003950_10153876598820101_7883295331550391678_n.jpg12009781_10153888984170101_5266069258705241699_n.jpg12004699_10153897146050101_3597189090970660061_n.jpg12011388_10153889661350101_5131329238086349719_n.jpg12036568_10153908289210101_6998003923331085648_n.jpg12019940_10153897274815101_1526169175946472650_n.jpg12011313_10153909851640101_1581033463229427215_n.jpg12036972_10153910540620101_6022824060604650082_n.jpg
 
Looks amazing so far! Great work. I'm just curious, what is considered to be the accurate overall dimensions (W & H) on a 1:1 WALL-E? I have one of the 3D cardboard theater lobby displays, and it has always looked over-sized to me. Just wondering if it really is. Thanks!
 
Thanks for the kind words! The scale throughout the film changes, but judging from the scale of known items (the Rubik's cube, cooler, and VHS tape), the geniuses in the WALL-E builder's club have put him around 18 or 19 inches wide (not including treads) and about that amount deep/tall. If you're interested in building one yourself, there's tons of helpful CAD drawings on the WALL-E Builder's Club yahoo group. BUT as I mentioned earlier, I chose to make mine 3/4 scale so it could fit through my door.
 
Very interesting, thanks for the reply. I measured my large cardboard version, and the body is 25" wide, excluding the tracks. It makes for a nice display, but just takes up a lot of space. There was a smaller version on display in some Best Buy stores years ago of similar construction, but that one looked *too*small. Oh well, guess you have to make one yourself to have it be the correct size. Looking forward to seeing more pics of your project in the future!

Large version:
http://1.bp.blogspot.com/_0nEW4Feaq...pg/bSzwqwlnAt4/s400/2625370804_7ca90d1558.jpg

Best Buy version:
http://i539.photobucket.com/albums/ff356/PixarVixen/forum images/BestBuyWALLEdisplay.jpg
 
UPDATE 9-29-15
Super short update! I bought a few cheap magnifying glass lenses from Amazon and attached them with Zap-a-Gap. The rings around them are just foam core and cardstock. I also added in the aperture decals around the eyes which feature "B&L" as well as other details.
12063848_10153921218240101_3538581266335799048_n.jpg12063740_10153921218235101_4998621536265658418_n.jpg12033068_10153922797915101_2329613647583464903_n.jpg
 
Last edited:
Very interesting, thanks for the reply. I measured my large cardboard version, and the body is 25" wide, excluding the tracks. It makes for a nice display, but just takes up a lot of space. There was a smaller version on display in some Best Buy stores years ago of similar construction, but that one looked *too*small. Oh well, guess you have to make one yourself to have it be the correct size. Looking forward to seeing more pics of your project in the future!

I have one of the large cardboard versions too - picked it up off gumtree (Craigslist) for $50!
I agree with it being overscale though. I thought about scanning/drawing up all the parts and printing another version at a more "correct" scale.
Just need to find the time to do it!

OP - the build look amazing!
 
UPDATE: 11-9-15

Hey folks! Pretty sizable update for you. I completed the neck section using the same methods as before (plus some red bull lids). I also purchased the servos and equipment from the fantastic Servo City website and am days away from connecting everything together to become operational.

12193497_10153978475645101_6022800088668781925_n.jpg12189641_10153980469640101_7914315586399115571_n.jpg12191483_10153983997235101_1503920330959210219_n.jpg11222510_10153993595065101_1550304240835628462_n.jpg12191557_10154000635140101_7769523802711662090_n.jpg12193314_10154001811100101_4266654212613171604_n.jpg11148809_10154004149825101_8989324308319692830_n.jpg12195909_10154004149860101_7118431727522207693_n.jpg12227142_10154002560395101_202506385386071095_n.jpg11694139_10154004156250101_8406820684835585138_n.jpg
 
This thread is more than 7 years old.

Your message may be considered spam for the following reasons:

  1. This thread hasn't been active in some time. A new post in this thread might not contribute constructively to this discussion after so long.
If you wish to reply despite these issues, check the box below before replying.
Be aware that malicious compliance may result in more severe penalties.
Back
Top